Введение
This repair guide will provide the user information needed to remove and replace the motherboard for the NikePlus Sportband. You will need metal tweezers, a metal spudger, and a Phillips #000 screwdriver.
Выберете то, что вам нужно
-
-
To begin the disassembly of your NikePlus Sportband, first remove the device from the rubber wristband.
-
-
-
Finish the disassembly of your NikePlus Sportband by utilizing the metal spudger tool on the short edge to pry the external body pieces apart.
-
-
-
After the cover had been removed, use the metal spudger tool to remove the body of the device from the casing.
-
-
-
-
Use the metal tweezers to pry the screen casing from the body of the device.
-
The screen casing is fastened to the body of the device by four clips located in each corner of the casing.
-
-
-
Flip the body of the device over so that the screen is now on the bottom.
-
The display ribbon cable is soldered to the motherboard. We were able to peel up the ribbon cable with a pair of tweezers.
-
-
-
Flip the body of the device back over so that the screen is facing up.
-
Using the tweezers, gently lift the screen from body of the device.
-
-
-
Remove the four highlighted screws from the motherboard using the Philips screwdriver.
-
-
-
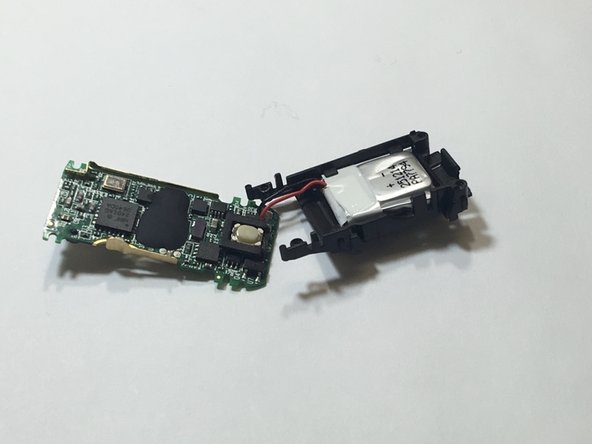
Use the metal tweezers to lift the motherboard out of the device.
-


To reassemble your device, follow these instructions in reverse order.
To reassemble your device, follow these instructions in reverse order.
Команда

IUPUI, Team 9-9, Wilson Spring 2016 Участник IUPUI, Team 9-9, Wilson Spring 2016
IUPUI-WILSON-S16S9G9
5 членов
Автор 4 руководств