Введение
If the screen on your Nikon Coolpix S5200 is unresponsive or not working, use this repair guide to replace the entire screen,
Выберете то, что вам нужно
-
-
There are four 0.1 mm screws holding the front and back of the camera together all along the outside of the camera
-
-
-
Use the Phillips Head screw driver head to remove the four 0.1 mm screws surrounding the outer edges of the camera
-
-
-
-
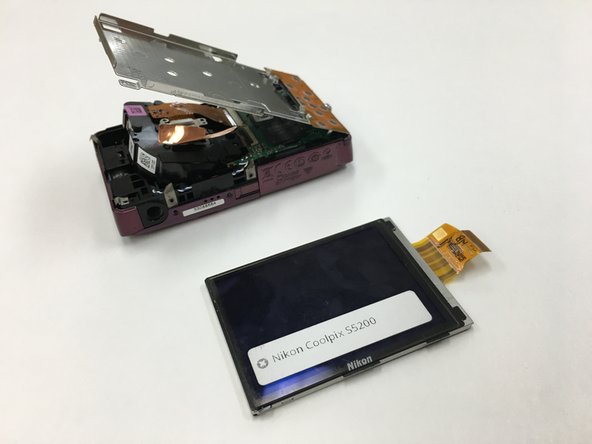
Carefully remove the LCD screen from the silver plate that once held it in place by pulling it away from the internal components
-
-
-
Remove the six designated screws sized 0.1 mm from the metal plate using a Phillip's Head screwdriver in size PH00.
Are there 6 screws or 3 screws? There is one that is being unscrewed in photo; there is another above it in the corner, and then there is one along the top underneath a tiny rubber disc. Where are other three screws? The three in a triangle in middle of metal plate don't seem to be connected to plate.
-
-
-
Lift the metal plate away from the internal components of the camera
Why is lens assembly lifted up in this photo? Is that a necessary step? Please explain.
-
-
-
Carefully remove the LCD screen by pulling it away from the camera. Repeat these steps in reverse order to install the new LCD screen.
How does one attach LCD cable back to circuit board through metal plate? This is extremely difficult. I just spent 30 minutes trying to do this and I think I punched a hole through the LCD trying to force it into slot with screwdriver through tiny slit between metal plate and camera body. WARNNG: do not try this repair until detailed instructions to attach LCD cable onto circuit board. I'm sure there is a trick, but you need to know the trick before starting this repair. Are we to remove lens assembly and circuit board to attach LCD cable? I think there are missing steps in this repair.
Trzeba zdjąć drugą zewnętrzną obudowę i wyciągnąć płytkę z przyciskami… wtedy łatwiej.
To Re-insert the Screen’s Ribbon Cable - Lift up the Button Panel and You’ll see, where it’s supposed to slide in..!
There is a Tiny Black Strip along the Front of the Connector (Facing inward’s ) This must be Carefully Flipped up with a Tiny Flat Head Screw-Driver, then it’ll slide in then You Must Flip this Black Strip back down to Trap the Ribbon -Cable..!
Make sure it sits Flush (But don’t force it in.!) it should just slide in True and Straight…
Then I put the battery back in and (The Screen) was just white also the Lens didn’t come out so I did it again and then it worked…
Also I Do Not See The Point of Removing the Metal Plate’s Screw’s , this has no Relevance to the Repair..!
Then I did manage to getb a Display on the Screen with Icons (for Date and Flash On-Off etc.!) and the Len’s did come out , but still No Picture from The Len’s…
So I’m still Stumped..!!
Anyhow hope these few pointer’s help someone.!?
-


To reassemble your device, follow these instructions in reverse order.
To reassemble your device, follow these instructions in reverse order.
Команда

University of Alabama, Team 1-2, Sydow campbell Fall 2015 Участник University of Alabama, Team 1-2, Sydow campbell Fall 2015
UA-SYDOW CAMPBELL-F15S1G2
4 членов
Автор 6 руководств
Один комментарий
Shouldn't the replacement LCD screen be considered a part? It is in fact very difficult to replace it without having the part to replace.
4 screws or 5 screws? In the first photo above, there is an empty screw hole to the left of the screw that is circled. Are we to remove this screw? What about the 2 empty screw holes above, on either side of the S/N?
joshronsen - Ответить