Перейти к основному содержанию

Эта версия возможно содержит некорректные исправления. Переключить на последнюю проверенную версию.

Выберете то, что вам нужно

  1. Этот шаг не переведен. Помогите перевести

    : шаг 1, изображение 1 из 1
    • Remove the two 4.8 mm Phillips screws securing the battery side of the rear cover to the D70.

  2. Этот шаг не переведен. Помогите перевести

    : шаг 2, изображение 1 из 1
    • Remove the two 4.8 mm Phillips screws securing the port side of the rear cover to the D70.

  3. Этот шаг не переведен. Помогите перевести

    : шаг 3, изображение 1 из 2 : шаг 3, изображение 2 из 2
    • Use your fingernail to flip up the ZIF locking flap on the LCD ribbon cable socket.

    • Be sure you are opening the locking tab, not pulling against the socket mounted to the board.

    • Pull the LCD board ribbon cable out of its socket.

  4. Этот шаг не переведен. Помогите перевести

    : шаг 4, изображение 1 из 2 : шаг 4, изображение 2 из 2
    • Carefully pull the sides of the rear cover away from the body of the D70.

  5. Этот шаг не переведен. Помогите перевести

    : шаг 5, изображение 1 из 2 : шаг 5, изображение 2 из 2
    • Pull the rear cover off the body of the D70, minding the LCD board ribbon cable that may get caught.

    • At this point, the capacitor is visible and its exposed contacts are boxed in red in the second picture. Even though they are recessed, be careful not to touch the contacts to avoid shocking yourself.

  6. Этот шаг не переведен. Помогите перевести

    : шаг 6, изображение 1 из 2 : шаг 6, изображение 2 из 2
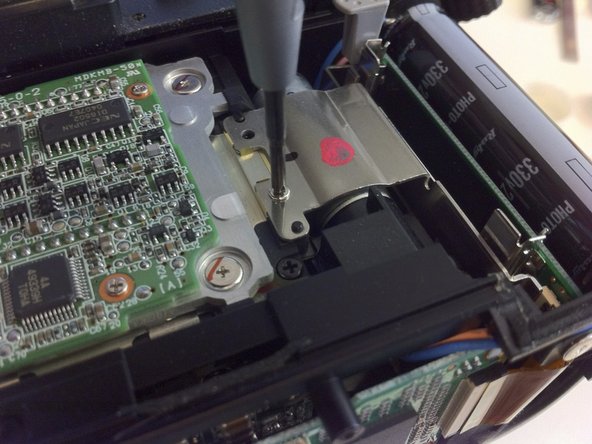
    • Remove the two Phillips screws securing the holder of the CF Card Slot.

  7. Этот шаг не переведен. Помогите перевести

    : шаг 7, изображение 1 из 1
    • Peel of the Foil securing the Flexcable.

  8. Этот шаг не переведен. Помогите перевести

    : шаг 8, изображение 1 из 2 : шаг 8, изображение 2 из 2
    • Use Tweezers to open the locking on the ribbon cable socket.

  9. Этот шаг не переведен. Помогите перевести

    : шаг 9, изображение 1 из 2 : шаг 9, изображение 2 из 2
    • Pull the ribbon cable out of its socket.

  10. Этот шаг не переведен. Помогите перевести

    : шаг 10, изображение 1 из 2 : шаг 10, изображение 2 из 2
    • Carefully fold the Pull the ribbon cable towards the CF Slot

  11. Этот шаг не переведен. Помогите перевести

    : шаг 11, изображение 1 из 1
    • Pull the Slot out of the body.

  12. Этот шаг не переведен. Помогите перевести

    : шаг 12, изображение 1 из 2 : шаг 12, изображение 2 из 2
    • Remove the two Phillips screws to separate the Holder from the Slot.

Финишная черта

24 участников успешно повторили данное руководство.

joergkihm

Участник с: 06/04/12

812 Репутация

1 руководство автора

6 Комментариев

Mine has a pin broken off. Where do I get a replacement?

Don Wirth - Ответить

Hello,

Thanks to your help, I was able to replace it easily.

Many Thanks from France

Yan Elie - Ответить

How do i change out the board with the pins…… second hand cam someone bent alot of pins

intimadationrc - Ответить

I can order board or can i order the whole cf ?

intimadationrc -

You can find them on ebay real easy. both full assemblies and just the board with the pins

Steve Ancona -

Добавить комментарий

Просмотр статистики:

За последние 24часов: 2

За последние 7 дней: 19

За последние 30 дней: 76

За всё время: 27,356