Введение
Note: You'll need JIS screwdrivers for this repair. Regular Phillips screwdrivers have a cross pattern with rounded inner edges and won't fully fit the slots in the JIS screws. JIS screwdrivers instead have a straight cross pattern which makes much better contact with the screw head and is made for the high torque you will need to loosen the screws.
Выберете то, что вам нужно
-
-
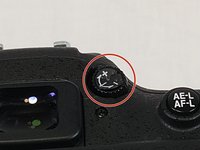
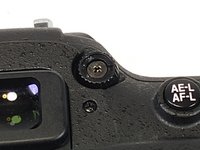
Remove the five screws on the bottom of the camera with a JIS #000 head screwdriver.
-
-
-
-
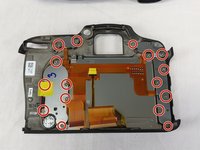
Then unscrew the remaining screws holding the back plate to the LCD.
-
Then simply remove the plate with the LCD.
-
-
-
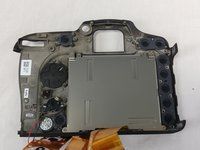
Undo the 5 ribbon cable connectors by flipping the latches up with a plastic spudger.
-


Remember to replace your broken components. Then follow the instructions in reverse order to reassemble your device.
Remember to replace your broken components. Then follow the instructions in reverse order to reassemble your device.
Отменить: Я не выполнил это руководство.
6 человек успешно провели ремонт по этому руководству.
Команду

USF Tampa, Team S11-G6, Cheng Spring 2018 Участник USF Tampa, Team S11-G6, Cheng Spring 2018
USFT-CHENG-S18S11G6
4 членов
Автор 6 руководств
2Комментарии к руководству
Great guide. I utilized Alexander's instructions successfully in order to remove the LCD screen on the back as well as removing the motherboard in order to swab out remnants of a soda that my Nikon D7200 drank when the soda burst in my camera bag, it was a hot day that day. The instructions worked out beautifully and the only things I would recommend is to take care with counting the amounts of screws removed for each step. Step 6 has 2 screws to be removed and Step 7 has 4 screws to be removed. Also make a note of the different sizes of screws, shorter or longer, and their respective locations so that the reassembly is done correctly. The operation on my camera was a success as it allowed me to find areas where soda had dried and impeded some of the copper grounding connections inside of the camera body causing an "Err" message and rendering my camera inoperable. I thank Alexander and the other contributors for putting this out into the world, you saved me some serious cash side stepping camera repair costs.
Great guide indeed!
After installing the new motherboard, are there any software settings that "authorized Nikon service only do" or can everything work without it?