Перейти к основному содержанию

Nintendo 2DS Motherboard Replacement

Выберете то, что вам нужно

  1. Nintendo 2DS Motherboard Replacement, Battery: шаг 1, изображение 1 из 1
    • Remove the two Phillips captive screws securing the upper rear panel.

    • The captive screws will not completely detach from the back panel.

  2. Nintendo 2DS Motherboard Replacement: шаг 2, изображение 1 из 2 Nintendo 2DS Motherboard Replacement: шаг 2, изображение 2 из 2
    • Hinge the upper rear panel upwards and outwards to remove it.

  3. Nintendo 2DS Motherboard Replacement: шаг 3, изображение 1 из 3 Nintendo 2DS Motherboard Replacement: шаг 3, изображение 2 из 3 Nintendo 2DS Motherboard Replacement: шаг 3, изображение 3 из 3
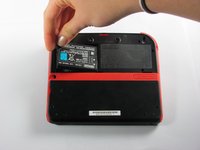
    • Remove the battery from its housing by lifting it up from the side closest to the outside edge.

  4. Nintendo 2DS Motherboard Replacement, Rear Panel: шаг 4, изображение 1 из 1
    • Remove the ten Phillips screws attaching the rear panel.

  5. Nintendo 2DS Motherboard Replacement: шаг 5, изображение 1 из 1
    • The rear panel is attached to the motherboard by a ribbon cable, so be careful not to lift the rear panel too far from the device.

    • Carefully pull the rear panel straight up from the device.

  6. Nintendo 2DS Motherboard Replacement: шаг 6, изображение 1 из 1
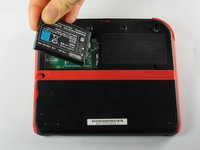
    • Use your fingernail or the flat end of a spudger to flip up the connector securing the ribbon cable to the motherboard

    • Remove the cable from the connector

    • Take the opportunity to remove the Left and Right triggers, they have hinges that may break and springs that may jump away.

  7. Nintendo 2DS Motherboard Replacement, Remove Side Panels: шаг 7, изображение 1 из 2 Nintendo 2DS Motherboard Replacement, Remove Side Panels: шаг 7, изображение 2 из 2
    • Hold the side panels of the device's case with your fingers and pull outward to remove them.

    • The panels should come off easily with little force required.

    • There are three ribbon cables which have already been unplugged in this picture, disconnect these before disassembling the device further.

  8. Nintendo 2DS Motherboard Replacement, Unscrew Motherboard: шаг 8, изображение 1 из 1
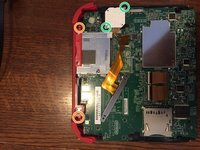
    • Remove the 12 brass-colored Phillips screws securing the main board.

    • Be very careful not to strip any of these screws. Stripping can occur very easily, and may make replacement of the motherboard impossible.

    • The circle pad has disappeared in this picture. Don't worry, we'll deal with that in the next step

  9. Nintendo 2DS Motherboard Replacement, Remove Top Panel: шаг 9, изображение 1 из 3 Nintendo 2DS Motherboard Replacement, Remove Top Panel: шаг 9, изображение 2 из 3 Nintendo 2DS Motherboard Replacement, Remove Top Panel: шаг 9, изображение 3 из 3
    • The top panel can only be removed when the mother board is not secured.

    • There are two additional screws located on the top rail. Remove these to fully remove the buttons and top rail.

    • There are two screws holding down the joystick base that must be removed. (Be careful of the ribbon cable—it stays connected!)

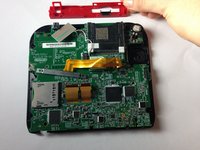
    • Hold the top panel with your fingers and pull away from the device to remove it.

    • The top panel should come off easily, with very little force applied.

  10. Nintendo 2DS Motherboard Replacement, Remove Motherboard: шаг 10, изображение 1 из 2 Nintendo 2DS Motherboard Replacement, Remove Motherboard: шаг 10, изображение 2 из 2
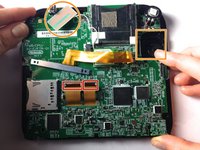
    • Detach the 2 ribbon cables by lifting the black flip connectors that hold them.

    • Lift out the rectangular board seated in the face and lift out the white square which is the joystick motor (takes a little effort). Both stay attached to the motherboard.

    • On some models, you'll need to remove three more tiny ribbon cables at the bottom of the screen. They are secured by flip up connectors. BE GENTLE!

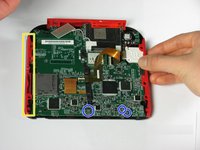
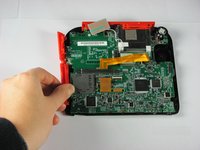
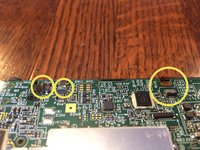
    • Holding the motherboard on either side, lift to remove it.

Заключение

To reassemble your device, follow these instructions in reverse order.

33 человек успешно провели ремонт по этому руководству.

Fina Beauchamp

Участник с: 01/12/15

3 150 Репутация

Автор 6 руководств

Команду

Cal Poly, Team 70-1, Forte Winter 2015 Участник Cal Poly, Team 70-1, Forte Winter 2015

CPSU-FORTE-W15S70G1

4 членов

Автор 35 руководств

13 Комментариев

o meu 2ds esta com um defeito que, quando eu aperto o botão de power ele liga e apos alguns segundo desliga e faz um pequeno barulho.

thiagopereira10000 - Ответить

Would a jis #000 screw driver work better? As i tried a ph +000 and the gold motherboard screws just dont fit right

Demon09 - Ответить

I have a question. After I replaced the mother board I have been having issues with it freezing after a couple mins running. Do you know why

briana1987be - Ответить

I have a similar problem. After I replaced mine it will not open any app, and it does not show the status bar. Does anyone know why?

Steve David -

Now that I've removed the motherboard, how do I fix it? The instructible is great as far as it goes, but it doesn't go far enough

Danielle Chester - Ответить

Добавить комментарий

Статистика просмотров:

За последние 24 час(ов): 24

За последние 7 дней: 169

За последние 30 дней: 527

За всё время: 58,013