Эта версия возможно содержит некорректные исправления. Переключить на последнюю проверенную версию.
Выберете то, что вам нужно
-
Этот шаг не переведен. Помогите перевести
-
Remove the cartridge from the console.
-
Use a Phillips #00 Screwdriver to remove the screw securing the battery door to the rear case.
-
Remove the battery door.
-
-
Этот шаг не переведен. Помогите перевести
-
Use a plastic opening tool or spudger to pry out the battery from the bottom. If a plastic opening tool or spudger isn't available, your fingernails may work.
-
-
Этот шаг не переведен. Помогите перевести
-
With your hands, pry the back panel off the main case.
-
Separate the back from the front, and set it aside.
-
-
Этот шаг не переведен. Помогите перевести
-
Using a Phillips #00 screwdriver, remove the four screws on the circuit board.
-
-
-
Этот шаг не переведен. Помогите перевести
-
Unlock the two large ribbon cables by moving the black clip up.
-
Carefully pull the ribbon cables down and out with your fingers.
-
-
Этот шаг не переведен. Помогите перевести
-
Locate the two small ribbon cables, beneath the rightmost large ribbon cable.
-
Slide the locks for the small ribbon cables down to the side, and remove the cables.
-
-
Этот шаг не переведен. Помогите перевести
-
Locate the Wifi antenna pigtail connector.
-
Remove the antenna by grasping it at the head with tweezers. Using a slight rocking motion, pull up to dislodge the connector.
-
-
Этот шаг не переведен. Помогите перевести
-
Feed the ribbon cables through the opening on the board.
-
Pull up and remove the circuit board, and set it aside.
-
-
Этот шаг не переведен. Помогите перевести
-
Use a flathead screwdriver, tweezers, a toothpick or dental tool to remove rubber covers on screen.
-
Then using a #00 Phillips head screw driver to remove the screws beneath.
-
-
Этот шаг не переведен. Помогите перевести
-
Using a plastic opening tool, pry the edges of the plastic case apart at the seam.
-
-
Этот шаг не переведен. Помогите перевести
-
Separate the top cover from the body.
-
Using a Phillips #00 screwdriver, remove the screw holding the hinge cover in place.
-
Remove the hinge cover and set it aside.
-
-
Этот шаг не переведен. Помогите перевести
-
Feed the ribbon cables and the Wifi pigtail cable through the opening in the hinge cover.
-
Remove the yellow spacer, and set aside.
-
-
Этот шаг не переведен. Помогите перевести
-
Using a Phillips #00 screwdriver, remove the two screws holding down the speaker circuit boards.
-
Remove the two small circuit boards and set aside.
-
-
Этот шаг не переведен. Помогите перевести
-
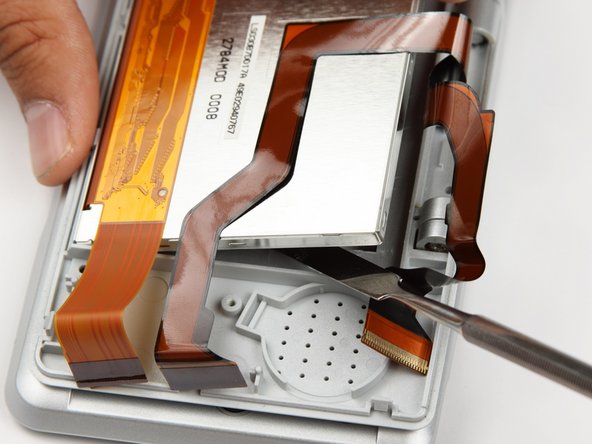
Move the black lock on the two large ribbon cables up with a pry tool, and gently pull out the two ribbon cables.
-
For the small ribbon cable, pull the lock downwards.
-
Gently pull out the small ribbon cable from the connector.
-
Set the two small circuit boards aside
-
-
Этот шаг не переведен. Помогите перевести
-
Using a pry tool, gently lift the top screen out of the shell.
-
Set the top screen aside
-


Отменить: Я не выполнил это руководство.
40 участников успешно повторили данное руководство.
Команда

Cal Poly, Team 18-3, Maness Fall 2009 Участник Cal Poly, Team 18-3, Maness Fall 2009
CPSU-MANESS-F09S18G3
4 членов
Автор 28 руководств
11 Комментариев
Unlike the DS Lite and later models, there is no reason to take apart the bottom portion of the original DS in order to remove the top screen. The first ten steps of this guide could be skipped.
Thanks great advice
Can a ds lite screen be used to repair a ds??
Nope, Nintendo engineered the Lite as a refinement of the original. Therefore almost every component is different! Likely to become cheaper to manufacture.
Can a ds lite screen be used to repair a ds one?? Lots of ds lite screens about......