Перейти к основному содержанию

Этот документ имеет более свежие изменения. Перейти к последней непроверенной версии.

Nintendo DSi XL Speakers Replacement

Выберете то, что вам нужно

  1. Nintendo DSi XL Speakers Replacement, Battery: шаг 1, изображение 1 из 2 Nintendo DSi XL Speakers Replacement, Battery: шаг 1, изображение 2 из 2
    • Remove the two Phillips screws securing the battery cover to the back of the handheld console.

    • Lift the battery cover off the back of the DSi XL.

  2. Nintendo DSi XL Speakers Replacement: шаг 2, изображение 1 из 1
    • Lift the battery from the DSi XL.

  3. Nintendo DSi XL Speakers Replacement, Rear Bezel: шаг 3, изображение 1 из 3 Nintendo DSi XL Speakers Replacement, Rear Bezel: шаг 3, изображение 2 из 3 Nintendo DSi XL Speakers Replacement, Rear Bezel: шаг 3, изображение 3 из 3
    • Use a push pin to remove the four plastic screw covers on the front bezel.

  4. Nintendo DSi XL Speakers Replacement: шаг 4, изображение 1 из 1
    • Remove four Phillips screws securing the front bezel to the rear bezel.

  5. Nintendo DSi XL Speakers Replacement: шаг 5, изображение 1 из 2 Nintendo DSi XL Speakers Replacement: шаг 5, изображение 2 из 2
    • Using two hands, gently slide the rear bezel upwards.

    • The rear bezel will move only about 2 mm.

  6. Nintendo DSi XL Speakers Replacement: шаг 6, изображение 1 из 2 Nintendo DSi XL Speakers Replacement: шаг 6, изображение 2 из 2
    • Insert a spudger into the gap between the front and rear bezel

    • Rotate the spudger away from the DSi XL, prying the two bezels apart.

  7. Nintendo DSi XL Speakers Replacement: шаг 7, изображение 1 из 1
    • In the same manner as described above, continue prying along the top edge of the front and rear bezels.

  8. Nintendo DSi XL Speakers Replacement: шаг 8, изображение 1 из 1
    • Separate the rear bezel from the front bezel.

    • Do not attempt to completely remove the rear bezel yet. It is still attached to the front bezel by the rear-facing camera.

  9. Nintendo DSi XL Speakers Replacement: шаг 9, изображение 1 из 1
    • Use the flat end of a spudger to pry the rear camera off the rear bezel.

    • Remove the rear bezel.

  10. Nintendo DSi XL Speakers Replacement, Speakers: шаг 10, изображение 1 из 1
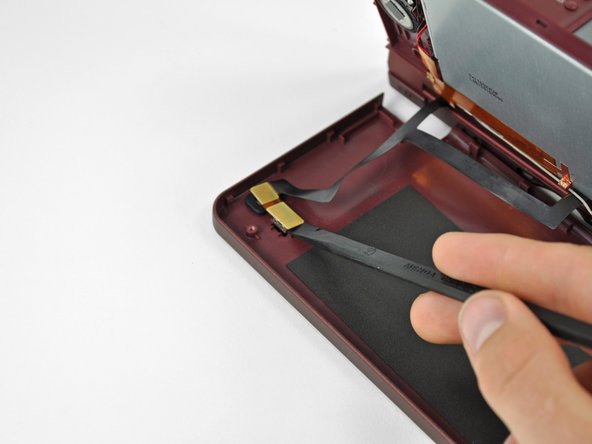
    • Use a spudger to lift the antenna from the front bezel to make room for lifting the speaker cables up.

  11. Nintendo DSi XL Speakers Replacement: шаг 11, изображение 1 из 1
    • Use a spudger to lift the right speaker from its housing in the front bezel.

  12. Nintendo DSi XL Speakers Replacement: шаг 12, изображение 1 из 1
    • Use a spudger to lift the left speaker from its housing in the front bezel.

  13. Nintendo DSi XL Speakers Replacement: шаг 13, изображение 1 из 2 Nintendo DSi XL Speakers Replacement: шаг 13, изображение 2 из 2
    • De-route the left speaker cable along the top edge of the upper LCD.

  14. Nintendo DSi XL Speakers Replacement: шаг 14, изображение 1 из 1
    • Open the display slightly, and lift the LCD out of the front bezel.

    • Lay the LCD down next to the DSi XL.

    • Don't attempt to remove the LCD, it is still attached to the front bezel via the display data ribbon cable.

  15. Nintendo DSi XL Speakers Replacement: шаг 15, изображение 1 из 1
    • Desolder the two solder joints to separate the speakers from the LCD.

    • Right Speaker

    • Left Speaker

    • For both speakers, the red wire (positive lead) is soldered to the left contact. The black wire (negative lead) is soldered to the right contact point.

    • For detailed instructions on how to solder this type of connection, see our guide for repairing soldered connections.

Заключение

To reassemble your device, follow these instructions in reverse order.

3 участников успешно повторили данное руководство.

Matthew Newsom

Участник с: 01/05/10

39 496 Репутация

Автор 67 руководств

3 Комментариев

Thank you for this video but I need some more help cause I dont know if my problem are the speakers or the earphones jack how can I solve this just one clue i need thanks again

Josh - Ответить

In my case, it turned out there was nothing wrong with my speaker… one of the wires that feeds around the screen was bad.

Dave Horlick - Ответить

is there anyway of adding two more speaker?

vincent johnson - Ответить

Добавить комментарий

Просмотр статистики:

За последние 24часов: 0

За последние 7 дней: 5

За последние 30 дней: 17

За всё время: 6,753