Перейти к основному содержанию

Nintendo DSi XL Volume Buttons Replacement

Выберете то, что вам нужно

  1. Nintendo DSi XL Volume Buttons Replacement, Battery: шаг 1, изображение 1 из 2 Nintendo DSi XL Volume Buttons Replacement, Battery: шаг 1, изображение 2 из 2
    • Remove the two Phillips screws securing the battery cover to the back of the handheld console.

    • Lift the battery cover off the back of the DSi XL.

  2. Nintendo DSi XL Volume Buttons Replacement: шаг 2, изображение 1 из 1
    • Lift the battery from the DSi XL.

  3. Nintendo DSi XL Volume Buttons Replacement, Lower Case: шаг 3, изображение 1 из 3 Nintendo DSi XL Volume Buttons Replacement, Lower Case: шаг 3, изображение 2 из 3 Nintendo DSi XL Volume Buttons Replacement, Lower Case: шаг 3, изображение 3 из 3
    • Remove the four rubber screw covers on the lower case by prying them up with a push pin.

  4. Nintendo DSi XL Volume Buttons Replacement: шаг 4, изображение 1 из 1
    • Remove the following seven Phillips screws that secure the lower case to the rest of the DSi XL:

    • Four silver 5.3 mm screws

    • Two black 5.3 mm screws

    • One black 2.5 mm screw

  5. Nintendo DSi XL Volume Buttons Replacement: шаг 5, изображение 1 из 3 Nintendo DSi XL Volume Buttons Replacement: шаг 5, изображение 2 из 3 Nintendo DSi XL Volume Buttons Replacement: шаг 5, изображение 3 из 3
    • Turn the DSi XL over, and open the display.

    • Insert a spudger between the upper and lower case at the bottom left corner of the DSi.

    • Slide the spudger along the bottom edge of the upper case to release the latches securing the upper case to the lower case.

  6. Nintendo DSi XL Volume Buttons Replacement: шаг 6, изображение 1 из 2 Nintendo DSi XL Volume Buttons Replacement: шаг 6, изображение 2 из 2
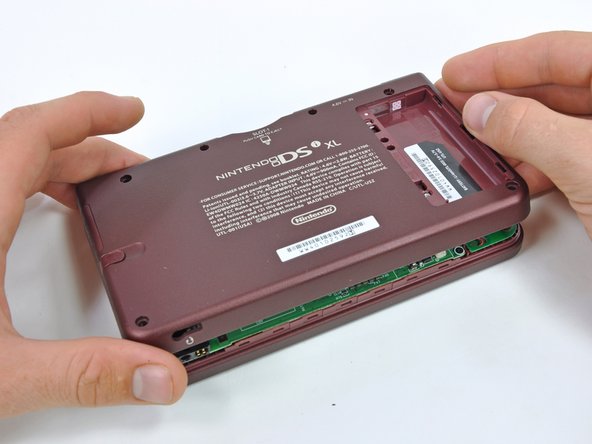
    • Close the display and turn the DSi XL over.

    • Lift the lower case from the front edge.

    • Rotate the lower case away from the DSi.

    • The lower case cannot be completely removed yet, since it is still connected to the motherboard.

  7. Nintendo DSi XL Volume Buttons Replacement: шаг 7, изображение 1 из 2 Nintendo DSi XL Volume Buttons Replacement: шаг 7, изображение 2 из 2
    • Using a spudger, pry the SD card/right shoulder button connector off its socket.

    • Pry the volume button/left shoulder button connector off its socket on the motherboard with a spudger.

  8. Nintendo DSi XL Volume Buttons Replacement, Volume Control Switch: шаг 8, изображение 1 из 1
    • On the inside of the battery compartment, use the tip of a spudger to detach the metal latch securing the volume control switch in place.

    • The latch will only move about 1 mm.

  9. Nintendo DSi XL Volume Buttons Replacement: шаг 9, изображение 1 из 3 Nintendo DSi XL Volume Buttons Replacement: шаг 9, изображение 2 из 3 Nintendo DSi XL Volume Buttons Replacement: шаг 9, изображение 3 из 3
    • Using the flat end of a spudger, remove the adhesive securing the volume control switch ribbon cable to the back of the battery compartment.

    • Using the flat of a spudger, pry the volume control switch straight up out of the lower case.

    • Remove the volume control switch from the DSi XL.

  10. Nintendo DSi XL Volume Buttons Replacement: шаг 10, изображение 1 из 1
    • Using the flat end of a spudger, remove the volume control buttons from the metal backing bracket.

    • The bracket is attached by a strong adhesive. Work slowly and carefully, being sure to not damage the ribbon cable.

    • Volume control switch remains.

  11. Nintendo DSi XL Volume Buttons Replacement, Volume Buttons: шаг 11, изображение 1 из 3 Nintendo DSi XL Volume Buttons Replacement, Volume Buttons: шаг 11, изображение 2 из 3 Nintendo DSi XL Volume Buttons Replacement, Volume Buttons: шаг 11, изображение 3 из 3
    • While pushing the volume buttons through their holes in the lower case, remove the buttons and their silicone pads with a pair of tweezers.

    • Work patiently and carefully as the silicone pad is easily torn.

    • Remove the buttons from the silicone pad.

Заключение

To reassemble your device, follow these instructions in reverse order.

Еще один человек закончил это руководство.

Brett Hartt

Участник с: 04/12/10

127 665 Репутация

Автор 143 руководств

Команда

iFixit Участник iFixit

Staff

135 членов

Автор 16 476 руководств

0 Комментариев

Добавить комментарий

Просмотр статистики:

За последние 24часов: 3

За последние 7 дней: 17

За последние 30 дней: 53

За всё время: 6,654