Введение
The Left and Right triggers are located on the back side of the controller near the cord. The triggers are spring loaded.
Выберете то, что вам нужно
-
-
Place the controller (buttons down) on a solid surface.
-
Remove the six 9.2mm Tri-wing Y0 screws that hold the back panel in place.
-
-
-
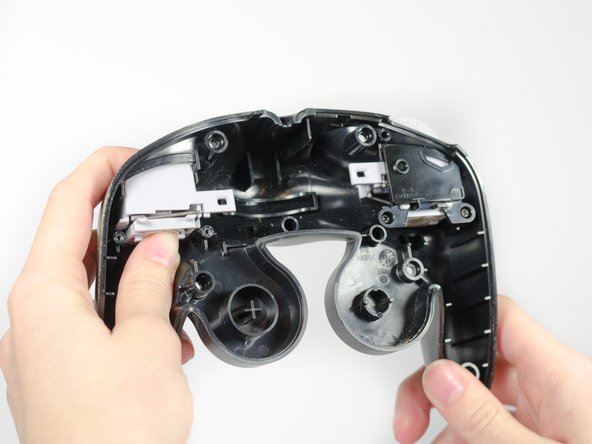
Gently lift the back panel up, separating it from the front panel.
For some reason, it was simpler to take the top half off, although it could be because it is most probably refurbished before
-
-
-
Grab the Z-button by the peg with tweezers and lift it out of the controller.
So how do you put it back in like the replacement because I have a controller I'm working a junker my Friend gave me and I'm trying to fix it the z button doesn't work here it's a pelican wireless controller it's actually not to bad bulky but not bad
-
-
-
-
Carefully unhook the cable that is looped around the peg.
Um can soneone explain the peg and cable part? I dont understand it...
I would say that the cable is somehow "hooked" to the case and you have to get the cable away from the case so that you can pull out the board
My1 -
-
-
-
To remove the trigger assembly, depress the trigger with your index finger as if you are using the controller normally.
-
Hold the grey square bracket onside of the controller with your thumb.
-
Keep your fingers in the same place while rotating upwards towards you to remove trigger assembly.
-


In order to remove the other trigger, simply repeat Steps 6 through Step 9 on the right side.
To reassemble your device, follow these instructions in reverse order.
In order to remove the other trigger, simply repeat Steps 6 through Step 9 on the right side.
To reassemble your device, follow these instructions in reverse order.
Отменить: Я не выполнил это руководство.
11 участников успешно повторили данное руководство.
Команда

Cal Poly, Team 19-44, Regan Winter 2013 Участник Cal Poly, Team 19-44, Regan Winter 2013
CPSU-REGAN-W13S19G44
4 членов
Автор 26 руководств
2 Комментариев
Hallo ich habe da mal eine Frage. Ist es möglich die Empfindlichkeit der Trigger zu beeinflussen ? Leider reagieren sie erst sehr spät da mann den Knopf sehr weit hereindrücken muss.
danke schon mal
Otti