Введение
Removing the top case will allow you access to the GameCube's internal parts.
Выберете то, что вам нужно
-
-
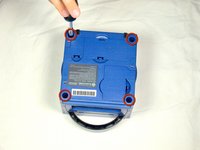
Turn over the Gamecube so that the bottom side is facing up.
-
Use the 4.5 mm Gamebit screwdriver to remove all four screws.
-
-
-
-
With the bottom side of the GameCube facing upward and the screws removed, carefully pull the outer shell of the unit away from the top half.
-
Move the GameCube so that the inside is facing upwards.
-


To reassemble your device, follow these instructions in reverse order.
Отменить: Я не выполнил это руководство.
18 человек успешно провели ремонт по этому руководству.
Команда

Cal Poly, Team 6-2, Maness Fall 2009 Участник Cal Poly, Team 6-2, Maness Fall 2009
CPSU-MANESS-F09S6G2
4 членов
Автор 45 руководств
1 Комментарий к руководству
Can you do a more in-depth version of the top cover? I had to clean each piece and need help figuring out where all the pieces go. Thanks