Перейти к основному содержанию

Nintendo Switch Lite Right Speaker Replacement

Выберете то, что вам нужно

  1. Nintendo Switch Lite Right Speaker Replacement, Remove the back panel screws: шаг 1, изображение 1 из 1
    Инструмент, используемый на этом этапе:
    Magnetic Project Mat
    $19.95
    Купить
    • Before beginning this repair, make sure that the device is completely turned off.

    • Use a Y00 screwdriver to remove the four 6.3 mm-long screws securing the back panel.

    • Throughout this repair, keep track of each screw and make sure it goes back exactly where it came from.

  2. Nintendo Switch Lite Right Speaker Replacement, Remove the top and bottom back panel screws: шаг 2, изображение 1 из 2 Nintendo Switch Lite Right Speaker Replacement, Remove the top and bottom back panel screws: шаг 2, изображение 2 из 2
    • Use a JIS 000 driver or an official iFixit PH 000 driver to remove the following screws securing the back panel:

    • Two 3.6 mm-long screws on the top of the device

    • Two 3.6 mm-long screws on the bottom of the device

    • To prevent these tight screws from stripping, apply firm downward force, work slowly and try a different screwdriver if the screws won't come out.

  3. Nintendo Switch Lite Right Speaker Replacement, Release the clips securing the back panel: шаг 3, изображение 1 из 2 Nintendo Switch Lite Right Speaker Replacement, Release the clips securing the back panel: шаг 3, изображение 2 из 2
    • Insert an opening tool into the left speaker grille on the bottom of the device.

    • Twist the opening tool to release the clips securing the back panel.

    • Avoid inserting the opening tool further than required to prevent damage to the speaker module.

  4. Nintendo Switch Lite Right Speaker Replacement, Continue releasing the clips around the device: шаг 4, изображение 1 из 2 Nintendo Switch Lite Right Speaker Replacement, Continue releasing the clips around the device: шаг 4, изображение 2 из 2
    • Slide the opening tool around the bottom-left corner to release the clips on the left side of the device.

  5. Nintendo Switch Lite Right Speaker Replacement, Twist to release the clips: шаг 5, изображение 1 из 2 Nintendo Switch Lite Right Speaker Replacement, Twist to release the clips: шаг 5, изображение 2 из 2
    • Insert an opening tool into the right speaker grille on the bottom of the device.

    • Twist the opening tool to release the clips.

    • Avoid inserting the opening tool further than required to prevent damage to the speaker module.

  6. Nintendo Switch Lite Right Speaker Replacement, Slide and pry around the corners: шаг 6, изображение 1 из 2 Nintendo Switch Lite Right Speaker Replacement, Slide and pry around the corners: шаг 6, изображение 2 из 2
    • Slide and pry the opening tool around the bottom-right corner to release the clips on the right side of the device.

  7. Nintendo Switch Lite Right Speaker Replacement: шаг 7, изображение 1 из 2 Nintendo Switch Lite Right Speaker Replacement: шаг 7, изображение 2 из 2
    • Continue sliding and prying the opening tool along the gap on the top of the device to release the clips.

  8. Nintendo Switch Lite Right Speaker Replacement, Remove the back panel: шаг 8, изображение 1 из 3 Nintendo Switch Lite Right Speaker Replacement, Remove the back panel: шаг 8, изображение 2 из 3 Nintendo Switch Lite Right Speaker Replacement, Remove the back panel: шаг 8, изображение 3 из 3
    • Lift the bottom edge of the back panel, opening it like a book.

    • Remove the back panel.

  9. Nintendo Switch Lite Right Speaker Replacement, Remove the shield plate: шаг 9, изображение 1 из 1
    • Use a JIS 000 driver or an official iFixit PH 000 driver to remove the following four screws:

    • Three 3.1 mm screws

    • One 4.5 mm screw

  10. Nintendo Switch Lite Right Speaker Replacement: шаг 10, изображение 1 из 3 Nintendo Switch Lite Right Speaker Replacement: шаг 10, изображение 2 из 3 Nintendo Switch Lite Right Speaker Replacement: шаг 10, изображение 3 из 3
    • Use a spudger or your fingers to lift the shield plate up and out of the device.

    • You may feel a bit of resistance. This is normal, since the shield plate is slightly bonded to the heat sink with thermal paste.

    • Remove the shield plate.

    • Clean off the old thermal paste from the shield plate and heat sink using isopropyl alcohol and a microfiber cloth. Apply new thermal paste to the heat sink before reassembly.

  11. Nintendo Switch Lite Right Speaker Replacement, Disconnect the battery: шаг 11, изображение 1 из 2 Nintendo Switch Lite Right Speaker Replacement, Disconnect the battery: шаг 11, изображение 2 из 2
    • Use an opening tool or your fingernail to flip up the small, hinged locking flap on the motherboard interconnect cable's ZIF connector.

  12. Nintendo Switch Lite Right Speaker Replacement: шаг 12, изображение 1 из 2 Nintendo Switch Lite Right Speaker Replacement: шаг 12, изображение 2 из 2
    • Do Not Use Metal Tweezers! Some fixers state that metallic tweezers can short circuit the ribbon cable/connector. It might be safer to just use nylon-tipped or ceramic-tipped tweezers.

    • Use a pair of tweezers to slide the interconnect cable out of its connector on the motherboard.

  13. Nintendo Switch Lite Right Speaker Replacement: шаг 13, изображение 1 из 2 Nintendo Switch Lite Right Speaker Replacement: шаг 13, изображение 2 из 2
    • Use the point of a spudger to pry the battery connector straight up and out of its socket on the motherboard.

  14. Nintendo Switch Lite Right Speaker Replacement, Remove the right speaker: шаг 14, изображение 1 из 2 Nintendo Switch Lite Right Speaker Replacement, Remove the right speaker: шаг 14, изображение 2 из 2
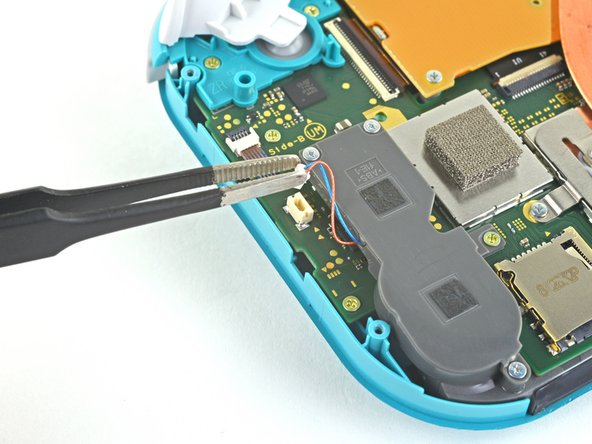
    • Use a pair of tweezers or your fingers to pull the right speaker cable straight up and out of its socket on the motherboard.

    • Do not pull from the wires, or else you risk ripping the wires off the connector.

  15. Nintendo Switch Lite Right Speaker Replacement: шаг 15, изображение 1 из 1
    • Use a JIS 000 driver or an official iFixit PH 000 driver to remove the following four screws:

    • Three 2.5 mm screws

    • One 4.5 mm screw

  16. Nintendo Switch Lite Right Speaker Replacement: шаг 16, изображение 1 из 2 Nintendo Switch Lite Right Speaker Replacement: шаг 16, изображение 2 из 2
    • Use your fingers to lift and remove the right speaker module cover.

  17. Nintendo Switch Lite Right Speaker Replacement: шаг 17, изображение 1 из 3 Nintendo Switch Lite Right Speaker Replacement: шаг 17, изображение 2 из 3 Nintendo Switch Lite Right Speaker Replacement: шаг 17, изображение 3 из 3
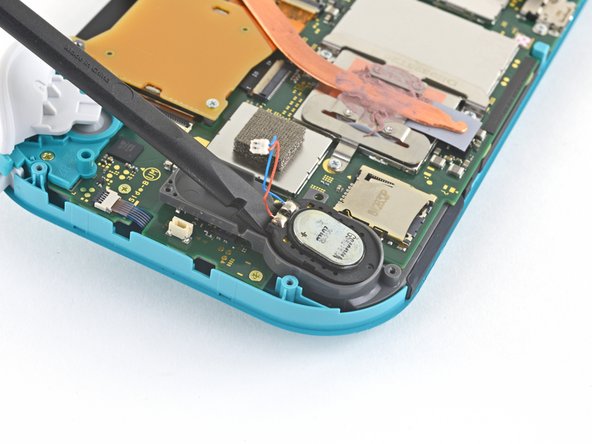
    • Insert a spudger into the gap at the top of the speaker.

    • Take care to avoid the speaker wires as you insert the spudger into the gap.

    • Pry the speaker up to lift it out of its recess.

    • The speaker is adhered with light adhesive inside the speaker module, so a bit of force is required.

    • Remove the right speaker.

Заключение

To reassemble your device, follow these instructions in reverse order.

Take your e-waste to an R2 or e-Stewards certified recycler.

Repair didn’t go as planned? Try some basic troubleshooting, or ask our Nintendo Switch Lite Answers community for help.

Еще один человек закончил это руководство.

Craig Lloyd

Участник с: 02/10/16

35 351 Репутация

Автор 82 руководств

0 Комментариев

Добавить комментарий

Просмотр статистики:

За последние 24часов: 9

За последние 7 дней: 40

За последние 30 дней: 116

За всё время: 2,985