Перейти к основному содержанию

Olympus E-Pl1 Speaker Replacement

Выберете то, что вам нужно

  1. Olympus E-Pl1 Speaker Replacement, Opening The Case: шаг 1, изображение 1 из 1
    • Push the gray tab down, using a spudger if necessary, and the battery will come out.

    • Failure to remove the battery prior to disassembly can result in harm.

  2. Olympus E-Pl1 Speaker Replacement: шаг 2, изображение 1 из 3 Olympus E-Pl1 Speaker Replacement: шаг 2, изображение 2 из 3 Olympus E-Pl1 Speaker Replacement: шаг 2, изображение 3 из 3
    • There are a total of six screws that must be removed using the the #000 Philips screwdriver.

    • As per picture one: there is one 4.9 mm Philips head screw on the left side of the camera.

    • As per picture two: on the bottom of the camera, there are three 3.4 mm Philips head screws; these are located on the darker area of the case.

    • As per picture three: there are two 5.3 mm Philips head screws on the right side, one is beneath the USB cover.

  3. Olympus E-Pl1 Speaker Replacement: шаг 3, изображение 1 из 1
    • Open the case by peeling off the back panel.

    • Pull the case apart gently so that the ribbon connector will not tear.

  4. Olympus E-Pl1 Speaker Replacement: шаг 4, изображение 1 из 2 Olympus E-Pl1 Speaker Replacement: шаг 4, изображение 2 из 2
    • Disconnect the two ribbon cables as shown in picture one.

    • Avoid using metal pry tools, as shown in the photo, on internal electronic components, as it can cause a short and damage the device. Use an ESD-safe tool such as a standard nylon spudger.

    • To disconnect a ribbon cable, use a spudger to lift the black tab then pull the ribbon out. This works the same for all ribbon cables.

  5. Olympus E-Pl1 Speaker Replacement: шаг 5, изображение 1 из 1
    • The back panel has now been removed.

  6. Olympus E-Pl1 Speaker Replacement, LCD Screen: шаг 6, изображение 1 из 3 Olympus E-Pl1 Speaker Replacement, LCD Screen: шаг 6, изображение 2 из 3 Olympus E-Pl1 Speaker Replacement, LCD Screen: шаг 6, изображение 3 из 3
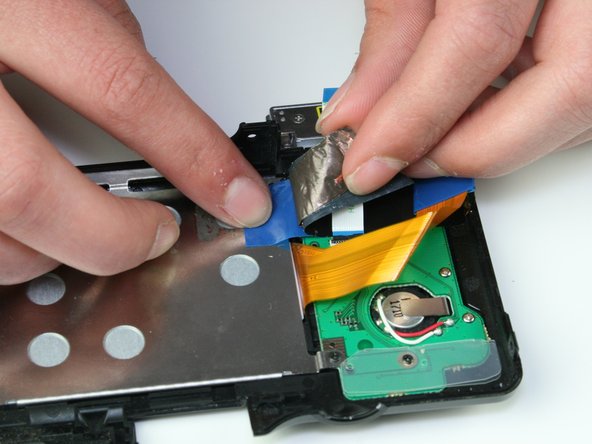
    • As per picture one: peel back the black strip.

    • As per picture two: peel back the Copper strip.

    • As per picture three: peel back the blue tape.

  7. Olympus E-Pl1 Speaker Replacement: шаг 7, изображение 1 из 2 Olympus E-Pl1 Speaker Replacement: шаг 7, изображение 2 из 2
    • There are four screws that need to be removed using the #000 Philips screwdriver.

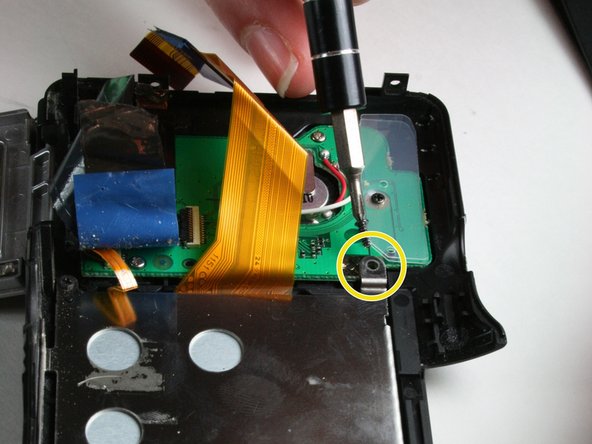
    • Remove the three 3.4 mm screws on the silver panel.

    • Now remove the 4.3 mm screw located on the green board.

  8. Olympus E-Pl1 Speaker Replacement: шаг 8, изображение 1 из 1
    • Lift out and remove the metal plating over the LCD screen.

  9. Olympus E-Pl1 Speaker Replacement: шаг 9, изображение 1 из 2 Olympus E-Pl1 Speaker Replacement: шаг 9, изображение 2 из 2
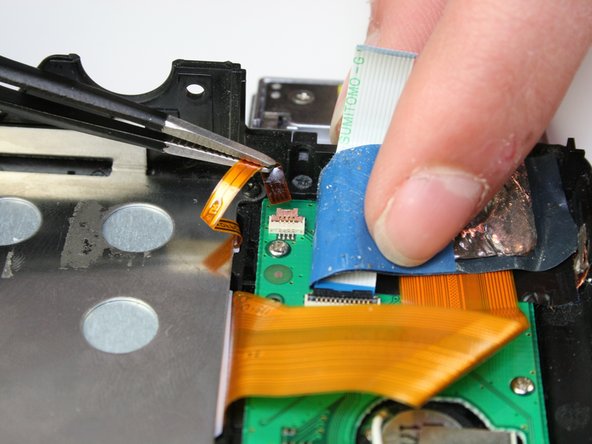
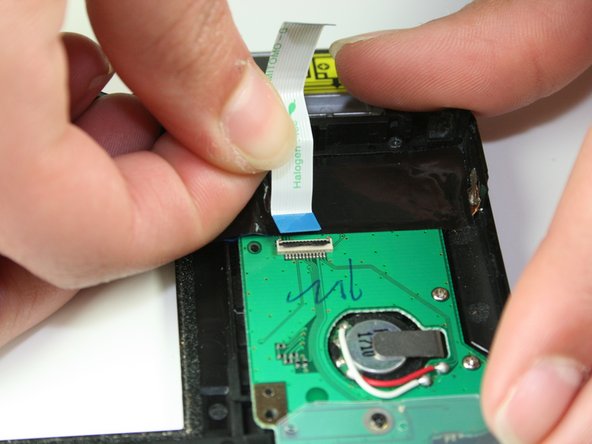
    • Use a spudger to lift the brown lock tab.

    • Avoid using metal pry tools, as shown in the photo, on internal electronic components, as it can cause a short and damage the device. Use an ESD-safe tool such as a standard nylon spudger.

    • Using tweezers, lift the ribbon cable from the brown lock tab.

  10. Olympus E-Pl1 Speaker Replacement: шаг 10, изображение 1 из 1
    • Lift out the LCD Screen.

  11. Olympus E-Pl1 Speaker Replacement, Speaker: шаг 11, изображение 1 из 2 Olympus E-Pl1 Speaker Replacement, Speaker: шаг 11, изображение 2 из 2
    • Using a spudger lift up the black retainer tab.

    • Avoid using metal pry tools, as shown in the photo, on internal electronic components, as it can cause a short and damage the device. Use an ESD-safe tool such as a standard nylon spudger.

    • Gently pull out the ribbon cable.

  12. Olympus E-Pl1 Speaker Replacement: шаг 12, изображение 1 из 2 Olympus E-Pl1 Speaker Replacement: шаг 12, изображение 2 из 2
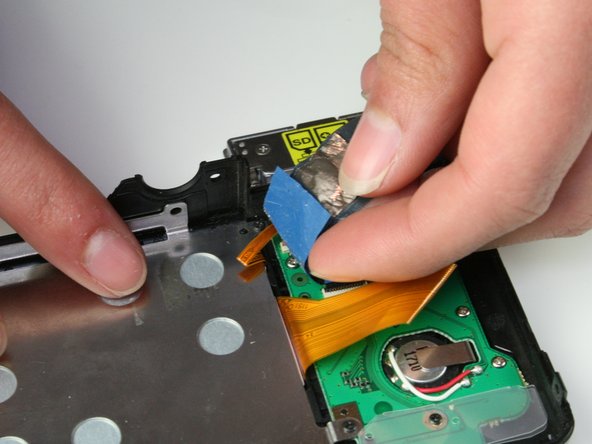
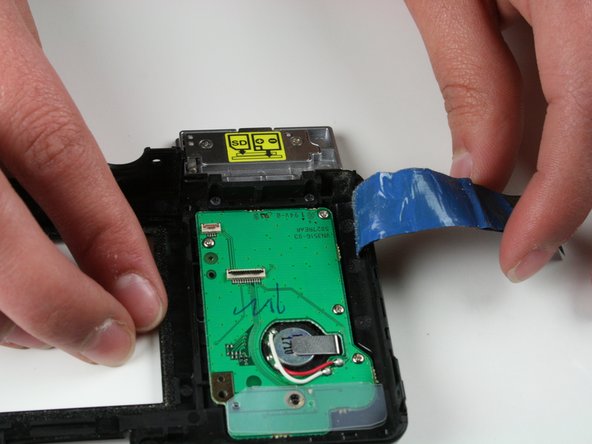
    • Using your fingers, grab the copper grounding strip and blue and black tape.

    • Pull these three back at the same time.

  13. Olympus E-Pl1 Speaker Replacement: шаг 13, изображение 1 из 2 Olympus E-Pl1 Speaker Replacement: шаг 13, изображение 2 из 2
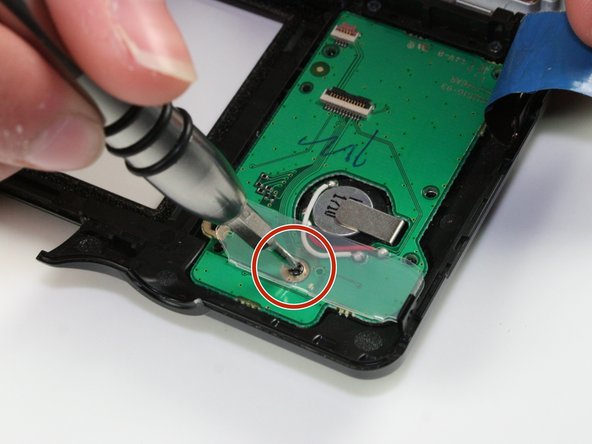
    • Using a #000 Phillips screwdriver remove the four 3.7 mm screws holding the board.

    • Using a #000 Phillips screwdriver remove the 4.3 mm screw as shown in picture two as well as the clear plastic sheet.

  14. Olympus E-Pl1 Speaker Replacement: шаг 14, изображение 1 из 1
    • Gently lift out the board being careful of the wires in the center

  15. Olympus E-Pl1 Speaker Replacement: шаг 15, изображение 1 из 1
    • With your fingers twist and move the speaker to the other side of the board.

  16. Olympus E-Pl1 Speaker Replacement: шаг 16, изображение 1 из 1
    • Using a soldering iron and soldering wick desolder the two wires connecting the speaker

    • The new speaker must be attached with the wire colors in the same orientation.

    • Solder in the new speaker. Be sure to match the wire color to the original wire placement.

Заключение

To reassemble your device, follow these instructions in reverse order.

Jeffery Smith

Участник с: 03/11/15

748 Репутация

Автор 6 руководств

Команда

Colorado Springs, Team 9-1, Panko Spring 2015 Участник Colorado Springs, Team 9-1, Panko Spring 2015

UCCS-PANKO-S15S9G1

3 членов

Автор 12 руководств

Один комментарий

Dear Jeffery,

thank you very much for this nice tutorial.

Could you please tell us the part number of the speaker you exchanged?

Can’t see the upper part of the number on the pictures: ???1710

Thank you

Sincerely

Lears

Lars Hooge - Ответить

Добавить комментарий

Просмотр статистики:

За последние 24часов: 1

За последние 7 дней: 4

За последние 30 дней: 12

За всё время: 1,078