Перейти к основному содержанию

Olympus Stylus 1030 SW Flash Assembly Replacement

Выберете то, что вам нужно

  1. Olympus Stylus 1030 SW Flash Assembly Replacement, Flash Assembly: шаг 1, изображение 1 из 3 Olympus Stylus 1030 SW Flash Assembly Replacement, Flash Assembly: шаг 1, изображение 2 из 3 Olympus Stylus 1030 SW Flash Assembly Replacement, Flash Assembly: шаг 1, изображение 3 из 3
    • Remove the three screws in the corner of the front plate using a Phillips #00 screwdriver.

    • Lift up on the plate until it comes off the rest of the camera.

  2. Olympus Stylus 1030 SW Flash Assembly Replacement: шаг 2, изображение 1 из 3 Olympus Stylus 1030 SW Flash Assembly Replacement: шаг 2, изображение 2 из 3 Olympus Stylus 1030 SW Flash Assembly Replacement: шаг 2, изображение 3 из 3
    • Use the Phillips #00 screwdriver to remove the two screws on both of the side plates of the camera.

  3. Olympus Stylus 1030 SW Flash Assembly Replacement: шаг 3, изображение 1 из 1
    • Remove the screw using the Phillips #00 screwdriver from the bottom of the camera.

  4. Olympus Stylus 1030 SW Flash Assembly Replacement: шаг 4, изображение 1 из 2 Olympus Stylus 1030 SW Flash Assembly Replacement: шаг 4, изображение 2 из 2
    • Turn the camera so the short side without the av port is facing you.

    • Remove both of the screws on this side using the Phillips #00 screwdriver.

    • Remove the front case.

  5. Olympus Stylus 1030 SW Flash Assembly Replacement: шаг 5, изображение 1 из 3 Olympus Stylus 1030 SW Flash Assembly Replacement: шаг 5, изображение 2 из 3 Olympus Stylus 1030 SW Flash Assembly Replacement: шаг 5, изображение 3 из 3
    • Face the camera so the short side with the AV port facing you. Use your Phillips #00 screwdriver to remove the single screw.

    • Turn your camera so the other short side is facing you. Use the Phillips #00 screwdriver to remove the two screws on the silver parts.

    • Face the bottom of your camera towards you and remove the single screw using the Phillips #00 screwdriver.

  6. Olympus Stylus 1030 SW Flash Assembly Replacement: шаг 6, изображение 1 из 3 Olympus Stylus 1030 SW Flash Assembly Replacement: шаг 6, изображение 2 из 3 Olympus Stylus 1030 SW Flash Assembly Replacement: шаг 6, изображение 3 из 3
    • Open the battery door and use your Phillips #00 screwdriver to remove the screw in the middle of the opening.

    • Use the spudger to pry at the rear case until it comes off.

  7. Olympus Stylus 1030 SW Flash Assembly Replacement: шаг 7, изображение 1 из 2 Olympus Stylus 1030 SW Flash Assembly Replacement: шаг 7, изображение 2 из 2
    • Flip the camera so the front is facing you.

    • Use your Phillips #00 screwdriver to remove the three screws located in the corners on this side.

  8. Olympus Stylus 1030 SW Flash Assembly Replacement: шаг 8, изображение 1 из 1
    • Turn the camera so you are looking at the top.

    • Use your Phillips #00 screwdriver to remove the single screw.

  9. Olympus Stylus 1030 SW Flash Assembly Replacement: шаг 9, изображение 1 из 3 Olympus Stylus 1030 SW Flash Assembly Replacement: шаг 9, изображение 2 из 3 Olympus Stylus 1030 SW Flash Assembly Replacement: шаг 9, изображение 3 из 3
    • Use your spudger to gently pry at the side of the LCD screen and the cover over it.

    • Gently take it apart, using caution with the motherboard and battery.

  10. Olympus Stylus 1030 SW Flash Assembly Replacement: шаг 10, изображение 1 из 3 Olympus Stylus 1030 SW Flash Assembly Replacement: шаг 10, изображение 2 из 3 Olympus Stylus 1030 SW Flash Assembly Replacement: шаг 10, изображение 3 из 3
    • Use your Phillips #00 screwdriver to remove the three screws.

  11. Olympus Stylus 1030 SW Flash Assembly Replacement: шаг 11, изображение 1 из 3 Olympus Stylus 1030 SW Flash Assembly Replacement: шаг 11, изображение 2 из 3 Olympus Stylus 1030 SW Flash Assembly Replacement: шаг 11, изображение 3 из 3
    • Use your Phillips #00 screwdriver to remove the three screws.

  12. Olympus Stylus 1030 SW Flash Assembly Replacement: шаг 12, изображение 1 из 1
    • Pull the foam to the side gently and use your Phillips #00 screwdriver to remove the single screw.

  13. Olympus Stylus 1030 SW Flash Assembly Replacement: шаг 13, изображение 1 из 1
    • Use your tweezers to gently pull the motherboard out of the camera.

  14. Olympus Stylus 1030 SW Flash Assembly Replacement: шаг 14, изображение 1 из 2 Olympus Stylus 1030 SW Flash Assembly Replacement: шаг 14, изображение 2 из 2
    • Use your Phillips #00 screwdriver to remove the two screws holding the wires to the flash assembly.

  15. Olympus Stylus 1030 SW Flash Assembly Replacement: шаг 15, изображение 1 из 2 Olympus Stylus 1030 SW Flash Assembly Replacement: шаг 15, изображение 2 из 2
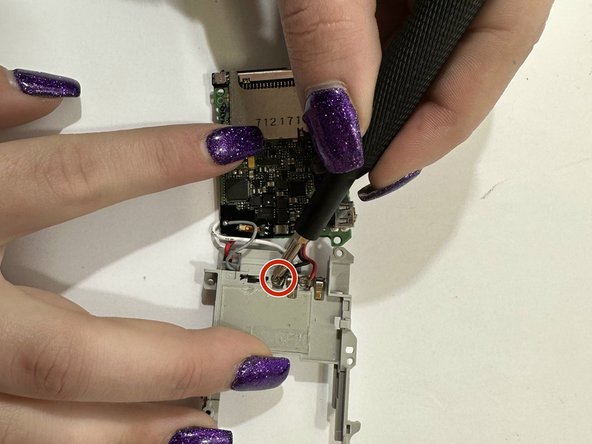
    • Use your tweezers to gently remove the last wires connected to the flash assembly.

Заключение

To reassemble your device, follow these instructions in reverse order.

Paige Asmus

Участник с: 03/24/23

241 Репутация

1 руководство автора

Команда

Casper College, Team 1-4, Lareau Spring 2023 Участник Casper College, Team 1-4, Lareau Spring 2023

CASC-LAREAU-S23S1G4

3 членов

Автор 5 руководств

0 Комментариев

Добавить комментарий

Просмотр статистики:

За последние 24часов: 0

За последние 7 дней: 1

За последние 30 дней: 6

За всё время: 51