Введение
Follow this guide to remove and replace the battery for the OnePlus 5. The hardest part is getting the frame clips free. Once that is done, the rest comes out easily.
If your battery is swollen, take appropriate precautions.
For your safety, discharge your battery below 25% before disassembling your phone. This reduces the risk of a dangerous thermal event if the battery is accidentally damaged during the repair.
Выберете то, что вам нужно
-
-
Insert a SIM card eject tool, bit, or a straightened paperclip into the small hole below the SIM card tray, located near the rear cameras on the edge of the phone.
-
Press firmly to eject the tray.
-
-
-
Remove the two 2.6 mm T2 screws straddling the USB-C port on the bottom edge of the phone.
What are the reference of the screws ? They are missing in the one I bought !
Hi Yôken,
They help hold the back cover on. Most of the time, the clips are enough to hold the phone together.
Just FYI, for whatever reason my brand new OnePlus 5 had 0,8 mm stars screws instead of T2 Torx.
Definitely T2 for me. Do watch out during assembly. I have a feeling that it’s easy to strip these.
T2 for me too. It was missing in my kit and iFixit sent it later when I asked them about it.
-
-
-
Display panel seam: This seam is part of the display assembly. Do not pry at this seam, or you will separate and damage the display panel.
-
Frame seam: This is where the plastic frame meets the back cover. Only pry at this seam.
-
There are twelve clips that hold the frame against the rear case. Be aware of their location as you pry the back cover off in the following steps.
-
-
-
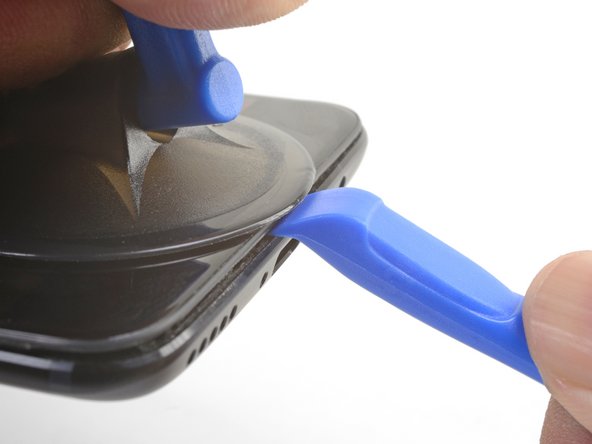
Place a suction cup near the bottom edge of the display.
-
Pull on the suction cup with strong steady force.
-
Press the edge of an opening tool straight into the frame seam near the suction cup until the edge wedges between the plastic frame and the back cover's lip.
I found the suction cup to be more of a hindrance and kept hitting the power button, making it necessary to stop and turn the phone off again. I watched a youtube video where the person didn't use a suction cup at all and decided to try that. I also found that a guitar pick type spudger worked far better than the one shown in the picture. If you're having trouble getting it started, I suggest trying those two things.
-
-
-
Once the opening tool's edge is wedged in position, carefully slide the tool along the bottom edge of the phone.
-
Carefully guide the opening tool around the left corner of the phone while keeping the tool's edge within the seam.
This was extremely difficult & took a lot of force. I needed a thin flat metal spudger and wrecked a couple of plastic ones in the process. I left a few scratches along the join in the process. It would be easier if I had something to hold the phone, in my hand I kept turning it on by accident.
what was the metal spudger did you use? I am having trouble as well. I cannot seem to pry the back cover and it feels like it is shut tightly, there are no crevices I can pry into. What was your strategy may I ask?
At first, I slightly opened the body with a plastic tool, but it was not enough to actually open the back cover. Then I used a thin metal screwdriver for this. It was difficult but nothing special. Just be sure that you are opening the correct seam between the body and the screen and don’t make sudden moves. I bent nothing, everything came back in place when reassembled.
ivan -
Same as David here: the plastic opening tools/guitar picks were doing nothing (not even creating the first "crack") . In the end I managed to open it using Jimmy (the metal knife/spudger), but not without scratching the whole metal cover.
-
-
-
Continue sliding the opening tool along the long edge, releasing the clips along the way.
-
-
-
-
With the bottom and left edge of the phone freed, gently wiggle the frame to release the top and right edge clips.
-
Align the top edge of the frame to the back cover and ensure that the top clips slip into place.
-
Squeeze along the long edges of the phone to snap the remaining clips into place.
Reinstalling the back cover stumped me for a second… If you’re struggling with aligning the top edge of the frame, remember that the camera is going to look off/pointed a bit too low until you actually clip the frame back in.
Really stupid but it was the only thing that tripped me up in this guide.
-
-
-
With all the clips released, flip the phone over so that the display is face-down.
-
Swing the back cover around and rest it on top of the exposed frame.
-
-
-
Remove the 2.6 mm Phillips screw holding the cable bracket above the battery in place.
-
Lift up and remove the cable bracket.
-
-
-
Use the point of a spudger to pry up and disconnect the back cover flex cable from its socket.
If the flex cable pins are damaged, the flex cable can be replaced.
If the connecter pins (on the motherboard) are damaged, you might need to do microsoldering (or contact a microsoldering company) to replace the damaged connector.
Brendan -
-
-
-
Use the point of a spudger to pry up and disconnect the battery connector from its socket.
-
-
-
Remove the six 2.6 mm Phillips screws securing the loudspeaker to the frame.
-
-
-
Insert the flat end of a spudger into the corner of the loudspeaker assembly and pry slightly, loosening the loudspeaker from its recess.
-
-
-
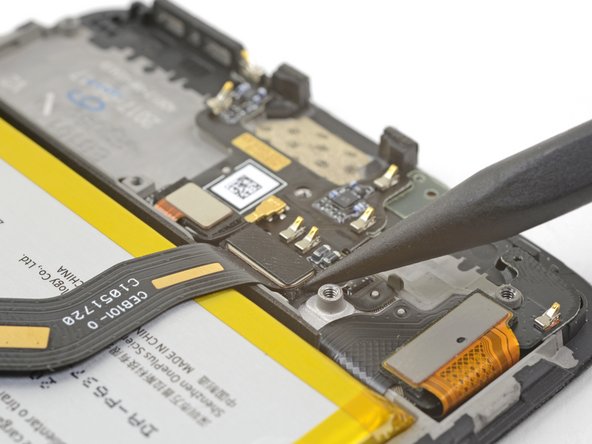
Use the point of a spudger to pry up and disconnect the interconnect flex cable from the socket.
This step is used in multiple guides, and not all of them require the cable to be bent away. You can just leave it sitting there, disconnected.
This image seems to show the daughterboard removed but there is no corresponding previous step. I see no way to remove the interconnect flex cable without removing the daughterboard. Possibly the volume switch can be removed with the cable still connected but I'm not confident enough to try this so will remove the daughterboard.
David,
Thanks for bringing this up. That's indeed a procedural error! I've added the missing steps in the affected guides.
-
-
-
Brace the phone frame against the table.
-
Using a strong, steady force, pull the green pull tab upwards until the battery loosens from its recess.
-
Swing the battery completely out of its recess and pull it off of the plastic liner.
-


To reassemble your device, follow these instructions in reverse order.
For optimal performance, calibrate your newly installed battery: Charge it to 100% and keep charging it for at least 2 more hours. Then use your device until it shuts off due to low battery. Finally, charge it uninterrupted to 100%.
Take your e-waste to an R2 or e-Stewards certified recycler.
Repair didn’t go as planned? Check out our OnePlus 5 Answers community for troubleshooting help.
Отменить: Я не выполнил это руководство.
90 участников успешно повторили данное руководство.


27 Комментариев
Thanks a lot for your contribution! It worked perfectly.
I follow the instructions but it said the battery is too slow
Charge the battery for at least a few hours. If the battery does not charge, double-check all connectors, especially the interconnect cable. Does the phone react to a charging cable? If not, something may be broken between the USB port and the motherboard.
It honestly took an hour to get the back cover off, and then another hour to take the rest apart and put it back together. But this guide was useful.
Thanks so much for this guide. Worked out great!
Followed the guide and worked perfectly. Thank you!
Thank a lot, pretty easy.
Thanks a lot for these instructions. It took me about 20min. to undertake the full process.
Finally changed my battery after more than couple months of buying. My phone had started getting stuck in bootloop and after rebooting twice it would go blank with a light blue LED. I thought no way this is a battery issue. Guess I was wrong.
Opening the display part looked scary and I kept putting it off. Definitely takes a substantial amount of force to pry it open from the bottom, specially the bottom left corner for me. Make sure you read the whole thing first and Don’t go trying to open from top if the bottom feels tight.
Took me an hour tops. Thanks a lot!
After putting it back together I wondered what to do with the screw I had left over. Had to go through the process of opening it back up to find somewhere for it to go!
Great help, thanks for the instructions.
Battery was slightly thicker than the available space. This is causing the screen to be pushed out from its frame a bit when put back together. otherwise everything worked as described.
I also had a battery that was 0.5mm thicker. the screen was bent and the glass on the sides was detaching from the display, I had to replace the old battery. do you know where to find the exact measurements of the battery?
After first charge of new battery, it seems that the battery will only charge to 85%. What should I do. It has been 2+ hrs that it is stuck at 85%, and (if I understand correctly) this is a critical step for battery conditioning.
Just try to unplug then plug the phone to the charger again :)
Brendan -
Great guide. Mind you, the cover is REALLY, REALLY hard to get off. I broke a few plastic tools, tried it with a metal one but made a tiny crack on the screen under the home button, so don’t do that. You can also expect some blood, as I damaged my skin a few times trying to get it open ;) Once this was done it was quite easy, though some screws don’t come out very easily. Oh, and I had some cheap tools which wore out, so I had to find better ones. I’m currently attempting to calibrate the battery, and I’ll see how it goes. I also changes the charging port while I was there, which is even simpler than the battery. So if you’re changing the battery, change the port also, it’s really cheap and it does make a change.
Thanks for the guide.. only ended up taking me about 30 mins but I already have some experience with phone repairs. This guide was bang on!
Worked perfectly! Managed to get through the whole thing in half an hour. Thank you :)
Everything worked great! Full battery install complete! :D I'd say the only thing I was confusing was receiving the adhesive for the OP5 battery replacement. You don't really need the adhesive to do the install since the factory adhesive seems to do the trick just fine. That's maybe the only thing I'd explain more (how to use the adhesive's given, or not).
Thank you!
I replaced my battery! It worked! Thanks author!
The screws either side of the charging port are not T2 - they are T1. This is an unusual size and should be emphasised.
It would be useful to know what size Phillips screwdriver is needed for internal screws. I assume that the mentioned 2.6mm refers to the screw length. This does not help.
I ordered the battery and had to remove a piece of the tap as the cabel was bent way way way to far to be plugged in so i had to rebend it IM NOT A FAN OF BENDING THOSE FLAT CABELS! I took fotos of it was thinking i got send the wrong battery... Made me really !#^&@@ off rebended the cabel amd pluged it in... Pls check next time that the connect is in the right spot be fore sending out a battery
Did it! The screen suction handle did not work. I kind of pressed it very very hard, but after that it did not apply enough suction force. So I just used the Jimmy tool, which scraped the edge of cover from black to metallic a bit until I understood that it has to be not horizontal but pointing kind of down, then it worked and I could get in the blue plastic opening tools to pry the bottom side outwards.
Also reassembly had to be made first on the power button side, then top, after that it went well.
Muchísimas gracias por compartir vuestro conocimiento. Con esta guía la sustitución resultó extrañamente sencilla a la par de que resulta entretenido el reparar las cosas por ti mismo. Espero darle una buena segunda vida a mi móvil :) Thanks so much!!!
I had a lot of trouble getting the first two screws off, and I figured out they were dirty lmao. The torx bit wasn't fitting right because it's so small and a little bit of grime was enough to keep it from fitting right. Other than that, what everyone else already said here. Those clips suck ass, but the guide really helped! Repair successful!