Перейти к основному содержанию

Oster 16-Speed Blender Circuit Board Replacement

Выберете то, что вам нужно

  1. Oster 16-Speed Blender Circuit Board Replacement, Fan and Motor: шаг 1, изображение 1 из 2 Oster 16-Speed Blender Circuit Board Replacement, Fan and Motor: шаг 1, изображение 2 из 2
    • Remove the Blender Container from the Blender Base.

  2. Oster 16-Speed Blender Circuit Board Replacement: шаг 2, изображение 1 из 2 Oster 16-Speed Blender Circuit Board Replacement: шаг 2, изображение 2 из 2
    • Flip the blender so the bottom is facing you.

  3. Oster 16-Speed Blender Circuit Board Replacement: шаг 3, изображение 1 из 3 Oster 16-Speed Blender Circuit Board Replacement: шаг 3, изображение 2 из 3 Oster 16-Speed Blender Circuit Board Replacement: шаг 3, изображение 3 из 3
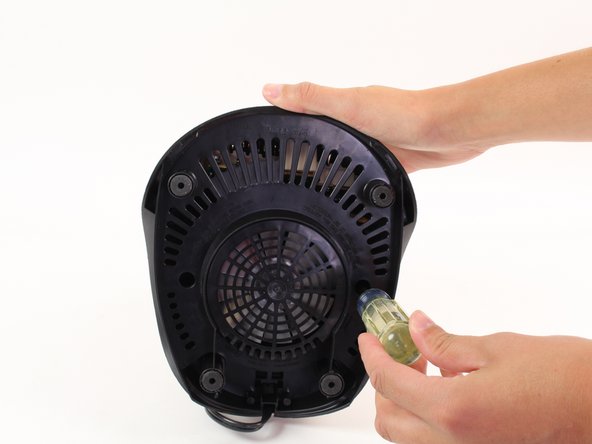
    • Unscrew the 16mm screws located on the plastic bottom from the blender base using a Phillips #2 screwdriver.

  4. Oster 16-Speed Blender Circuit Board Replacement: шаг 4, изображение 1 из 2 Oster 16-Speed Blender Circuit Board Replacement: шаг 4, изображение 2 из 2
    • Remove the plastic bottom from the base of the blender.

  5. Oster 16-Speed Blender Circuit Board Replacement: шаг 5, изображение 1 из 2 Oster 16-Speed Blender Circuit Board Replacement: шаг 5, изображение 2 из 2
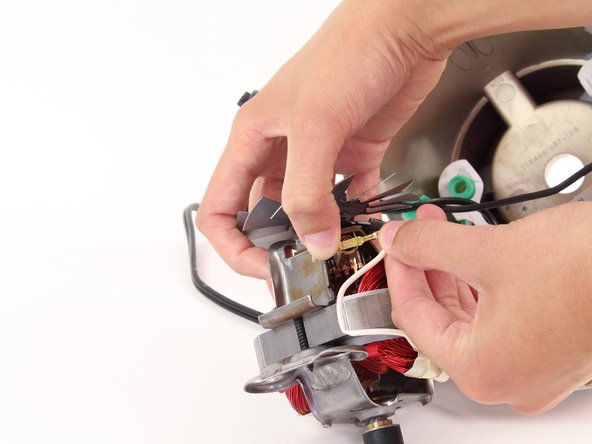
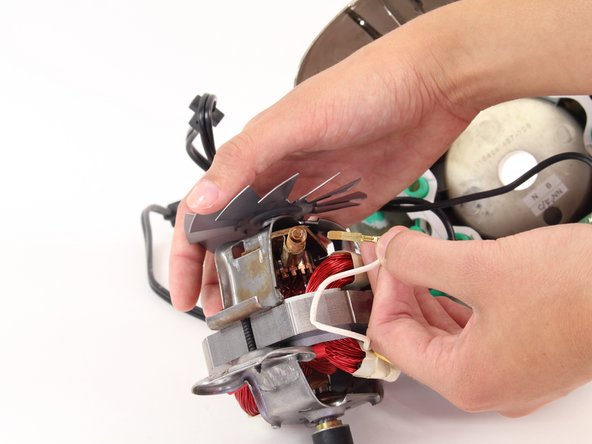
    • Holding the center of the fan, grip the knob in the center of the top of the blender with a wrench and twist the wrench counterclockwise.

  6. Oster 16-Speed Blender Circuit Board Replacement: шаг 6, изображение 1 из 1
    • Carefully remove the motor and fan from the base of the blender.

  7. Oster 16-Speed Blender Circuit Board Replacement: шаг 7, изображение 1 из 3 Oster 16-Speed Blender Circuit Board Replacement: шаг 7, изображение 2 из 3 Oster 16-Speed Blender Circuit Board Replacement: шаг 7, изображение 3 из 3
    • Now, gently pull the white wire that is connected to the base and the motor.

    • Be careful, as there is a spring behind the contact points, that might try to shoot out and hurt you.

  8. Oster 16-Speed Blender Circuit Board Replacement: шаг 8, изображение 1 из 3 Oster 16-Speed Blender Circuit Board Replacement: шаг 8, изображение 2 из 3 Oster 16-Speed Blender Circuit Board Replacement: шаг 8, изображение 3 из 3
    • Now, turn the motor over, and remove the black wire from the motor.

    • Again, be warned as the is another spring that wants to shoot out and hurt you here as well.

  9. Oster 16-Speed Blender Circuit Board Replacement: шаг 9, изображение 1 из 2 Oster 16-Speed Blender Circuit Board Replacement: шаг 9, изображение 2 из 2
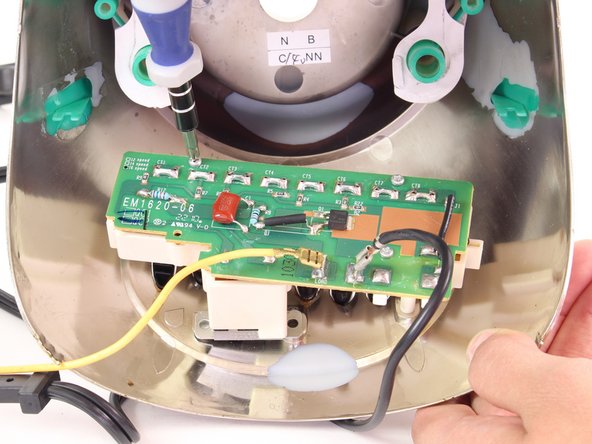
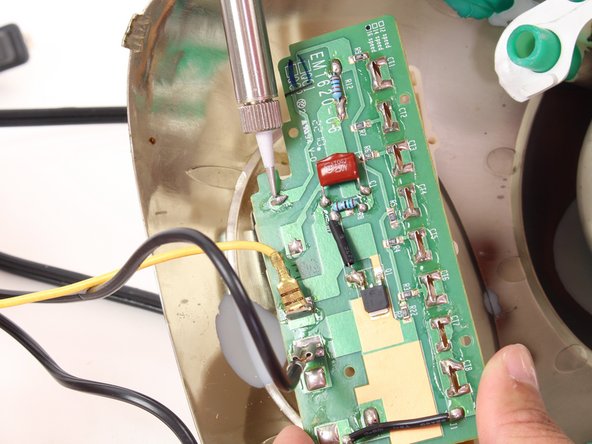
    • Now de-solder the yellow wire from circuit board. De-solder the wire following these instructions.

    • Be careful, as there is another, black wire, nearby that you do not want to de-solder.

  10. Oster 16-Speed Blender Circuit Board Replacement, Circuit Board: шаг 10, изображение 1 из 3 Oster 16-Speed Blender Circuit Board Replacement, Circuit Board: шаг 10, изображение 2 из 3 Oster 16-Speed Blender Circuit Board Replacement, Circuit Board: шаг 10, изображение 3 из 3
    • Locate the four 11mm screws in the circuit board.

    • Unscrew the four screws using the Phillips #1 screwdriver.

  11. Oster 16-Speed Blender Circuit Board Replacement: шаг 11, изображение 1 из 2 Oster 16-Speed Blender Circuit Board Replacement: шаг 11, изображение 2 из 2
    • Desolder the circuit board from the base at the indicated point, following the directions by clicking here.

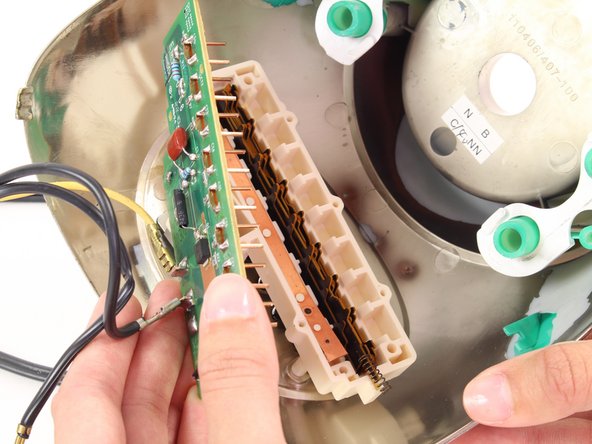
    • Now separate the circuit board from the base.

  12. Oster 16-Speed Blender Circuit Board Replacement: шаг 12, изображение 1 из 3 Oster 16-Speed Blender Circuit Board Replacement: шаг 12, изображение 2 из 3 Oster 16-Speed Blender Circuit Board Replacement: шаг 12, изображение 3 из 3
    • You will see that the circuit board is still attached by a red wire and a black wire.

    • Flip the circuit board back over and desolder at the indicated points following the directions given here.

Заключение

Now your circuit board is ready to be replaced. To reassemble your device, follow these instructions in reverse order.

6 участников успешно повторили данное руководство.

Dana

Участник с: 04/14/14

773 Репутация

Автор 5 руководств

Команда

Cal Poly, Team 12-37, Maness Spring 2014 Участник Cal Poly, Team 12-37, Maness Spring 2014

CPSU-MANESS-S14S12G37

4 членов

Автор 5 руководств

10 Комментариев

So, a question. Where does the spring go? I was fixing one of these and the spring fell out and I never saw where it came from.

Seth Grady - Ответить

inside 2 tubes that stick out opposite of each other just below the fan.

dbagarotti -

Spring goes on the one of the strips that slides back and forth....it has small end which goes in a small notched cavity of the plastic housing. Spring goes on that longer end of the stripe. See the picture in step 12...its popped out from the plastic housing.

Jignesh Rathod -

conoces el orden de las laminas del circuito de velocidades…? agradecere cualquier sugerencia…

juliogpe_cc - Ответить

Awesome, this guide was really helpful in repairing my blender. Thumbs up for the author.

Okikiolu Jegede - Ответить

Добавить комментарий

Просмотр статистики:

За последние 24часов: 1

За последние 7 дней: 14

За последние 30 дней: 64

За всё время: 5,629