Перейти к основному содержанию

PSP 2000 Memory Stick Slot Replacement

Выберете то, что вам нужно

  1. PSP 2000  Memory Stick Slot Replacement, Battery: шаг 1, изображение 1 из 3 PSP 2000  Memory Stick Slot Replacement, Battery: шаг 1, изображение 2 из 3 PSP 2000  Memory Stick Slot Replacement, Battery: шаг 1, изображение 3 из 3
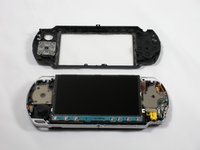
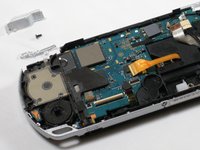
    • Place PSP face down, so that the UMD Drive is facing upwards.

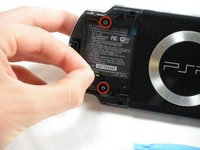
    • Locate the battery door and open.

    • Remove the battery from inside.

  2. PSP 2000  Memory Stick Slot Replacement, Front Casing: шаг 2, изображение 1 из 1
    • This step requires the removal of the warranty sticker. Removing the sticker will void the warranty. According to the FTC removing this will not void your warranty.

    • Locate the sticker in the battery compartment labeled: "En: Warranty Void if Seal Damaged."

    • Remove the sticker using the PSP Opening Tools.

    • Under the sticker is a 5mm Phillips screw needed in the next step.

  3. PSP 2000  Memory Stick Slot Replacement: шаг 3, изображение 1 из 2 PSP 2000  Memory Stick Slot Replacement: шаг 3, изображение 2 из 2
    • Remove four 5 mm Phillips from the case.

    • If the screws stick in the case, you can use a magnetized screwdriver to draw them out.

  4. PSP 2000  Memory Stick Slot Replacement: шаг 4, изображение 1 из 2 PSP 2000  Memory Stick Slot Replacement: шаг 4, изображение 2 из 2
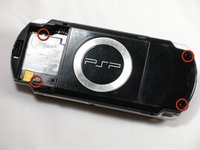
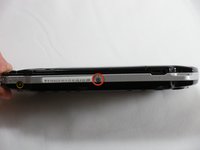
    • Remove the following screws from around the bezel:

    • Two 4 mm Phillips

    • One 5 mm Phillips

    • The two shorter 4 mm screws are on the top of the PSP; the longer 5 mm screw is on the bottom.

  5. PSP 2000  Memory Stick Slot Replacement: шаг 5, изображение 1 из 2 PSP 2000  Memory Stick Slot Replacement: шаг 5, изображение 2 из 2
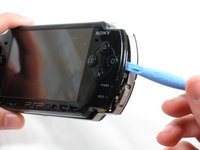
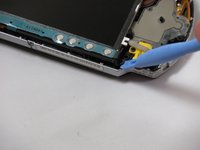
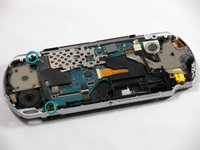
    • Gently pry the front bezel away from the casing using a PSP opening tool.

    • Start on the right hand side of the PSP bezel, and carefully work the tool around the side.

    • If you want to clean the control buttons or D-pad, you can easily pop them out once the faceplate is off and wipe them clean.

  6. PSP 2000  Memory Stick Slot Replacement, Display: шаг 6, изображение 1 из 3 PSP 2000  Memory Stick Slot Replacement, Display: шаг 6, изображение 2 из 3 PSP 2000  Memory Stick Slot Replacement, Display: шаг 6, изображение 3 из 3
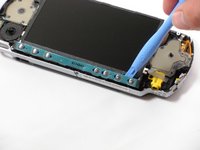
    • Remove the home bar by gently prying on the left and right sides of it with the opening tools. Lift the bar out of the device.

    • A ribbon cable connects the home bar to the logic board. Be careful not to damage the cable when removing the bar.

  7. PSP 2000  Memory Stick Slot Replacement: шаг 7, изображение 1 из 3 PSP 2000  Memory Stick Slot Replacement: шаг 7, изображение 2 из 3 PSP 2000  Memory Stick Slot Replacement: шаг 7, изображение 3 из 3
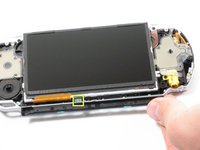
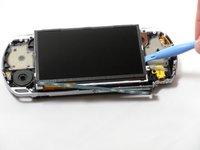
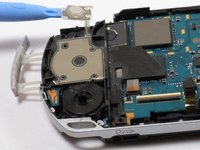
    • With the home bar out of the way, gently pry up the display using the opening tools.

    • There is another ribbon cable attached to the bottom of the LCD. Be careful not to damage either of the connectors when removing.

    • Lift the black tabs of the ribbon cable connectors using a opening tool. Pull the ribbons out towards the bottom of the PSP to disconnect.

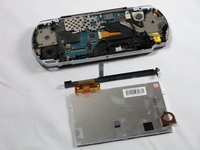
    • Gently lift out the display.

  8. PSP 2000  Memory Stick Slot Replacement,  Memory Stick Slot: шаг 8, изображение 1 из 3 PSP 2000  Memory Stick Slot Replacement,  Memory Stick Slot: шаг 8, изображение 2 из 3 PSP 2000  Memory Stick Slot Replacement,  Memory Stick Slot: шаг 8, изображение 3 из 3
    • Remove two 4.5 mm Phillips screws from the left-hand side of the PSP.

    • Slide off the left trigger along with the plastic bracket underneath.

    • Carefully pry off left trigger button using opening tools.

    • The button is adhered to the body. It can be re-adhered with hot glue after being pried-up, if necessary.

  9. PSP 2000  Memory Stick Slot Replacement: шаг 9, изображение 1 из 2 PSP 2000  Memory Stick Slot Replacement: шаг 9, изображение 2 из 2
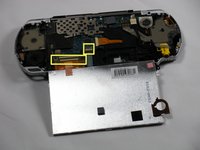
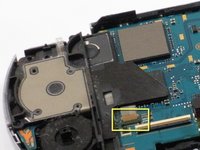
    • Use an opening tool to lift up the brown tab on the connector and remove the cable horizontally.

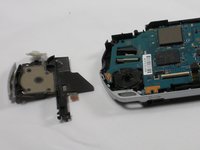
    • Gently remove the memory card slot by pulling it straight out.

Заключение

To reassemble your device, follow these instructions in reverse order.

15 участников успешно повторили данное руководство.

espinks

Участник с: 10/18/09

3 472 Репутация

Автор 5 руководств

Команда

Cal Poly, Team 6-3, Maness Fall 2009 Участник Cal Poly, Team 6-3, Maness Fall 2009

CPSU-MANESS-F09S6G3

5 членов

Автор 35 руководств

2 Комментариев

Thank you, i'am Zakaria Farid from Morocoo

swat4ever2015 - Ответить

would this work for a 2001 model?

James Ginther - Ответить

Добавить комментарий

Просмотр статистики:

За последние 24часов: 7

За последние 7 дней: 48

За последние 30 дней: 200

За всё время: 25,810