Эта версия возможно содержит некорректные исправления. Переключить на последнюю проверенную версию.
Выберете то, что вам нужно
-
Этот шаг не переведен. Помогите перевести
-
Unscrew the four Phillips screws on the back of the PSP Go.
-
Rotate the PSP so you can see the top of the device.
-
Unscrew the two Phillips screws next to the volume buttons.
-
-
Этот шаг не переведен. Помогите перевести
-
Use a plastic opening tool around the perimeter of the back cover to loosen it on all sides.
-
Open the back cover by gently lifting the right side, and rotating it to the left side (as if you were opening a book).
-
-
Этот шаг не переведен. Помогите перевести
-
Use a plastic opening tool to gently flip up the left trigger connector.
-
-
Этот шаг не переведен. Помогите перевести
-
Unscrew the lone Phillips screw holding the trigger in place. Remove both trigger and retaining plate from the PSP Go.
-
-
Этот шаг не переведен. Помогите перевести
-
Use the plastic opening tool to gently peel away at the "Warranty Void" sticker. Start on one edge, as shown, and slide the tool from side to side until the sticker is removed from just the battery.
-
-
-
Этот шаг не переведен. Помогите перевести
-
Gently pull the sticker away from the battery connector, just enough so that the connector is visible.
-
Wedge a plastic opening tool in between the connector and logic board, and gently pull the connector upwards.
-
-
Этот шаг не переведен. Помогите перевести
-
Use a plastic opening tool to pop out the battery, being careful not to snag the "Warranty Void" sticker in the process.
-
-
Этот шаг не переведен. Помогите перевести
-
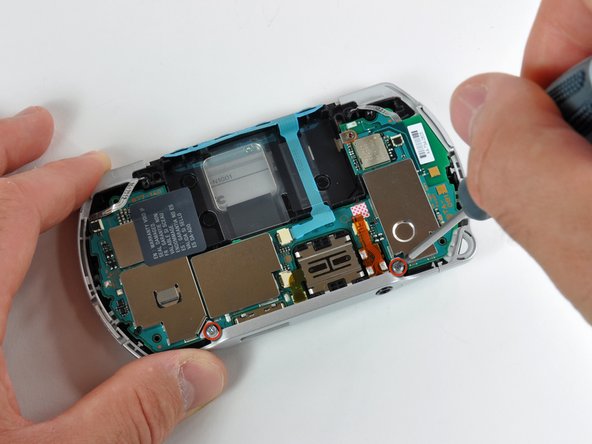
Remove the single Phillips screw securing the logic board to the inner case.
-
-
Этот шаг не переведен. Помогите перевести
-
Use a plastic opening tool to gently flip up the right trigger connector.
-
Unscrew the lone Phillips screw holding the trigger in place. Remove both trigger and retaining plate from the PSP Go.
-
-
Этот шаг не переведен. Помогите перевести
-
Use a #00 Phillips screwdriver to unscrew both bottom plate screws.
-
Remove the bottom plate by lifting it away from the device.
-
-
Этот шаг не переведен. Помогите перевести
-
Remove both headphone jack and analog joystick screws using your #00 Phillips screwdriver.
-
-
Этот шаг не переведен. Помогите перевести
-
Unplug the volume button cable using a pair of tweezers. Be careful not to damage the cable.
-
Unplug the Start/Select button cable the same way. Make sure to grasp the black plastic pull tab of the cable.
-
-
Этот шаг не переведен. Помогите перевести
-
Use a pair of tweezers to pull out the battery's clear plastic cover.
-
-
Этот шаг не переведен. Помогите перевести
-
Use a plastic opening tool to disconnect the display cable from the logic board.
-
The logic board should now be free from the rest of the device.
-


Отменить: Я не выполнил это руководство.
9 участников успешно повторили данное руководство.
