Перейти к основному содержанию

Panasonic ARC ES-LT3N Power Button Replacement

Выберете то, что вам нужно

  1. Panasonic ARC ES-LT3N Power Button Replacement, Back Casing: шаг 1, изображение 1 из 2 Panasonic ARC ES-LT3N Power Button Replacement, Back Casing: шаг 1, изображение 2 из 2
    • Flip the razor over so the back is facing you.

  2. Panasonic ARC ES-LT3N Power Button Replacement: шаг 2, изображение 1 из 2 Panasonic ARC ES-LT3N Power Button Replacement: шаг 2, изображение 2 из 2
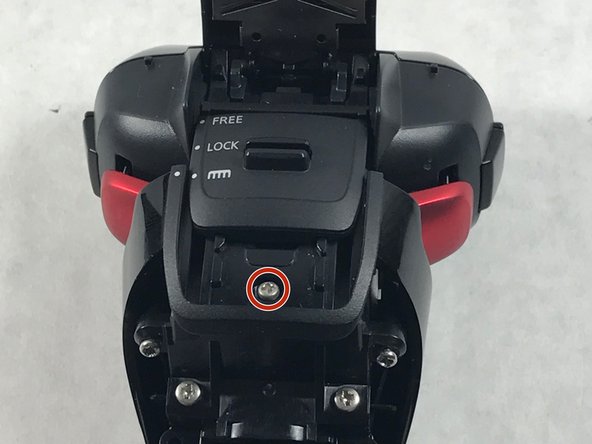
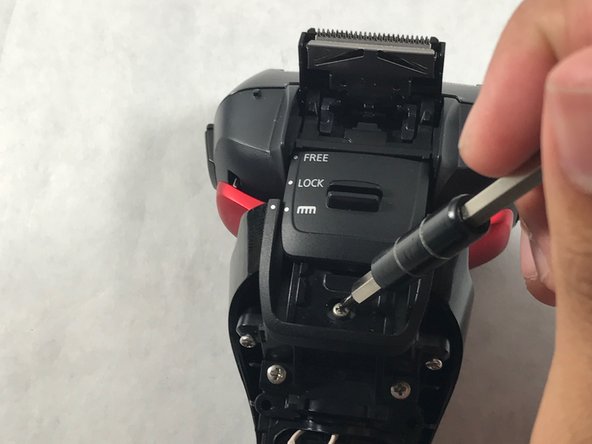
    • Using a Phillips #00 screwdriver, remove the 6 mm screw just above the charger port.

  3. Panasonic ARC ES-LT3N Power Button Replacement: шаг 3, изображение 1 из 2 Panasonic ARC ES-LT3N Power Button Replacement: шаг 3, изображение 2 из 2
    • Slide the plastic cover at the bottom of the razor downward to remove.

  4. Panasonic ARC ES-LT3N Power Button Replacement: шаг 4, изображение 1 из 2 Panasonic ARC ES-LT3N Power Button Replacement: шаг 4, изображение 2 из 2
    • Lift up the rear casing from the bottom of the razor.

    • This may require you to gently pry it apart with you fingers.

    • Lift up the rear casing from the sides of the razor.

    • Pull rear casing up and off razor.

    • Be careful not to break any plastic!

  5. Panasonic ARC ES-LT3N Power Button Replacement, Battery: шаг 5, изображение 1 из 1
    • Using the Phillips 00 driver bit, remove six screws (12mm) from the battery case.

  6. Panasonic ARC ES-LT3N Power Button Replacement: шаг 6, изображение 1 из 1
    • Remove battery case.

  7. Panasonic ARC ES-LT3N Power Button Replacement: шаг 7, изображение 1 из 2 Panasonic ARC ES-LT3N Power Button Replacement: шаг 7, изображение 2 из 2
    • Remove old battery by lifting the battery up and left.

    • There are plastic brackets holding the battery on the right. Removing up and left ensures that the brackets will not be damaged and the battery will not come loose.

  8. Panasonic ARC ES-LT3N Power Button Replacement, Power Button: шаг 8, изображение 1 из 3 Panasonic ARC ES-LT3N Power Button Replacement, Power Button: шаг 8, изображение 2 из 3 Panasonic ARC ES-LT3N Power Button Replacement, Power Button: шаг 8, изображение 3 из 3
    • Remove the 8 mm screws directly below the lock switch.

  9. Panasonic ARC ES-LT3N Power Button Replacement: шаг 9, изображение 1 из 3 Panasonic ARC ES-LT3N Power Button Replacement: шаг 9, изображение 2 из 3 Panasonic ARC ES-LT3N Power Button Replacement: шаг 9, изображение 3 из 3
    • Push the lock switch upward and remove the 6 mm screw hidden beneath.

  10. Panasonic ARC ES-LT3N Power Button Replacement: шаг 10, изображение 1 из 2 Panasonic ARC ES-LT3N Power Button Replacement: шаг 10, изображение 2 из 2
    • Remove the lock switch by sliding it downward until it is out of place.

  11. Panasonic ARC ES-LT3N Power Button Replacement: шаг 11, изображение 1 из 3 Panasonic ARC ES-LT3N Power Button Replacement: шаг 11, изображение 2 из 3 Panasonic ARC ES-LT3N Power Button Replacement: шаг 11, изображение 3 из 3
    • Starting from the bottom, lift the front casing upward to separate the case from the device.

    • Continue to lift the device upward until you can pull the casing off.

    • It may take some wiggling or slight bending of the plastic to remove all the way.

  12. Panasonic ARC ES-LT3N Power Button Replacement: шаг 12, изображение 1 из 3 Panasonic ARC ES-LT3N Power Button Replacement: шаг 12, изображение 2 из 3 Panasonic ARC ES-LT3N Power Button Replacement: шаг 12, изображение 3 из 3
    • Remove the button.

Заключение

To reassemble your device, follow these instructions in reverse order.

Andrew Trainor

Участник с: 03/05/17

603 Репутация

Автор 5 руководств

Команда

UMass Dartmouth, Team S8-G3, Catania Spring 2017 Участник UMass Dartmouth, Team S8-G3, Catania Spring 2017

UMASSD-CATANIA-S17S8G3

3 членов

Автор 5 руководств

0 Комментариев

Добавить комментарий

Просмотр статистики:

За последние 24часов: 0

За последние 7 дней: 0

За последние 30 дней: 6

За всё время: 430