Перейти к основному содержанию

Parrot AR.Drone 2.0 Central Cross Replacement

Выберете то, что вам нужно

Видео обзор

  1. Parrot AR.Drone 2.0 Central Cross Replacement, Mainboard and Navigation Board: шаг 1, изображение 1 из 1
    • Remove the foam body.

  2. Parrot AR.Drone 2.0 Central Cross Replacement: шаг 2, изображение 1 из 2 Parrot AR.Drone 2.0 Central Cross Replacement: шаг 2, изображение 2 из 2
    • Disconnect the battery by pulling the two red wires apart.

    • Remove the battery by releasing the battery retaining straps.

  3. Parrot AR.Drone 2.0 Central Cross Replacement: шаг 3, изображение 1 из 2 Parrot AR.Drone 2.0 Central Cross Replacement: шаг 3, изображение 2 из 2
    • Turn the drone upside down.

    • The cover is held on by plastic tape. Peel off the tape and use a spudger to remove the back cover.

  4. Parrot AR.Drone 2.0 Central Cross Replacement: шаг 4, изображение 1 из 3 Parrot AR.Drone 2.0 Central Cross Replacement: шаг 4, изображение 2 из 3 Parrot AR.Drone 2.0 Central Cross Replacement: шаг 4, изображение 3 из 3
    • Using a spudger, separate the connector for the downward camera.

    • Remove the camera from the body by pulling it off the foam body.

  5. Parrot AR.Drone 2.0 Central Cross Replacement: шаг 5, изображение 1 из 2 Parrot AR.Drone 2.0 Central Cross Replacement: шаг 5, изображение 2 из 2
    • Use a spudger to release the black retaining clip. Then disconnect the connector to the sensors.

    • Use tweezers to carefully remove the ribbon from the connector.

    How can I get that connector, the one it’s disconnected?

    gui txr - Ответить

  6. Parrot AR.Drone 2.0 Central Cross Replacement: шаг 6, изображение 1 из 1
    • Remove the four 8mm torx screws with a T6 bit.

    • Remove the four 8mm philips head screws with a PH00 bit.

  7. Parrot AR.Drone 2.0 Central Cross Replacement: шаг 7, изображение 1 из 2 Parrot AR.Drone 2.0 Central Cross Replacement: шаг 7, изображение 2 из 2
    • Carefully pull the secondary board from the mainboard.

  8. Parrot AR.Drone 2.0 Central Cross Replacement: шаг 8, изображение 1 из 3 Parrot AR.Drone 2.0 Central Cross Replacement: шаг 8, изображение 2 из 3 Parrot AR.Drone 2.0 Central Cross Replacement: шаг 8, изображение 3 из 3
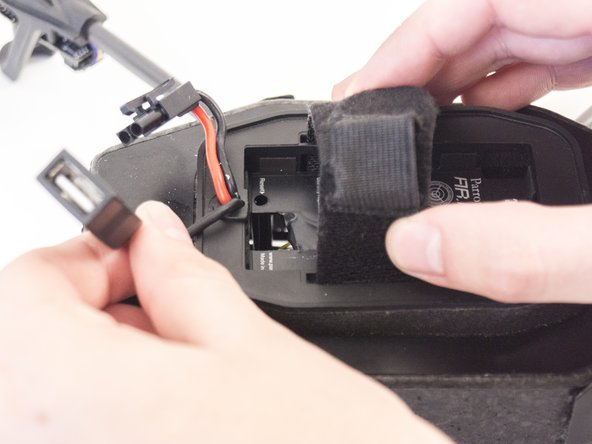
    • Turn the drone right side up

    • Remove the USB connector from the battery retaining straps.

  9. Parrot AR.Drone 2.0 Central Cross Replacement: шаг 9, изображение 1 из 1
    • Release the rubber clip holding the USB and battery power cable to the body.

  10. Parrot AR.Drone 2.0 Central Cross Replacement: шаг 10, изображение 1 из 2 Parrot AR.Drone 2.0 Central Cross Replacement: шаг 10, изображение 2 из 2
    • Avoid using sharp tools near the battery.

    • Push the USB and power cable through the battery panel.

  11. Parrot AR.Drone 2.0 Central Cross Replacement: шаг 11, изображение 1 из 2 Parrot AR.Drone 2.0 Central Cross Replacement: шаг 11, изображение 2 из 2
    • Turn the drone upside down again.

    • Use a spudger to release the connector and carefully remove the ribbon.

  12. Parrot AR.Drone 2.0 Central Cross Replacement: шаг 12, изображение 1 из 2 Parrot AR.Drone 2.0 Central Cross Replacement: шаг 12, изображение 2 из 2
    • Lift the mainboard up so that you can access the back.

    • Disconnect the first connector with the white wires using a nylon spudger.

    • Disconnect the second connector with the red and black wires using a spudger.

  13. Parrot AR.Drone 2.0 Central Cross Replacement: шаг 13, изображение 1 из 1
    • The mainboard is now fully detached and can be removed.

  14. Parrot AR.Drone 2.0 Central Cross Replacement, Central Cross: шаг 14, изображение 1 из 1
    • Using a nylon spudger, peel off the four pieces of plastic securing the frame to the body.

  15. Parrot AR.Drone 2.0 Central Cross Replacement: шаг 15, изображение 1 из 1
    • Carefully maneuver the four arms of the drone’s central cross until it detaches from the body by pulling apart the foam surrounding the arms.

    between arm 1 and arm 2 there is a little triangle on the central cross, that should point to the front.

    deebee122 - Ответить

  16. Parrot AR.Drone 2.0 Central Cross Replacement: шаг 16, изображение 1 из 1
    • The central cross can now be removed and replaced.

    between arm 1 and arm 2 there is a little triangle on the central cross, that should point to the front.

    deebee122 - Ответить

Заключение

To reassemble your device, follow these instructions in reverse order.

4 участников успешно повторили данное руководство.

David Hoyt

Участник с: 04/09/10

4 023 Репутация

Автор 43 руководств

Команда

Cal Poly, Team 25-89, Amido Spring 2010 Участник Cal Poly, Team 25-89, Amido Spring 2010

CPSU-AMIDO-S10S25G89

4 членов

Автор 63 руководств

2 Комментариев

If the crossbones are off just a bit would that effect the flight?

John Wurst - Ответить

So once I have removed the central cross, how do I put it all back together again?? I feel as though this is letting your guide down!!!!

Jacob Kenworthy - Ответить

Добавить комментарий

Просмотр статистики:

За последние 24часов: 0

За последние 7 дней: 1

За последние 30 дней: 3

За всё время: 6,137