Выберете то, что вам нужно
-
-
Wedge an opening tool between the case of the watch, and the glass screen bezel.
-
Pry the screen bezel away from the device.
-
-
-
Pull the screen protector away from the device, breaking glue sealant.
-
Separate the screen protector from the screen.
-
-
-
Insert a prying tool between the bezel ring and the e-paper screen. Move the tool around the circumference of the ring until it separates from the e-paper screen.
-
-
-
Инструмент, используемый на этом этапе:Tweezers$4.99
-
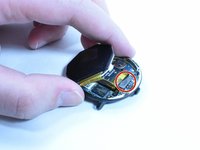
Slightly lift the screen and you will see a yellow cable that connects to the motherboard.
-
Use a pair of tweezers to carefully pull the cable up from the motherboard to disconnect it.
-
-
-
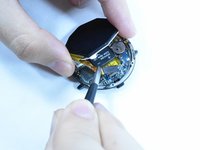
Use tweezers to disconnect the small yellow wire from the top of the e-paper screen.
-
The wire is connected with a bit of glue, so it will come off with ease.
-
-
-
Remove the three screws that hold the motherboard down using a Phillips #000 screwdriver.
-
-
-
Remove the cable connecting the motherboard vibration motor, microphone, and light sensor.
-
Remove the motherboard from the device.
-


To reassemble your device, follow these instructions in reverse order.
Отменить: Я не выполнил это руководство.
Еще один человек закончил это руководство.
Команда

UMass Dartmouth, Team 4-5, Gulbrandsen Fall 2021 Участник UMass Dartmouth, Team 4-5, Gulbrandsen Fall 2021
UMASSD-GULBRANDSEN-F21S4G5
4 членов
Автор 5 руководств