Эта версия возможно содержит некорректные исправления. Переключить на последнюю проверенную версию.
Выберете то, что вам нужно
-
Этот шаг не переведен. Помогите перевести
-
Locate the plastic warranty sticker next to the three ports on the side of the console.
-
Remove the warranty sticker by peeling it off with any kind of spudger.
-
-
Этот шаг не переведен. Помогите перевести
-
Unscrew and remove the now exposed 5.0mm screw using a T8 security Torx screwdriver with a counter-clockwise motion.
-
-
Этот шаг не переведен. Помогите перевести
-
Place the Playstation 4 Slim upside down with the side of the screw you just removed facing you.
-
Pry up on the two corners that are facing you with your fingers.
-
Remove the bottom cover by sliding it towards the back corners and lifting up.
-
-
Этот шаг не переведен. Помогите перевести
-
Place the Playstation 4 Slim right side up, with the PS logo on top and the side with the words "SONY" and "PS4" facing you.
-
Pry up on the two corners that are facing you with your fingers.
-
Remove the top cover by sliding it towards the back corners and lifting up.
-
-
Этот шаг не переведен. Помогите перевести
-
Unscrew and remove the two screws (left one 31.0mm and right one 24.0mm) using a T8 screwdriver with a counter-clockwise motion.
-
Unscrew and remove the 3.0mm screw using a Phillips #1 screwdriver with a counter-clockwise motion.
-
-
Этот шаг не переведен. Помогите перевести
-
Remove the four 16mm Philips screws holding the power supply in place.
-
-
Этот шаг не переведен. Помогите перевести
-
Remove the metal sheet from the top of the power supply by grabbing and lifting up with your hands.
-
-
-
Этот шаг не переведен. Помогите перевести
-
Remove the antenna from the top of the power supply by guiding the wire with your fingers through the groves underneath the metal panel.
-
-
Этот шаг не переведен. Помогите перевести
-
Flip the Playstation 4 Slim onto its back.
-
Unscrew and remove the 4.0mm screw using a Phillips #1 screwdriver with a counter-clockwise motion.
-
-
Этот шаг не переведен. Помогите перевести
-
Use a plastic opening tool to make space between the power supply and console by wedging and wiggling it in-between the two.
-
Lift the power supply up and onto its back on the metal sheet using your hands.
-
-
Этот шаг не переведен. Помогите перевести
-
Disconnect the wire connection from the power supply by firmly gripping it with your fingers or tweezers and pulling out.
-
Remove the power supply completely by grabbing and lifting up with your hands.
-
-
Этот шаг не переведен. Помогите перевести
-
Unscrew and remove the 31.0mm safety screw using a T8 screwdriver with a counter-clockwise motion.
-
-
Этот шаг не переведен. Помогите перевести
-
Locate the two wires connected to the bottom of the motherboard.
-
Remove the wires by firmly grasping the metal connections with your fingers or tweezers and pulling up until they disconnect.
-
-
Этот шаг не переведен. Помогите перевести
-
Flip the device to the backside.
-
Unscrew and remove 14x (19x for CUH-21xx) 4.0mm black screws using a Phillips #1 screwdriver with a counter-clockwise motion.
-
Unscrew and remove 8x (7x for CUH-21xx) 6.0mm silver screws using a Phillips #1 screwdriver with a counter-clockwise motion.
-
Unscrew and remove 4x 3.0mm silver screws using a Phillips #1 screwdriver with a counter-clockwise motion.
-
-
Этот шаг не переведен. Помогите перевести
-
Unscrew and remove the two 5.0mm screws on the side of the console using a Phillips #1 screwdriver with a counter-clockwise motion.
-
-
Этот шаг не переведен. Помогите перевести
-
Locate the white wire connected to the corner of the top of the motherboard.
-
Disconnect the wire by firmly grasping the metal connection with your fingers or tweezers and pulling up until it detaches.
-
Unthread the wire from the tape and move it off to the side using tweezers or your fingers.
-
-
Этот шаг не переведен. Помогите перевести
-
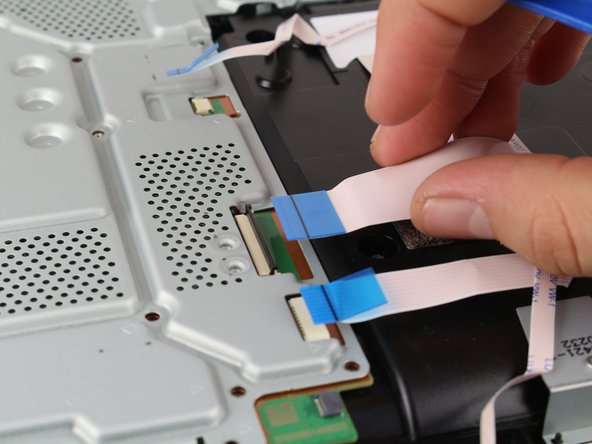
Remove the connections by pulling out on the blue tabs with your fingers.
-
Flip up the black clip on the largest tab with your finger before removing it.
-
Remove this wire connection by firmly gripping the wire with your fingers and pulling it out.
-
-
Этот шаг не переведен. Помогите перевести
-
Remove the metal plate by grabbing two sides of the plate and lifting up and away from yourself.
-
-
Этот шаг не переведен. Помогите перевести
-
Unscrew and remove the two 10.0mm screws (one silver and one black) using a Phillips #1 screwdriver with a counter-clockwise motion.
-
Remove the small metal plate by grabbing it with your fingers and lifting up.
-
-
Этот шаг не переведен. Помогите перевести
-
Remove this wire connection by firmly grasping it with tweezers and pulling out.
-
-
Этот шаг не переведен. Помогите перевести
-
Remove the motherboard by grabbing the edge of the board with one or two hands and pulling away and up.
-


Отменить: Я не выполнил это руководство.
62 участников успешно повторили данное руководство.
Команда

Cal Poly, Team S19-G4, Livingston Winter 2018 Участник Cal Poly, Team S19-G4, Livingston Winter 2018
CPSU-LIVINGSTON-W18S19G4
4 членов
Автор 35 руководств
10 Комментариев
Hi Harry
I think this guide is fantastic. My PS4 slim is not coming on. It’s not the HDMI display port or anything of the sort. It powers on, you hear the beep and the blue power light stays on. That’s all. Nothing after this… no signal to the TV, cannot reinitialise, nothing. I’ve checked online to see if I can diagnose it. Based on the few signs I’ve seen I think the board is gone. So am looking to replace that hence I came across your guide. Is there a way you know to be certain my board is faulty. Thanks
I have a PS4 slim issue…. when connected to power it doesn't show it’s on and no light displays….. I would say the board is faulty and how do I work on such problem.
do you need to change the optical drive as well?
my ps4 slim power supply ok no power motherboard