Перейти к основному содержанию

Polaroid PMID4312 Motherboard Replacement

Выберете то, что вам нужно

  1. Polaroid PMID4312 Motherboard Replacement, Battery: шаг 1, изображение 1 из 1
    • Pry the seam between the screen and the case and slide it on all four sides with a large plastic opening tool until the plastic case comes off.

  2. Polaroid PMID4312 Motherboard Replacement: шаг 2, изображение 1 из 1
    • Lift the device off of the case and flip over the device so that it sits screen side down.

  3. Polaroid PMID4312 Motherboard Replacement: шаг 3, изображение 1 из 1
    • The device is now free from the plastic case.

  4. Polaroid PMID4312 Motherboard Replacement: шаг 4, изображение 1 из 2 Polaroid PMID4312 Motherboard Replacement: шаг 4, изображение 2 из 2
    Инструмент, используемый на этом этапе:
    Plastic Cards
    $2.99
    Купить
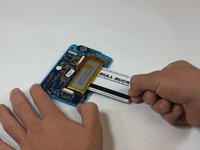
    • Wedge a plastic card beneath the battery unit and wiggle the card side to side and up and down gently until the glue sealing the battery to the device is broken.

  5. Polaroid PMID4312 Motherboard Replacement: шаг 5, изображение 1 из 1
    • Peel back any yellow tape not directly attached to the battery.

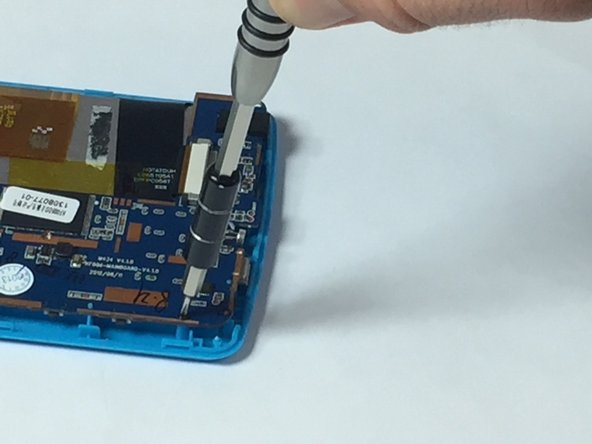
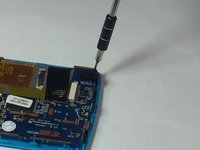
    • Using a soldering iron, desolder the two wires that connect the battery to the motherboard.

  6. Polaroid PMID4312 Motherboard Replacement, Speaker: шаг 6, изображение 1 из 2 Polaroid PMID4312 Motherboard Replacement, Speaker: шаг 6, изображение 2 из 2
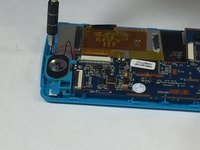
    • Remove the two 5mm screws attached to the top right and bottom left corners of the speaker

  7. Polaroid PMID4312 Motherboard Replacement: шаг 7, изображение 1 из 2 Polaroid PMID4312 Motherboard Replacement: шаг 7, изображение 2 из 2
    • Solder off the wires connecting the speaker to the device

  8. Polaroid PMID4312 Motherboard Replacement: шаг 8, изображение 1 из 1
    • Pull the speaker out of the casing to release it.

  9. Polaroid PMID4312 Motherboard Replacement, Motherboard: шаг 9, изображение 1 из 2 Polaroid PMID4312 Motherboard Replacement, Motherboard: шаг 9, изображение 2 из 2
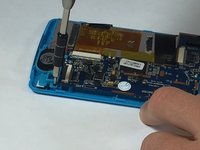
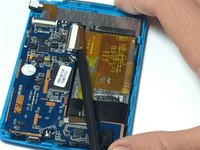
    • Using the ph#00 screwdriver, remove the four 5mm screws connecting the motherboard to the casing.

  10. Polaroid PMID4312 Motherboard Replacement: шаг 10, изображение 1 из 3 Polaroid PMID4312 Motherboard Replacement: шаг 10, изображение 2 из 3 Polaroid PMID4312 Motherboard Replacement: шаг 10, изображение 3 из 3
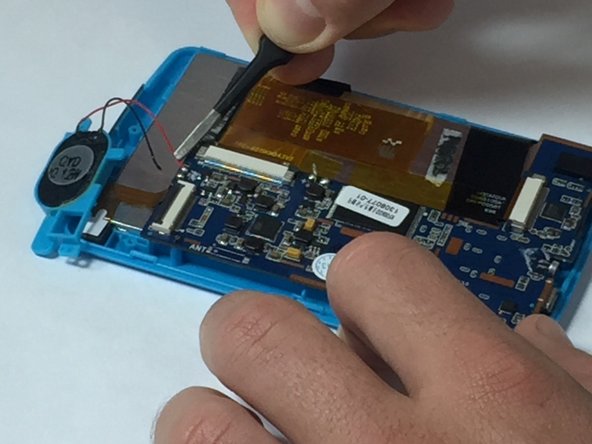
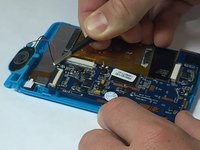
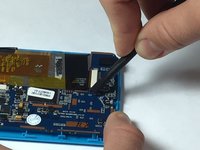
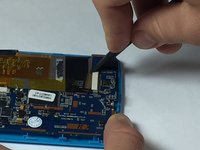
    • Using a spudger or a fingernail, detach the two ribbons from the motherboard by pushing the plastic tab away from the Zero Insertion Force connectors.

    • As the name implies, no force is needed to plug in or remove the cable.

    • Be sure you are prying the plastic tabs connected tab and not the connector itself.

  11. Polaroid PMID4312 Motherboard Replacement: шаг 11, изображение 1 из 1
    • Now carefully remove the motherboard.

Заключение

To reassemble your device, follow these instructions in reverse order.

Christopher Bertan

Участник с: 10/06/16

479 Репутация

Автор 4 руководств

Команда

USF Tampa, Team 5-4, Lacy Fall 2016 Участник USF Tampa, Team 5-4, Lacy Fall 2016

USFT-LACY-F16S5G4

4 членов

Автор 10 руководств

0 Комментариев

Добавить комментарий

Просмотр статистики:

За последние 24часов: 0

За последние 7 дней: 4

За последние 30 дней: 5

За всё время: 163