Перейти к основному содержанию

PowerBook 3400 M3553 Display Replacement

Выберете то, что вам нужно

  1. PowerBook 3400 M3553 Display Replacement, Battery: шаг 1, изображение 1 из 1
    • Close the screen and turn the PowerBook over, orienting the computer upside down, using the label to guide you.

  2. PowerBook 3400 M3553 Display Replacement: шаг 2, изображение 1 из 2 PowerBook 3400 M3553 Display Replacement: шаг 2, изображение 2 из 2
    • Hold the button on the front left side and slide the battery out.

  3. PowerBook 3400 M3553 Display Replacement, Keyboard: шаг 3, изображение 1 из 1
    • With a Torx T8 screwdriver, remove the three Torx 24mm screws along the center of the back panel.

  4. PowerBook 3400 M3553 Display Replacement: шаг 4, изображение 1 из 3 PowerBook 3400 M3553 Display Replacement: шаг 4, изображение 2 из 3 PowerBook 3400 M3553 Display Replacement: шаг 4, изображение 3 из 3
    • Turn the computer over and open the display. You should see that the keyboard is loose.

    • Before attempting to remove the keyboard, note that a ribbon cable connects the keyboard to the logic board. Improper removal may damage your keyboard.

    • Slightly lift the front of the keyboard up, and slide the keyboard towards yourself.

    • Carefully lift the top half of the keyboard and pull it towards yourself.

  5. PowerBook 3400 M3553 Display Replacement: шаг 5, изображение 1 из 2 PowerBook 3400 M3553 Display Replacement: шаг 5, изображение 2 из 2
    • Loosen the ribbon cables connecting the keyboard to the computer by using a plastic opening tool to lift the tabs on either side of the cable port.

    • Gently remove the ribbons from its tabs.

    I did find that, strictly speaking, you don’t need to remove the ribbons. If you carefully hold up the keyboard up towards the screen with one hand, you can remove the old RAM and install the new one with the other. I suppose you could also use a length of masking tape to hold the keyboard up.

    I found it easier not to remove the ribbon, especially as I couldn’t find my plastic opening tool.

    Scott - Ответить

  6. PowerBook 3400 M3553 Display Replacement, RAM: шаг 6, изображение 1 из 2 PowerBook 3400 M3553 Display Replacement, RAM: шаг 6, изображение 2 из 2
    • Gently wiggle the RAM card to loosen the connection until it pulls free.

  7. PowerBook 3400 M3553 Display Replacement, Speaker Panel: шаг 7, изображение 1 из 2 PowerBook 3400 M3553 Display Replacement, Speaker Panel: шаг 7, изображение 2 из 2
    • Disconnect the wires from the port.

    Speaker panel? I don’t think this is correct - I accidently pulled the black & red wires out from this part and sound still worked fine. Is this instead a battery connection?

    Matt - Ответить

  8. PowerBook 3400 M3553 Display Replacement: шаг 8, изображение 1 из 1
    • Remove the 7mm screw connecting the speaker panel to the computer.

  9. PowerBook 3400 M3553 Display Replacement: шаг 9, изображение 1 из 2 PowerBook 3400 M3553 Display Replacement: шаг 9, изображение 2 из 2
    • To detach the speaker panel's ribbon cable, use a plastic opening tool to lift the tabs on both sides of the cable port.

    • Once loose, pull the ribbon cable free.

  10. PowerBook 3400 M3553 Display Replacement: шаг 10, изображение 1 из 2 PowerBook 3400 M3553 Display Replacement: шаг 10, изображение 2 из 2
    • Lift the lighting/audio panel from it's bottom corners and pull the panel towards yourself.

  11. PowerBook 3400 M3553 Display Replacement, Display: шаг 11, изображение 1 из 1
    • Remove the panels on either side by gently but firmly pulling up on them with both hands.

    gently, because there is this tiny green connector board with its two little buttons for PCMCIA cards ejection stuck in directly under it/ hold in place.

    Jamba - Ответить

  12. PowerBook 3400 M3553 Display Replacement: шаг 12, изображение 1 из 2 PowerBook 3400 M3553 Display Replacement: шаг 12, изображение 2 из 2
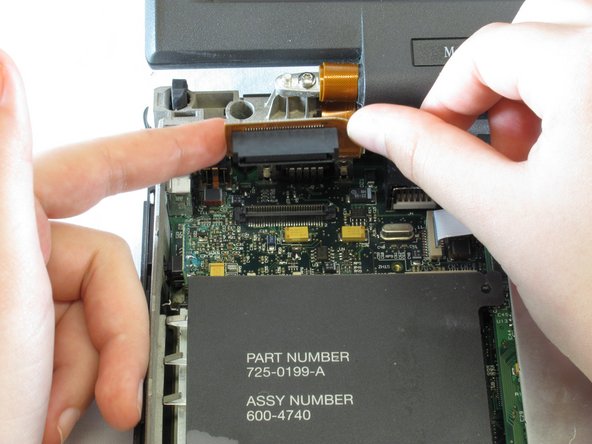
    • Gently pull up on the ribbon cable connection that connects the screen to the logic board.

  13. PowerBook 3400 M3553 Display Replacement: шаг 13, изображение 1 из 2 PowerBook 3400 M3553 Display Replacement: шаг 13, изображение 2 из 2
    • The two T8 13 mm torx screws hold the display screen in place. Be sure to remove the screws while supporting the screen or else it will fall.

    • Remove the two T8 13 mm long torx screws on either side of the display, located under the side panels.

    • Gently pull the display free of the computer.

Заключение

To replace the display, follow these instructions in reverse order.

Еще один человек закончил это руководство.

Michael Mondragon

Участник с: 04/12/11

274 Репутация

Автор 9 руководств

Команда

Cal Poly, Team 24-59, Amido Spring 2011 Участник Cal Poly, Team 24-59, Amido Spring 2011

CPSU-AMIDO-S11S24G59

4 членов

Автор 9 руководств

2 Комментариев

Note that the side panels should be placed back BEFORE the audio panel.

Stanislav Ambartsumov - Ответить

right, also I often had problems with placing the audio panel back into its place, it's three little plastic noses just didnt want to fit back into its notches of the back.

Jamba - Ответить

Добавить комментарий

Просмотр статистики:

За последние 24часов: 1

За последние 7 дней: 6

За последние 30 дней: 17

За всё время: 2,907