Перейти к основному содержанию

PowerLead Puto PLD003 Lens Replacement

Выберете то, что вам нужно

  1. PowerLead Puto PLD003 Lens Replacement, Side Panel: шаг 1, изображение 1 из 1
    • Slide the battery eject button open to release the battery door.

  2. PowerLead Puto PLD003 Lens Replacement: шаг 2, изображение 1 из 1
    • With the battery door open, carefully remove all four 5 mm Phillips #1 screws.

  3. PowerLead Puto PLD003 Lens Replacement: шаг 3, изображение 1 из 1
    • Rotate the camera so that the underside is facing up.

    • Remove the four 5 mm Phillips #1 screws.

  4. PowerLead Puto PLD003 Lens Replacement: шаг 4, изображение 1 из 1
    • Place the camera on a flat surface, with its underside facing you.

    • Gently pull up on the side panel to remove it from the camera.

  5. PowerLead Puto PLD003 Lens Replacement, Lens: шаг 5, изображение 1 из 2 PowerLead Puto PLD003 Lens Replacement, Lens: шаг 5, изображение 2 из 2
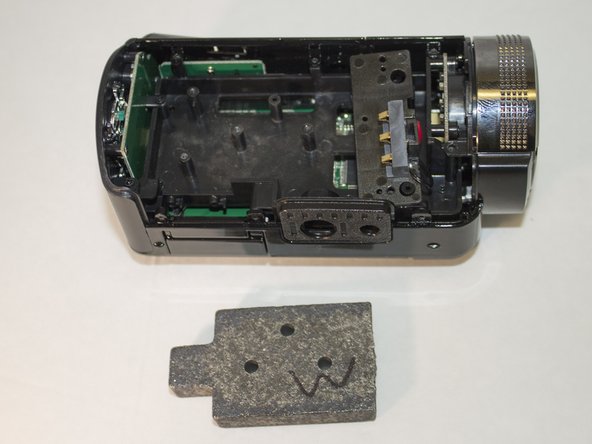
    • Remove the three 4 mm Phillips #1 screws holding the weight.

    • Remove the weight.

  6. PowerLead Puto PLD003 Lens Replacement: шаг 6, изображение 1 из 1
    • Remove the two 4 mm Phillips #1 screws holding the back panel in place.

  7. PowerLead Puto PLD003 Lens Replacement: шаг 7, изображение 1 из 1
    • Apply pressure to the back panel (away from the camera) to remove.

  8. PowerLead Puto PLD003 Lens Replacement: шаг 8, изображение 1 из 1
    • Set aside back panel for now.

    • Remove the final 4 mm Phillips #1 screw holding the screen in place. It is very small and hard to see.

  9. PowerLead Puto PLD003 Lens Replacement: шаг 9, изображение 1 из 1
    • Carefully apply pressure, away from the camera, to the screen to detach it from the body.

    • The white cord should still be connected to the body.

    • OPTIONAL: Remove the screen to make accessing the lens easier

  10. PowerLead Puto PLD003 Lens Replacement: шаг 10, изображение 1 из 1
    • Unscrew the two 4 mm Phillips #1 screws holding onto the lens casing

    • There are also two 4 mm Phillips #1 screws on the other side holding onto the lens casing, remove them as well.

  11. PowerLead Puto PLD003 Lens Replacement: шаг 11, изображение 1 из 1
    • Pull forward on the lens casing to remove it. The cord connecting the light to the motherboard should still be attached.

  12. PowerLead Puto PLD003 Lens Replacement: шаг 12, изображение 1 из 1
    • Unscrew the three 4 mm Phillips #1 screws holding the plastic lens holder.

  13. PowerLead Puto PLD003 Lens Replacement: шаг 13, изображение 1 из 1
    • Remove the plastic lens holder.

  14. PowerLead Puto PLD003 Lens Replacement: шаг 14, изображение 1 из 1
    • Push the lens out of the plastic casing from the back.

    • Insert new lens into the plastic casing.

Заключение

To reassemble your device, follow these instructions in reverse order.

Justin Tew

Участник с: 03/31/16

767 Репутация

Автор 7 руководств

Команда

Eastern Washington University, Team 1-2, Giguere Spring 2016 Участник Eastern Washington University, Team 1-2, Giguere Spring 2016

EWU-GIGUERE-S16S1G2

4 членов

Автор 7 руководств

0 Комментариев

Добавить комментарий

Просмотр статистики:

За последние 24часов: 0

За последние 7 дней: 1

За последние 30 дней: 1

За всё время: 164