Перейти к основному содержанию

ProntoTec Axius Battery Replacement

Выберете то, что вам нужно

  1. ProntoTec Axius Battery Replacement, Battery: шаг 1, изображение 1 из 1
    • Make sure the device is completely turned off before you begging taking it apart to avoid electrocution risks.

    • Place the tablet face-up on a flat table

  2. ProntoTec Axius Battery Replacement: шаг 2, изображение 1 из 1
    • Starting near the headphone port, fit the flat end of the spudger in between the screen and back case.

    • Pry the back case from the screen around each point on the device to release the clips securing the case halves to each other.

  3. ProntoTec Axius Battery Replacement: шаг 3, изображение 1 из 1
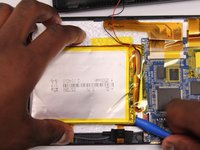
    • Gently remove the back case of the device and lay it in a flat surface as shown in the photo.

    • Make sure not to sever the wires (red and black) connected to the speaker that is located in the back case.

  4. ProntoTec Axius Battery Replacement: шаг 4, изображение 1 из 1
    • Using a spudger remove all the tapes that touches the battery.

    • Be careful not to cute any wires that are under the tapes

  5. ProntoTec Axius Battery Replacement: шаг 5, изображение 1 из 1
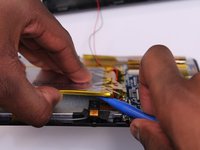
    • Using a soldering iron, heat up the contact point of the red wire from the battery and the motherboard.

    • When the solder begins to melt, use pliers to gently pull the wire from the motherboard

    • Don't leave the soldering iron too long on top of the wire so it doesn't melt any other component in the motherboard or surrounding the area.

  6. ProntoTec Axius Battery Replacement: шаг 6, изображение 1 из 1
    • Repeat Step 5 on the black wire connecting the battery to the motherboard as shown in the photo.

    • Don't leave the soldering iron too long on top of the wire so it doesn't melt any other component in the motherboard or surrounding the area.

  7. ProntoTec Axius Battery Replacement: шаг 7, изображение 1 из 2 ProntoTec Axius Battery Replacement: шаг 7, изображение 2 из 2
    • Using a spudger, gently pry the battery from the back of the screen to remove it from the device.

Заключение

To reassemble your device, follow these instructions in reverse order.

Antonio Irons

Участник с: 10/20/16

441 Репутация

Автор 4 руководств

Команда

UMass Dartmouth, Team 5-3, Martin Fall 2016 Участник UMass Dartmouth, Team 5-3, Martin Fall 2016

UMASSD-MARTIN-F16S5G3

3 членов

Автор 10 руководств

0 Комментариев

Добавить комментарий

Просмотр статистики:

За последние 24часов: 0

За последние 7 дней: 0

За последние 30 дней: 1

За всё время: 292