Введение
This guide describes how to replace the Puritan Bennett 840 Re/X800 Expiratory Bacterial Filter.
The expiratory filter is responsible for filtering out impurities and particulates from the gas or airflow within the ventilator, and redirects said impurities into the collector vial.
Before completing the replacement, it is important that you are familiarized with the expiratory filter and collector vial system. Please ensure that all safety measures are followed to replace the filter successfully.
There are two types of expiratory filters–reusable filters and single-use filters. Single-use filters must be discarded each time the collector vial must be emptied. Reusable filters must be sterilized using a steam autoclave. These instructions are applicable to both types of filters, providing that the user understands how to use autoclaves.
For more information on replacing the expiratory filter, please refer to page 8-76 (section 8.15.9.1) in the service manual.
Выберете то, что вам нужно
-
-
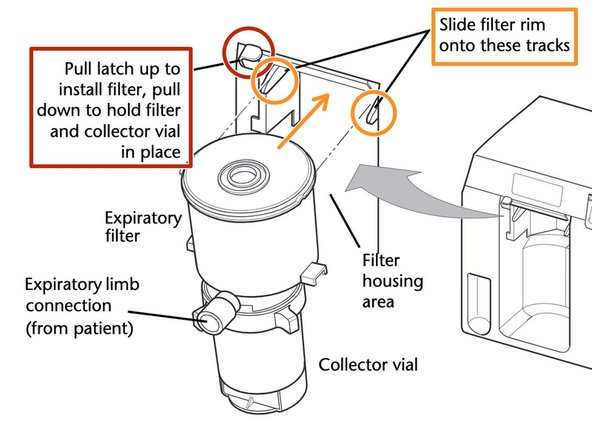
Locate the expiratory filter system inside the patient circuit. It is a cylindrical object that sits inside the housing as shown.
-
-
-
Once the expiratory filter has been located, find the latch that sits on the outside edge of the housing area (see picture).
-
Gently push this latch upward, and slide the filter out of the housing.
-
-
-
Once the expiratory filter has been removed from the housing, detach the expiratory filter system from the patient circuit expiratory limb tubing.
-
-
-
Obtain a new expiratory filter intended for the replacement.
-
This can either be a new single-use expiratory filter, or a reusable filter that has been sterilized using an autoclave.
-
-
-
Locate the same latch used in Step 1, and lift it up gently.
-
Slide the new expiratory filter system into the housing so that the rims rest on the ridges inside the housing.
-
-
-
Once the expiratory filter system is inside the housing, push the latch down gently and ensure that the filter stays in place.
-
Locate the expiratory limb tubing in the patient circuit, and attach it to the fitting on the outside of the expiratory filter.
-
-
-
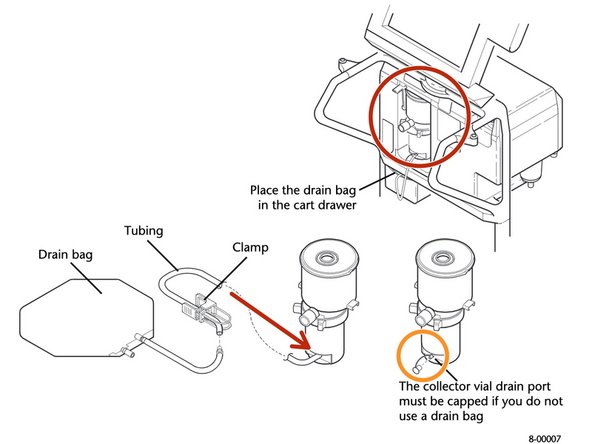
If your ventilator uses a drain bag, attach the drain bag to the collector vial as shown, which is placed underneath the expiratory filter system.
-
If a drain bag is not used, make sure to cap the bottom outlet of the collector vial.
-


Once all steps are completed and the filter has been replaced, run an SST circuit leak test to ensure that the expiratory limb tubing, drain bag tubing, or any other components are sealed tightly. A circuit leak test should be conducted each time the filter is replaced.
Once all steps are completed and the filter has been replaced, run an SST circuit leak test to ensure that the expiratory limb tubing, drain bag tubing, or any other components are sealed tightly. A circuit leak test should be conducted each time the filter is replaced.
Отменить: Я не выполнил это руководство.
Еще один человек закончил это руководство.

Команда

Cal Poly, Team S7-G4, Paton Spring 2020 Участник Cal Poly, Team S7-G4, Paton Spring 2020
CPSU-PATON-S20S7G4
3 членов
Автор 3 руководств