Эта версия возможно содержит некорректные исправления. Переключить на последнюю проверенную версию.
Выберете то, что вам нужно
-
Этот шаг не переведен. Помогите перевести
-
Turn the laptop upside down and gently lay it down on a flat surface.
-
Slide the battery release latch to the right and the battery will pop up slightly.
-
While keeping the latch slid with one hand, grab the battery with the other hand and remove it by pivoting it upward.
-
-
Этот шаг не переведен. Помогите перевести
-
Remove the Phillips PM2.0×4.0 screw using a PH#00 screwdriver.
-
-
Этот шаг не переведен. Помогите перевести
-
With an opening tool pry off the tabs that secure the service door to the base enclosure. Start with the long edge.
-
Continue along the short edges.
-
Once you have pried the service door off as it is in pic#3, it will come out of the rear edge very easily.
-
-
-
Этот шаг не переведен. Помогите перевести
-
RAM memory modules
-
HDD (Hard Disk Drive)
-
mSATA SSD slot
-
Wifi & BT module (Wireless card)
-
-
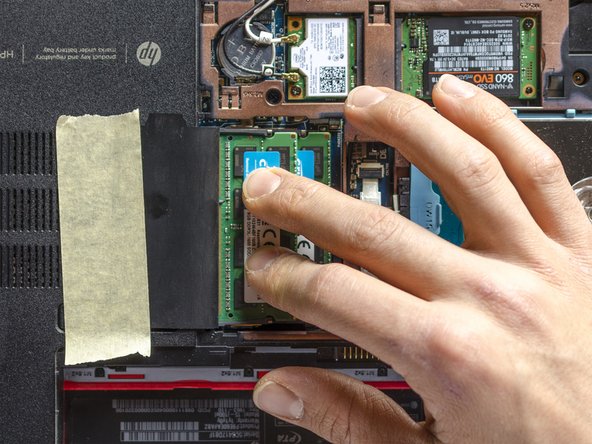
Этот шаг не переведен. Помогите перевести
-
Without bending it, gently turn the RAM modules' protective flap to the left and stick it to the base enclosure with a piece of adhesive tape.
-
-
Этот шаг не переведен. Помогите перевести
-
Take the spudger and place it over the bottom retaining arm so that the former can have a good grip on the latter. When you feel the grip, straightly towards yourself and quite forcefully, push the retaining arm off. You are going to hear a tiny click when the arm will be detached.
-
Repeat the last operation on the top retaining arm. This time pushing it off towards the opposite direction: as soon as you released the second arm also, the memory module will tilt up immediately.
-
The top memory module is now released, and, if you're grounded, you can take it out of its slot. Grab the module as it is shown in pic#3 and - maintaining its inclination and making it lightly and repeatedly swing as a pendulum (btw left and right, as the bent blue arrow tries to show) - pull it out and put it away.
-
-
Этот шаг не переведен. Помогите перевести
-
Repeat the same process on the bottom memory module in order to remove that one too.
-
-
Этот шаг не переведен. Помогите перевести
-
Are you grounded? If yes, take one of the new memory modules and align it with the connector by the correct side: the close-to-the-middle indentation of the module has to face the highlighted pin.
-
Then, keeping it tilted and carrying on the "pendulum" movement, gently push the module inside the slot. STOP when you feel you can't go any further: the new memory module should be now tilted and totally inside the connector - as it is shown in pic#2 - and the indentation of the module should almost be attached to the centring pin.
-
Once that the module is so positioned, gently press it down pushing it in the middle with your fingers until you hear a loud click: that sound means that the retaining arms have correctly grabbed the module and that the latter one has been successfully inserted!
-
-
Этот шаг не переведен. Помогите перевести
-
Repeat the same process in order to insert the remaining module and it's done!
-