Перейти к основному содержанию

RCA 8 Apollo Volume Button Replacement

Выберете то, что вам нужно

  1. RCA 8 Apollo Volume Button Replacement, Back Panel: шаг 1, изображение 1 из 1
    • Before you begin, discharge your tablet battery below 25%. A charged lithium-ion battery can catch fire and/or explode if accidentally punctured.

    • Power off your tablet before beginning to disassemble.

  2. RCA 8 Apollo Volume Button Replacement: шаг 2, изображение 1 из 2 RCA 8 Apollo Volume Button Replacement: шаг 2, изображение 2 из 2
    • Insert an iFixit opening tool into the gap between the tablet and back panel.

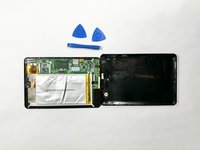
    • Using a combination of iFixit opening tools and iFixit opening picks, pry the tablet upward around its perimeter to release it from the plastic rear case.

    • If inserted too far, an opening pick can damage your device. It is helpful to mark the edge with an opening pick, or opening tool at a depth that will not damage the inner contents of the tablet.

  3. RCA 8 Apollo Volume Button Replacement: шаг 3, изображение 1 из 2 RCA 8 Apollo Volume Button Replacement: шаг 3, изображение 2 из 2
    • Disconnect the red and black speaker wires from the tablet.

    • The front and back of the tablet will be disconnected.

  4. RCA 8 Apollo Volume Button Replacement, Volume Button: шаг 4, изображение 1 из 1
    • The volume button control pad is located in the back panel, on the right side of the tablet.

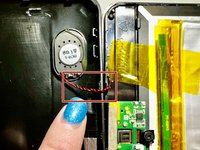
    • Push on the outside of the volume button control pad and it will simply loosen and detach.

Заключение

To reassemble your device, follow these instructions in reverse order.

Brooke Still

Участник с: 04/12/24

123 Репутация

1 руководство автора

Команда

Casper College, Team 1-1, Lareau Spring 2024 Участник Casper College, Team 1-1, Lareau Spring 2024

CASC-LAREAU-S24S1G1

3 членов

Автор 4 руководств

0 Комментарии к руководству

Добавить комментарий

Статистика просмотров:

За последние 24 часов: 0

За последние 7 дней: 2

За последние 30 дней: 7

За всё время: 81