Введение
Use this guide to replace a full or faulty solid state drive (SSD) in your Razer Book 13.
The SSD is a piece of hardware that stores and retrieves data in your computer. A failing SSD can cause your laptop to produce crashes or error messages like “file not found” or “file could not be moved.” In some cases, the computer may not boot at all which will require a new SSD to be installed.
This laptop comes with a limited size NVMe M.2 SSD with up to 500 GB. If you are running low on storage, you may want to use this guide to upgrade to a higher storage capacity.
This guide will not cover transferring of data from the old SSD to the new one or the installation of an operating system. Before starting the guide, make sure the computer is turned off and you are statically discharged.
Выберете то, что вам нужно
-
-
Remove the ten screws from the back plate of the laptop using a Torx T5 screwdriver.
-
-
-
Lift the front side of the back plate.
-
Lift the front edge slowly while you pry up each side.
-
-
-
-
Slide the backplate towards you while maintaining the lifted angle.
-
Remove the hook located in the center of the back plate.
-
-
-
Remove the warranty sticker.
-
Unscrew the Phillips head screw holding the SSD in place.
-
-
-
Slide the SSD out of its socket by pulling it to the left while slightly lifted.
-


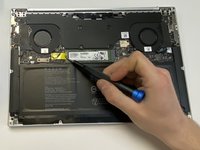
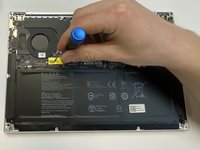


To reassemble your device, follow these instructions in reverse order.
Отменить: Я не выполнил это руководство.
4 человек успешно провели ремонт по этому руководству.


Команда

University of North Texas, Team S1-G16, Raign Spring 2021 Участник University of North Texas, Team S1-G16, Raign Spring 2021
UNT-RAIGN-S21S1G16
2 членов
Автор 1 руководств
3 Комментарии к руководству
Hey Wesley, I couldn't find any documentation, videos, or photos of the thermal pad placement on the Razer Book anywhere. Could you please take off the vapor chamber and take a photo of the pad placement for me? It would help me tons.
Hi! I have the Razer Blade Stealth 13” Mercury White Intel® Iris™ Plus Graphics with only 256 GB PCIe M.2 SSD.
Can I upgrade this to 1TB?
