Перейти к основному содержанию

Replace AirPort Time Capsule A1409 HDD

Выберете то, что вам нужно

  1. Replace AirPort Time Capsule A1409 HDD, Hard Disk Drive: шаг 1, изображение 1 из 3 Replace AirPort Time Capsule A1409 HDD, Hard Disk Drive: шаг 1, изображение 2 из 3 Replace AirPort Time Capsule A1409 HDD, Hard Disk Drive: шаг 1, изображение 3 из 3
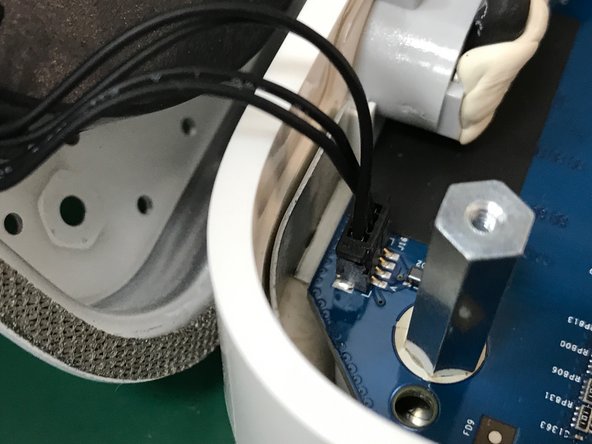
    • Put the unit upside down and take off the rubber bottom cover. It is better to start at a corner.

    • Rubber becomes brittle as it ages. Depending on air temperature and how set the adhesive is, you may need to spend some time warming the back plate with a hot plate (on low) or hair dryer.

  2. Replace AirPort Time Capsule A1409 HDD: шаг 2, изображение 1 из 3 Replace AirPort Time Capsule A1409 HDD: шаг 2, изображение 2 из 3 Replace AirPort Time Capsule A1409 HDD: шаг 2, изображение 3 из 3
    • Remove the # 10 Phillips # 00 screws that hold the Time Capsule's lower metal bracket.

    • Open to the left leaving the network connectors on that side. Do not open it fully to avoid breaking the fan cable.

  3. Replace AirPort Time Capsule A1409 HDD: шаг 3, изображение 1 из 2 Replace AirPort Time Capsule A1409 HDD: шаг 3, изображение 2 из 2
    • With the tip of a spudger carefully remove the fan connector then remove the metal bottom cover.

  4. Replace AirPort Time Capsule A1409 HDD: шаг 4, изображение 1 из 3 Replace AirPort Time Capsule A1409 HDD: шаг 4, изображение 2 из 3 Replace AirPort Time Capsule A1409 HDD: шаг 4, изображение 3 из 3
    • Find the temperature sensor on the surface of the hard disk.

    • Carefully remove the tape covering the temperature sensor.

  5. Replace AirPort Time Capsule A1409 HDD: шаг 5, изображение 1 из 2 Replace AirPort Time Capsule A1409 HDD: шаг 5, изображение 2 из 2
    • Remove the clip that holds the temperature sensor and remove both.

  6. Replace AirPort Time Capsule A1409 HDD: шаг 6, изображение 1 из 2 Replace AirPort Time Capsule A1409 HDD: шаг 6, изображение 2 из 2
    • Lift the hard drive a bit without pulling too hard to not cause damage to the power and data connectors of the hard disk. Removing the power connector from the hard drive

    • Remove the data connector from the hard disk.

  7. Replace AirPort Time Capsule A1409 HDD: шаг 7, изображение 1 из 2 Replace AirPort Time Capsule A1409 HDD: шаг 7, изображение 2 из 2
    • Once we have the disc out of the Time Capsule, we remove the 4 Phillips head # 00 pillars and place them in the new unit.

Заключение

To reassemble your gadget, follow these instructions backward.

38 участников успешно повторили данное руководство.

Особая благодарность этим переводчикам:

es en

100%

Эти переводчики помогают нам починить мир! Хотите внести свой вклад?
Начните переводить ›

David Medrano

Участник с: 12/22/13

1 441 Репутация

1 руководство автора

Команда

Tecnico Center Teatinos, S.L. Участник Tecnico Center Teatinos, S.L.

Business

1 член

Автор 3 руководств

12 Комментариев

I replaced a dead drive in about 30 mins following these instructions. The steps are clear, straight forward and the photos were extremely helpful. Many thanks as I now have a renovated AirPort Time Capsule.

Peter Long - Ответить

I just replaced the 2 TB WDC Green with a WD Red Pro 4 TB with this guide in less than 30 min. Except for the fan cable it was a cake walk.

Alex Senger - Ответить

Successfully upgraded my A1409 to a Western Digital - WD100PURZ - 5400 RPM Class SATA 6 Gb/s 256MB Cache 3.5. There are two additional steps: (a), there is a rubber strip around the original drive that reduces noise and protects the drive, gently remove from the original drive and place on the new drive; (b) once the rubber strip is on the drive, it is hard to get into place, angle the drive towards the connector side, and press in.

Brunob00 - Ответить

12 TB WD RED (inbuilt version WD120EMAZ) just confirmed for 1409 (G4 version).

you are welcome

AD G - Ответить

Hola. Reemplacé el disco con toda facilidad pero, desgraciadamente, la Utilidad AirPort no lo está reconociendo ni consigue borrarlo para activarlo. El HD nuevo es un WD Red de 10 TB. Si alguien puede ayudarme a resolver el problema, agradezco mucho.

I MM - Ответить

Добавить комментарий

Просмотр статистики:

За последние 24часов: 11

За последние 7 дней: 68

За последние 30 дней: 281

За всё время: 21,144