Перейти к основному содержанию

Replace Saeco Moltio heater

Выберете то, что вам нужно

  1. Replace Saeco Moltio heater, Decorative frame made of metal or plastic?: шаг 1, изображение 1 из 2 Replace Saeco Moltio heater, Decorative frame made of metal or plastic?: шаг 1, изображение 2 из 2
    • First check which model you have in front of you: is the decorative frame made of chromed metal (image 1) or made of metalized plastic (image 2). In the first case use this guide, in the second case use this guide. Then come back here.

    • Also make sure that the power plug is unplugged.

  2. Replace Saeco Moltio heater, Replace water heater: шаг 2, изображение 1 из 2 Replace Saeco Moltio heater, Replace water heater: шаг 2, изображение 2 из 2
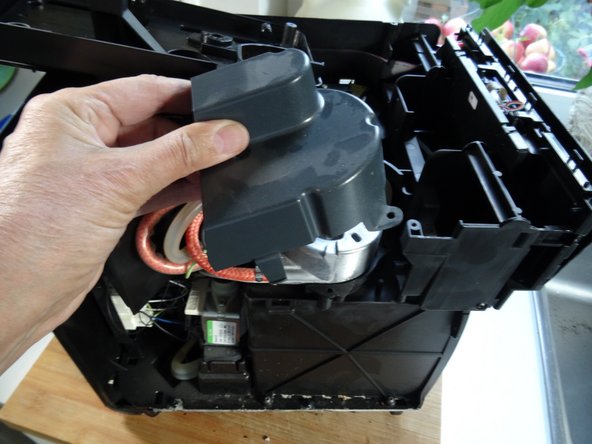
    • If the support plate for the exchangeable bean container has already been removed, you can skip this step.

    • The carrier plate is attached with five Torx T10 screws. turn them out.

    • Lift the carrier plate up and place it on the device.

    • Don't lift the plate all the way out yet. It is still connected to a sensor cable. The cable does not necessarily have to be detached.

  3. Replace Saeco Moltio heater: шаг 3, изображение 1 из 2 Replace Saeco Moltio heater: шаг 3, изображение 2 из 2
    • The instantaneous water heater is now clearly visible. It is still hidden under a gray plastic cover. The cover is attached with two latches. The one on the back is a bit difficult to access.

    • Press down on the tabs with your finger and lift off the cover.

  4. Replace Saeco Moltio heater: шаг 4, изображение 1 из 2 Replace Saeco Moltio heater: шаг 4, изображение 2 из 2
    • The holder of the instantaneous water heater is fastened with three Torx T10 screws. (The third is here covered by the heater). remove those.

    • The heater is attached to the support plate with a Torx T20 screw. remove that one.

  5. Replace Saeco Moltio heater: шаг 5, изображение 1 из 2 Replace Saeco Moltio heater: шаг 5, изображение 2 из 2
    • The Oetiker clamps on the hose connections must be cut open with side cutters.

    • Then pull off the hoses.

  6. Replace Saeco Moltio heater: шаг 6, изображение 1 из 1
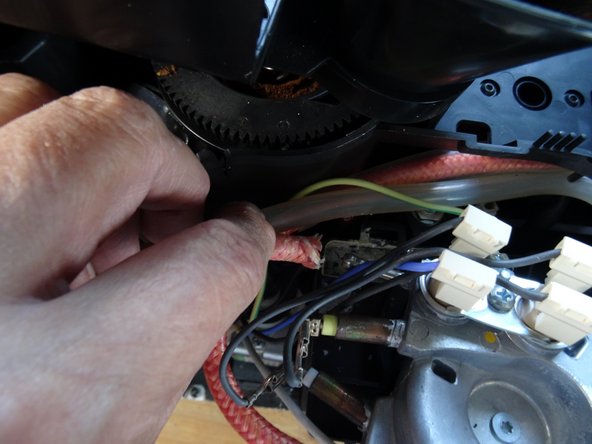
    • Remove the Phillips #2 screw on the thermal switch holder.

    • Lift off the holder and thermal switches.

    • Disconnect the spade connectors on the heater connections.

    • Apply thermal paste to the replacement part and attach the holder and thermal switches.

    • Plug in the flat plugs for the heater.

  7. Replace Saeco Moltio heater: шаг 7, изображение 1 из 2 Replace Saeco Moltio heater: шаг 7, изображение 2 из 2
    • When reassembling, the Oetiker clamps can be replaced with a 9mm hose clamp.

Заключение

Follow the steps in reverse order to reassemble your device.

Еще один человек закончил это руководство.

Особая благодарность этим переводчикам:

de en

100%

oldturkey03помогает нам починить мир! Хотите внести свой вклад?
Начните переводить ›

VauWeh

Участник с: 10/19/15

203 941 Репутация

Автор 246 руководств

Команда

Repair is War on Entropy Участник Repair is War on Entropy

Community

25 членов

Автор 1 129 руководств

Один комментарий

es gibt auch noch auf der unterseite des Erhitzers einen Thermosensor, der ebenfalls entfernt und mit Wärmeleitpaste an dem Austauschteil befestigt werden muss

Hermann Floerchinger - Ответить

Добавить комментарий

Просмотр статистики:

За последние 24часов: 0

За последние 7 дней: 9

За последние 30 дней: 26

За всё время: 778