Введение
This guide will show how to replace the camera assembly for the Ricoh Theta S. Be aware that any replacement of disassembly of the original product may void the manufacturer warranty.
Выберете то, что вам нужно
-
-
Wedge the spudger underneath the small plastic square located on the bottom of the device.
-
Move the spudger to remove the plastic cover.
-
-
-
Remove the four 3-mm screws located on the bottom of the device. You will need to use the Phillips 00 screwdriver.
-
-
-
Insert the plastic opening tool in between the panels shown.
-
Apply pressure to unlatch the 9 spring clips located around the perimeter of the device.
-
Lift the panel from the device.
-
-
-
-
Remove the two 3mm Phillips screws, with the Phillips 00 Screwdriver.
-
-
-
Gently lift the camera assembly from the device until the ribbon cable connections are accessible.
-
Peel back the piece of tape securing the microphone wire the the circuit board.
-
-
-
Find the two ribbon cable connectors located on each side of the device.
-
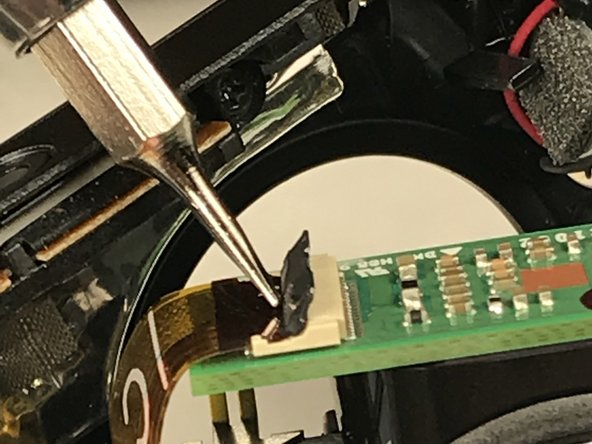
Using a plastic spudger, gently lift the black plastic piece of the connector.
-
-
-
Carefully detach the two ribbons cables from their connectors to remove the camera assembly.
-


To reassemble your device, follow these instructions in reverse order.
To reassemble your device, follow these instructions in reverse order.
Отменить: Я не выполнил это руководство.
5 участников успешно повторили данное руководство.
Команда

IUPUI, Team S3-G1, Harley Fall 2017 Участник IUPUI, Team S3-G1, Harley Fall 2017
IUPUI-HARLEY-F17S3G1
3 членов
Автор 4 руководств
12 Комментариев
Hello, is there a way to replace the glass the cover the lens? I Have 2 Ricoh Theta, one the glass is broken and other has a scratch that shows in every image… so I want to replace the scratched glass with the good one of the other camera
I also have same issue… Broke part of my glass, will like to find out if its possible to replace just one part of it….
I have one with a shattered lens and took it appart to check…. glass seems to be permanently fixed to optical block with very strong epoxi resin and doesn’t seem to be replaceable even if you manage to clean up, the problem is how to remove a good lens for transplant, without breaking it.