Перейти к основному содержанию

Samsung Captivate Glide Motherboard Replacement

Выберете то, что вам нужно

  1. Samsung Captivate Glide Motherboard Replacement, Motherboard: шаг 1, изображение 1 из 3 Samsung Captivate Glide Motherboard Replacement, Motherboard: шаг 1, изображение 2 из 3 Samsung Captivate Glide Motherboard Replacement, Motherboard: шаг 1, изображение 3 из 3
    • Remove back cover using fingernail or plastic opening tool. The cover pulls up and off.

  2. Samsung Captivate Glide Motherboard Replacement: шаг 2, изображение 1 из 2 Samsung Captivate Glide Motherboard Replacement: шаг 2, изображение 2 из 2
    • Remove battery with plastic opening tool or finger.

  3. Samsung Captivate Glide Motherboard Replacement: шаг 3, изображение 1 из 2 Samsung Captivate Glide Motherboard Replacement: шаг 3, изображение 2 из 2
    • Remove the seven screws from backplate using the #00 screwdriver.

  4. Samsung Captivate Glide Motherboard Replacement: шаг 4, изображение 1 из 3 Samsung Captivate Glide Motherboard Replacement: шаг 4, изображение 2 из 3 Samsung Captivate Glide Motherboard Replacement: шаг 4, изображение 3 из 3
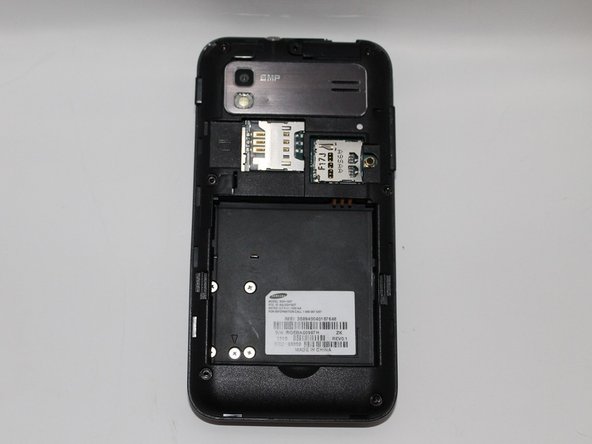
    • Remove the back plate using the plastic opening tool.

    • There is a lip on each side, and both must be pried up.

    • You can work your way around the edges after prying the two sides.

  5. Samsung Captivate Glide Motherboard Replacement: шаг 5, изображение 1 из 2 Samsung Captivate Glide Motherboard Replacement: шаг 5, изображение 2 из 2
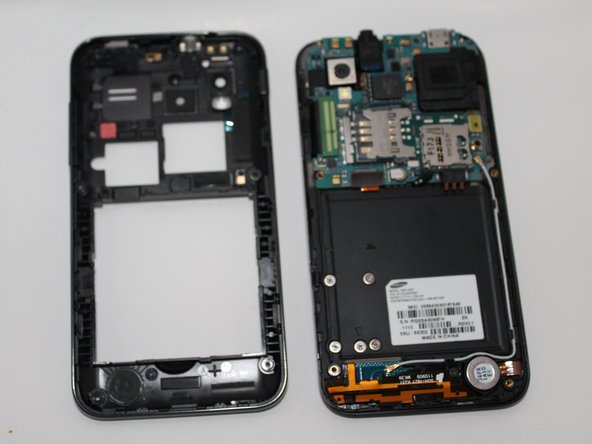
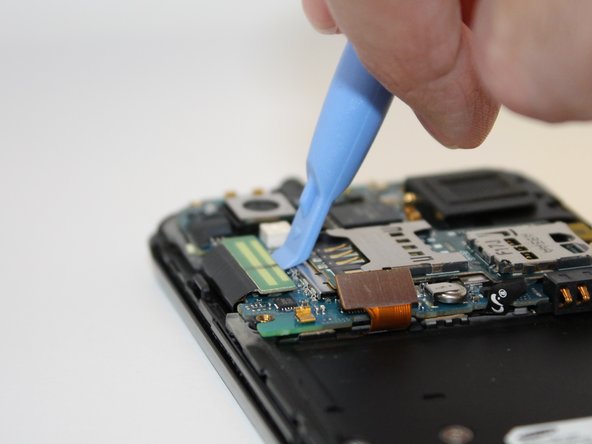
    • Use the plastic opening tool to detach the two tabs connecting the motherboard to the base of the phone.

  6. Samsung Captivate Glide Motherboard Replacement: шаг 6, изображение 1 из 1
    • Disconnect the antenna cable from the motherboard using tweezers.

  7. Samsung Captivate Glide Motherboard Replacement: шаг 7, изображение 1 из 1
    • Remove the single screw connecting the motherboard to the base of the phone by using the #00 Phillips screwdriver.

  8. Samsung Captivate Glide Motherboard Replacement: шаг 8, изображение 1 из 2 Samsung Captivate Glide Motherboard Replacement: шаг 8, изображение 2 из 2
    • Lift the motherboard out of the base of the phone.

Заключение

To reassemble your device, follow these instructions in reverse order.

Еще один человек закончил это руководство.

Nicholas Mira

Участник с: 09/23/14

289 Репутация

Автор 2 руководств

Команда

USF Tampa, Team 5-3, Mcgee Fall 2014 Участник USF Tampa, Team 5-3, Mcgee Fall 2014

USFT-MCGEE-F14S5G3

4 членов

Автор 5 руководств

0 Комментариев

Добавить комментарий

Просмотр статистики:

За последние 24часов: 0

За последние 7 дней: 0

За последние 30 дней: 2

За всё время: 743