Перейти к основному содержанию

Samsung Galaxy A20e Display Replacement

Выберете то, что вам нужно

  1. Samsung Galaxy A20e Display Replacement, Display: шаг 1, изображение 1 из 2 Samsung Galaxy A20e Display Replacement, Display: шаг 1, изображение 2 из 2
    • Remove the SIM and MicroSD tray.

  2. Samsung Galaxy A20e Display Replacement: шаг 2, изображение 1 из 2 Samsung Galaxy A20e Display Replacement: шаг 2, изображение 2 из 2
    • Release the back cover with the help of a thin blade or a Jimmy. Insert the tool between the frame display and the cover unclipping it along the entire perimeter.

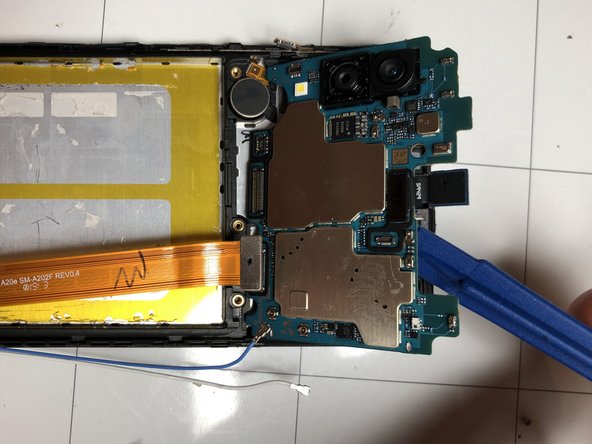
    • Insert a Jimmy between the display frame and the side shell and slide it along the edge, in order to completely disengage the two parts.

    • Be careful if you use a Jimmy as they are made of metal and make breaking internal components very easy. It is preferable to use a plastic utensil.

  3. Samsung Galaxy A20e Display Replacement: шаг 3, изображение 1 из 1
    • Disconnect the Fingerprint scanner.

  4. Samsung Galaxy A20e Display Replacement: шаг 4, изображение 1 из 1
    • Using a Philips #00 screwdriver, remove the 13 screws securing the inner cover.

  5. Samsung Galaxy A20e Display Replacement: шаг 5, изображение 1 из 3 Samsung Galaxy A20e Display Replacement: шаг 5, изображение 2 из 3 Samsung Galaxy A20e Display Replacement: шаг 5, изображение 3 из 3
    • Now you can remove the upper and lower covers that protect the logic board and the speaker respectively.

  6. Samsung Galaxy A20e Display Replacement: шаг 6, изображение 1 из 2 Samsung Galaxy A20e Display Replacement: шаг 6, изображение 2 из 2
    • Pry up the following four connectors:

    • Battery connector;

    • Display connector;

    • Power / volume buttons;

    • Lower logic board connector.

    • The lower logic board ribbon cable must be disconnected from the lower board as well before proceeding with the next steps.

    • There is an arrow on the ribbon cable connecting the lower board with the logic board. When reinstalling it, this arrow must point towards the main board.

  7. Samsung Galaxy A20e Display Replacement, Remove The Battery: шаг 7, изображение 1 из 1
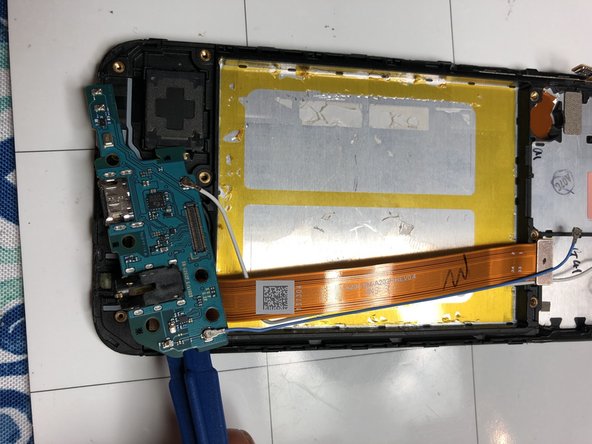
    • Remove the battery by placing a few drops of alcohol underneath the battery and letting it sit for about a minute. This will weaken the double-sided adhesive that holds the battery.

    • If you notice that it wasn't enough, and you need to use too much force, with the risk of bending or damaging the battery, apply more alcohol.

    • Never puncture or bend the battery.

    • During reassembly, remember to apply new double-sided tape to hold the battery in place.

  8. Samsung Galaxy A20e Display Replacement: шаг 8, изображение 1 из 3 Samsung Galaxy A20e Display Replacement: шаг 8, изображение 2 из 3 Samsung Galaxy A20e Display Replacement: шаг 8, изображение 3 из 3
    • Disconnect the two blue and white antenna wires.

    • Remember the locations of these wires when you reassemble the phone.

    • Remove the motherboard by lifting it away by the upper part.

    • Carefully remove the microphone, as it is glued and easily damaged. Try to warm up that area a little to make it easier.

  9. Samsung Galaxy A20e Display Replacement: шаг 9, изображение 1 из 3 Samsung Galaxy A20e Display Replacement: шаг 9, изображение 2 из 3 Samsung Galaxy A20e Display Replacement: шаг 9, изображение 3 из 3
    • Remove the glued-on vibration motor with the help of a small amount of heat

    • Remove the lower motherboard.

    • Remove the glued-on speaker with the help of a heat source.

  10. Samsung Galaxy A20e Display Replacement: шаг 10, изображение 1 из 3 Samsung Galaxy A20e Display Replacement: шаг 10, изображение 2 из 3 Samsung Galaxy A20e Display Replacement: шаг 10, изображение 3 из 3
    • Once you have completed the component removal, you can begin the reassembly by placing the components on the new display.

Заключение

To reassemble your device, follow these instructions in reverse order.

14 участников успешно повторили данное руководство.

Особая благодарность этим переводчикам:

it en

100%

Эти переводчики помогают нам починить мир! Хотите внести свой вклад?
Начните переводить ›

Smilzo

Участник с: 11/09/13

10 832 Репутация

Автор 39 руководств

8 Комментариев

this guide isn’t for a A20 its for an A20e

CPR Jackson TN - Ответить

Ciao,il codice completo è A20E SM-A202f .

se cerchi questo codice nelle guide riparazione trovi telefono-Android-Samsung-A- A20e SM-A202f trovi la mia guida del display. Non posso nominarla come la cartella genitore,non so se questo è un bug. Grazie

Smilzo -

If you're gonna re-use the battery I wouldn't use heat, it damages the cells inside of the battery. Just pry with a spudger and have

joey Van beek - Ответить

I'm sorry I don't agree with a spudger without adequate heat the battery would bend to be removed. The adhesive is very resistant and the heat must be dosed appropriately for the situation so as not to damage the battery and the other components

Smilzo -

In another vid, to remove the battery “without" heat, the person used “rubbing alcohol” said it consumes the adhesive making it very easy to remove, placing it with a syringe like tip, along both the left and right sides, when the phone is in the normal upright position. And because rubbing alcohol evaporates, it's not harmful to the phone. Then a spudger can be used without brute force. That was a vid for the A205. (2019)

Becky Firestone - Ответить

Добавить комментарий

Просмотр статистики:

За последние 24часов: 9

За последние 7 дней: 66

За последние 30 дней: 333

За всё время: 21,432