Введение
Use this guide to replace the display in your Samsung Galaxy A3 (2017).
Opening the Samsung Galaxy A3 (2017) will damage the waterproof sealing on the device. If you do not replace the adhesive seals, your phone will function normally, but will loose its water-protection.
This guide instructs you to replace only the display while leaving the original frame, logic board, and battery in place. However, some replacement screens for this phone come pre-installed in a new frame (a.k.a. chassis), which requires a very different procedure—transplanting your phone's internals and installing a new battery. Make sure you have the correct part before starting this guide.
The process of separating the display from the frame usually destroys the display, so don't follow this guide unless you intend to replace the display.
You’ll need replacement adhesive to reattach a new display and the back cover when reassembling the device.
Выберете то, что вам нужно
-
-
Power off your phone before beginning disassembly.
-
Use an iOpener to loosen the adhesive beneath the back cover. Apply the iOpener for at least two minutes. You might want to repeat this step several times during the back cover removal.
-
-
-
Use a small suction handle to create a gap at the bottom end of the Galaxy A3.
-
Insert an opening pick and slide the tip to the bottom left corner to cut the adhesive.
-
Leave the opening pick in the bottom left corner to prevent the adhesive from resealing.
-
Insert a new opening pick and start to cut the adhesive towards the bottom left side of the phone.
-
-
-
Use an opening pick to cut the adhesive on all sides of the phone. Leave one opening pick in every corner to prevent the adhesive from resealing.
-
Insert an opening pick on the right side of the phone after you cut the adhesive on all sides. Flip it sideways until you can get a good grip on the back cover.
-
-
-
Remove the five Phillips #00 screws that hold the motherboard covers in their place.
-
-
-
-
Use a pair of tweezers to lift up the motherboard cover including the loudspeaker and the NFC antenna and remove it.
-
-
-
Use the flat end of a spudger to disconnect the battery flex connector.
-
-
-
Prepare an iOpener and apply it to the display for at least two minutes to loosen the adhesive beneath.
-
Lay overlapping strips of clear packing tape over the display until the whole face is covered.
-
This will keep glass shards contained and provide structural integrity when prying and lifting the display.
-
-
-
Once the display is warm to the touch, apply a suction cup to the upper edge of the phone.
-
Lift on the suction cup, and insert an opening pick under the display assembly.
-
Start to slide the opening pick along the upper edge of the phone to cut the adhesive. Leave an opening pick at the corner to prevent the adhesive from resealing.
-
Continue to cut the adhesive on the remaining sides of the phone and leave an opening pick in each corner.
-
-
-
After cutting the adhesive on all sides of the phone, insert a plastic card beneath the display assembly to loosen any remaining adhesive behind it.
-
-
-
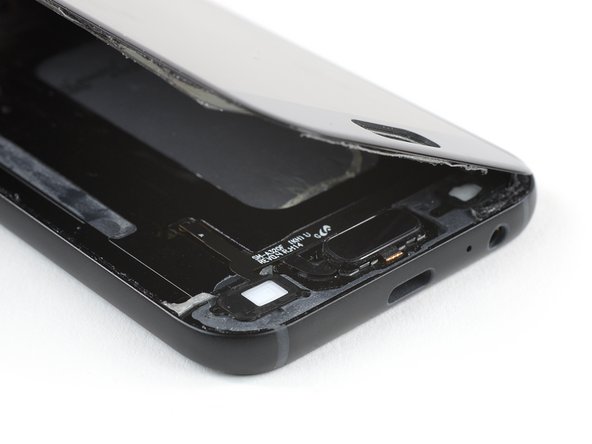
Start to carefully lift the upper edge of the display assembly and thread the display flex cable through the mid frame.
-
In case one of the cables sticks to the display, carefully peel them off with a pair of tweezers or an opening pick.
-
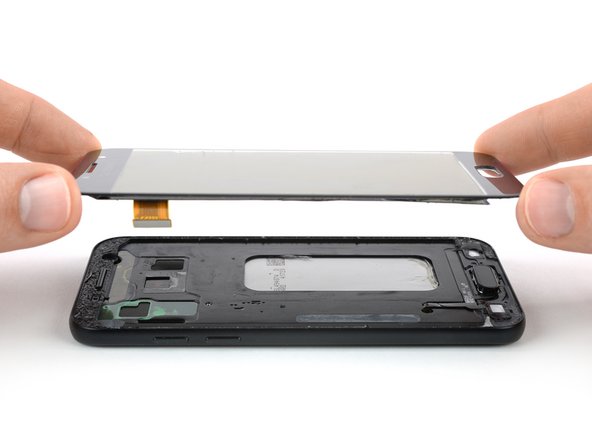
Remove the display assembly from the phone.
-
Before reassembling make sure to remove any remaining adhesive from the frame by using isopropyl alcohol (>97%) and a lint-free cloth or Q-tip.
-


If possible, turn on your phone and test your repair before installing new adhesive and resealing the phone.
After reapplying adhesive, follow these instructions in reverse order to reassemble your device.
The best way to secure the new screen is with a sheet of custom-cut double-sided tape. Apply the tape to the back of the screen, then carefully feed the display cable through the mid frame. Align the screen and press it into place.
Отменить: Я не выполнил это руководство.
19 участников успешно повторили данное руководство.


5 Комментариев
Does anyone know if or how you can get the AMOLED display the SM-A320FL had originally.
Thank you.
Ich scheitere bereits am ersten Schritt: Ich erhitze die Rückseite gleichmäßig mit einer kleinen Heißluftpistole bis ich Sie nicht mehr anfassen kann, also deutlich über 70°C. Dennoch schaffe ich es auch mit äußerster Kraft nicht, die Rückwand unten mittig nur den Bruchteil eines Millimeters anzuheben.
Hallo Ralf,
wenn das Gerät oder die Heißluftpistole zu heiß wird ist das natürlich nicht gut. Manchmal kann der verwendete Klebstoff sehr widerspenstig sein. Du kannst versuchen eine Spielkarte in die Lücke zwischen Rückseite und Rahmen zu pressen oder an einer der Kanten entlang zu ziehen. Versuche so eine kleine Stelle des Klebstoffs zu durchtrennen um danach ein Opening Pick anzusetzen. Sollte die Spielkarte nicht stabil genug sein, ist der letzte Ausweg eine dünne Klinge von einem Cutter-Messer o.ä. Sei hierbei jedoch äußerst vorsichtig da du damit sehr schnell Kratzer in dein Gerät schneidest und Verletzungsgefahr besteht. Verwende nachdem du mit dem Messer einen kleinen Spalt geschaffen hast am besten sofort wieder Plastikwerkzeug um Schäden am Telefon zu vermeiden.
Danke, ich habe es schlussendlich doch geschafft - mit etwas mehr Wärme und einem stärkeren Sauger.
I used a hot air heater on 110 degrees Celcius, worked fine.