Перейти к основному содержанию
Присоединяйся к сообществу ремонтников - Создай аккаунт

Samsung Galaxy A5 (2016) Display Replacement

Выберете то, что вам нужно

  1. Samsung Galaxy A5 (2016) Display Replacement, Back Cover: шаг 1, изображение 1 из 3 Samsung Galaxy A5 (2016) Display Replacement, Back Cover: шаг 1, изображение 2 из 3 Samsung Galaxy A5 (2016) Display Replacement, Back Cover: шаг 1, изображение 3 из 3
    • Start by switching off your phone.

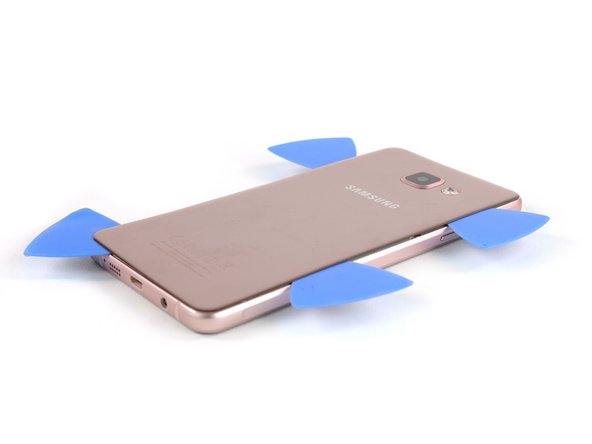
    • Take an iOpener to heat up and soften the glue behind the back cover.

    • With a suction handle lift the back cover to insert an opening pick.

    Спросите у FixBot

    Добавить комментарий

  2. Samsung Galaxy A5 (2016) Display Replacement: шаг 2, изображение 1 из 3 Samsung Galaxy A5 (2016) Display Replacement: шаг 2, изображение 2 из 3 Samsung Galaxy A5 (2016) Display Replacement: шаг 2, изображение 3 из 3
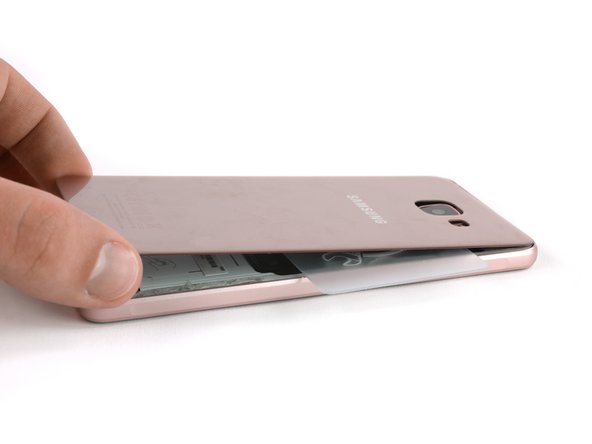
    • Slide the pick up to the middle to separate the back cover from the frame.

    • Insert a second opening pick and move around the right corner along the bottom and around the left corner.

    Спросите у FixBot

    Добавить комментарий

  3. Samsung Galaxy A5 (2016) Display Replacement: шаг 3, изображение 1 из 3 Samsung Galaxy A5 (2016) Display Replacement: шаг 3, изображение 2 из 3 Samsung Galaxy A5 (2016) Display Replacement: шаг 3, изображение 3 из 3
    • Take another opening pick and continue towards the top corner.

    • Here you want to use one more pick for the last part at the top.

    Спросите у FixBot

    Добавить комментарий

  4. Samsung Galaxy A5 (2016) Display Replacement: шаг 4, изображение 1 из 3 Samsung Galaxy A5 (2016) Display Replacement: шаг 4, изображение 2 из 3 Samsung Galaxy A5 (2016) Display Replacement: шаг 4, изображение 3 из 3
    Инструмент, используемый на этом этапе:
    Plastic Cards
    $2.99
    • Insert a plastic card at the bottom and slide it underneath the back cover.

    Спросите у FixBot

    Добавить комментарий

  5. Samsung Galaxy A5 (2016) Display Replacement: шаг 5, изображение 1 из 3 Samsung Galaxy A5 (2016) Display Replacement: шаг 5, изображение 2 из 3 Samsung Galaxy A5 (2016) Display Replacement: шаг 5, изображение 3 из 3
    • Heat up the back cover once again so you can slide the plastic card towards the top.

    • Always take a peek underneath the back cover to not damage any parts like the NFC antenna.

    • Move the plastic card until you reach the camera bump. Now slowly lift up the back cover and finally remove it.

    • Be sure to remove any residue from the glue and apply new adhesive when reassembling.

    Спросите у FixBot

    Добавить комментарий

  6. Samsung Galaxy A5 (2016) Display Replacement, Display: шаг 6, изображение 1 из 2 Samsung Galaxy A5 (2016) Display Replacement, Display: шаг 6, изображение 2 из 2
    • Remove the SIM card tray.

    • Remove the 17 Phillips #00 screws on the midframe.

    Спросите у FixBot

    Добавить комментарий

  7. Samsung Galaxy A5 (2016) Display Replacement: шаг 7, изображение 1 из 3 Samsung Galaxy A5 (2016) Display Replacement: шаг 7, изображение 2 из 3 Samsung Galaxy A5 (2016) Display Replacement: шаг 7, изображение 3 из 3
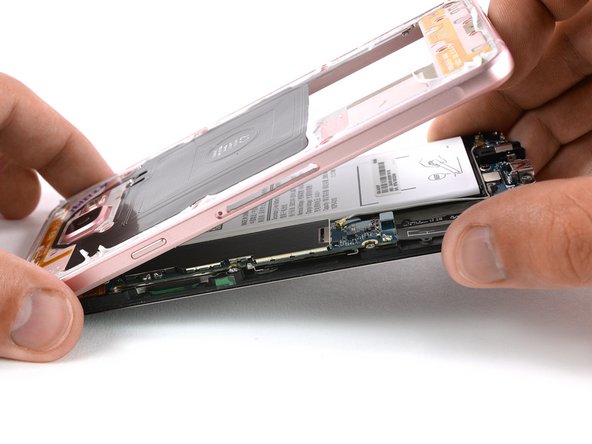
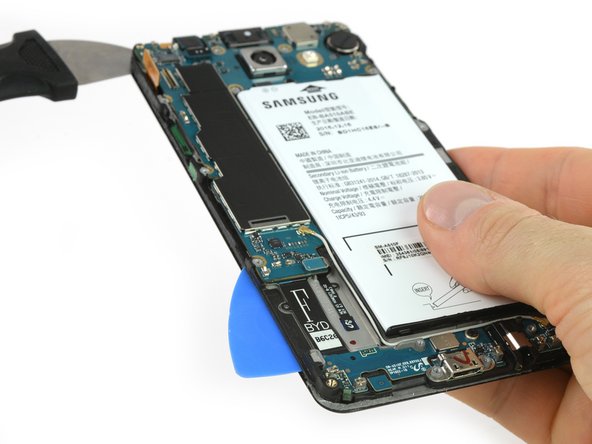
    • Push the exposed part of the battery away from the midframe to separate the components.

    • You may need the IMEI sticker on your old battery to identify your phone in the future, be sure to transfer it to the replacement battery.

    Спросите у FixBot

    Добавить комментарий

  8. Samsung Galaxy A5 (2016) Display Replacement: шаг 8, изображение 1 из 2 Samsung Galaxy A5 (2016) Display Replacement: шаг 8, изображение 2 из 2
    • With a flat end of a spudger disconnect the display connector.

    • Reheat the iOpener and use it to loosen the adhesive under the display.

    Спросите у FixBot

    Добавить комментарий

  9. Samsung Galaxy A5 (2016) Display Replacement: шаг 9, изображение 1 из 2 Samsung Galaxy A5 (2016) Display Replacement: шаг 9, изображение 2 из 2
    • Use a Jimmy to get between the frame and the front panel.

    • Pry up the display unit just a bit so you can put an opening pick behind the display.

    • You just want to insert the tip of the opening pick where the display cable is.

    • Slide down the side to separate the glue. At the bottom you can insert the opening pick further to keep the adhesive from resealing.

    Спросите у FixBot

    Добавить комментарий

  10. Samsung Galaxy A5 (2016) Display Replacement: шаг 10, изображение 1 из 3 Samsung Galaxy A5 (2016) Display Replacement: шаг 10, изображение 2 из 3 Samsung Galaxy A5 (2016) Display Replacement: шаг 10, изображение 3 из 3
    • Repeat the same procedure on the other side.

    • Here you can insert the opening pick as far as half of an inch to get the glue off behind the battery.

    • Slide down to where the display ends.

    Спросите у FixBot

    Добавить комментарий

  11. Samsung Galaxy A5 (2016) Display Replacement: шаг 11, изображение 1 из 3 Samsung Galaxy A5 (2016) Display Replacement: шаг 11, изображение 2 из 3 Samsung Galaxy A5 (2016) Display Replacement: шаг 11, изображение 3 из 3
    • Now slide along the bottom to get the glue off.

    • Be careful, there are two touch buttons on each side behind the front panel. In the middle only go as deep as where the home button begins.

    Спросите у FixBot

    Добавить комментарий

  12. Samsung Galaxy A5 (2016) Display Replacement: шаг 12, изображение 1 из 1
    • Re-heat the display unit for the next few steps.

    Спросите у FixBot

    Добавить комментарий

  13. Samsung Galaxy A5 (2016) Display Replacement: шаг 13, изображение 1 из 3 Samsung Galaxy A5 (2016) Display Replacement: шаг 13, изображение 2 из 3 Samsung Galaxy A5 (2016) Display Replacement: шаг 13, изображение 3 из 3
    Инструмент, используемый на этом этапе:
    Plastic Cards
    $2.99
    • On the left hand side (where the motherboard sits) replace the opening pick with a plastic card to get to the glue behind the battery.

    • Continue separating the adhesive until you reach the display cable.

    Спросите у FixBot

    Добавить комментарий

  14. Samsung Galaxy A5 (2016) Display Replacement: шаг 14, изображение 1 из 3 Samsung Galaxy A5 (2016) Display Replacement: шаг 14, изображение 2 из 3 Samsung Galaxy A5 (2016) Display Replacement: шаг 14, изображение 3 из 3
    • Separate the display from the display frame and cut the remaining glue at the top with an opening pick.

    • Carefully slide the display cable out of the slot in the display frame.

    Спросите у FixBot

    Добавить комментарий

  15. Samsung Galaxy A5 (2016) Display Replacement: шаг 15, изображение 1 из 1
    • Before you start reassembling plug the new display to the motherboard and perform a short test by powering on your phone. See if the display lights up and the touch works properly.

    • Remove any adhesive from the display and rear glass and reapply as necessary.

    Спросите у FixBot

    Добавить комментарий

Заключение

To reassemble your device, follow these instructions in reverse order.

Отменить: Я не выполнил это руководство.

64 человек успешно провели ремонт по этому руководству.

Tobias Isakeit

Участник с: 03/31/14

133 742 Репутация

Автор 189 руководств

Команда

Tobias Isakeit - Repairability Engineer Участник Tobias Isakeit - Repairability Engineer

Business

1 член

Автор 1 145 руководств

8 Комментарии к руководству

dear sir,

i follow the steps above but still my mobile with black screen and colored dots, what shall i do please help me

mohammad khateeb - Ответить Поделиться

Dear sir

Mera Mobile gir jane ke karan screen tut gya h but work kar rha mai chahta hu ise repair karwana please contact me Mobile -7903248447

PAWAN KUMAR - Ответить Поделиться

Miei parole ci sono sei molto bravo , grazie mille per tutorial , e ti mandò un mondo di salute e più grande fortuna dell' mondo Grazie…..

Teofil Timis - Ответить Поделиться

Evo da i ja ostavim komentar. kad vec svako na svoj jezik pise

sturman - Ответить Поделиться

Unfortunately, Croatian is not yet available on our site. A team of volunteers has already started localizing the iFixit user interface into Croatian, but there is still lots of work to do. We are using an open web translation software which is called "Crowdin". If you'd like to participate, you can just follow this link and create an account to start translating: https://crowdin.com/project/ifixit/hr# , but I would recommend that you read the iFixit translator guidelines first: Translator Guidelines Crowdin. If you’d like to get a notification as soon as we get started with Guide and Wiki translations in Croatian, you can just fill in this form:++ https://docs.google.com/forms/d/e/1FAIpQ.... I stay at your disposal for any further question or concern!

Sandra Hiller - Ответить Поделиться

Добавить комментарий

Статистика просмотров:

За последние 24 часов: 1

За последние 7 дней: 33

За последние 30 дней: 127

За всё время: 66,255