Перейти к основному содержанию

Samsung Galaxy Camera Lens and Motherboard Replacement

Выберете то, что вам нужно

  1. Careful: steps 1-6 are sourced from a guide that's marked as in-progress.

    Samsung Galaxy Camera Lens and Motherboard Replacement, Screen: шаг 1, изображение 1 из 1
    • Begin removing the 3/16" screws for the device.

  2. Samsung Galaxy Camera Lens and Motherboard Replacement: шаг 2, изображение 1 из 1
    • Turn the device and remove the additional 3/16" screws.

  3. Samsung Galaxy Camera Lens and Motherboard Replacement: шаг 3, изображение 1 из 1
    • Turn the device and remove the additional 3/16" screw.

  4. Samsung Galaxy Camera Lens and Motherboard Replacement: шаг 4, изображение 1 из 3 Samsung Galaxy Camera Lens and Motherboard Replacement: шаг 4, изображение 2 из 3 Samsung Galaxy Camera Lens and Motherboard Replacement: шаг 4, изображение 3 из 3
    • Take the white cover plate off.

  5. Samsung Galaxy Camera Lens and Motherboard Replacement: шаг 5, изображение 1 из 1
    • Using the plastic opening tools, pry open the camera from the bottom.

    • This may require a moderate use of force because of the sealing glue.

  6. Samsung Galaxy Camera Lens and Motherboard Replacement: шаг 6, изображение 1 из 1
    • Gently pull the connector away from the motherboard.

  7. Samsung Galaxy Camera Lens and Motherboard Replacement, Lens and Motherboard: шаг 7, изображение 1 из 1
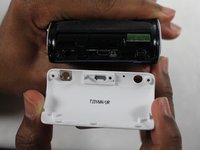
    • Unscrew the motherboard's screws. There are 4 3/32" screws and 3 5/32" screws.

  8. Samsung Galaxy Camera Lens and Motherboard Replacement: шаг 8, изображение 1 из 1
    • Unscrew the lens' screws. There are 1 black 4/32" screw, 3 3/16" black screws, and 2 white 5/32" screws.

  9. Samsung Galaxy Camera Lens and Motherboard Replacement: шаг 9, изображение 1 из 1
    • Pull these connectors away from motherboard.

  10. Samsung Galaxy Camera Lens and Motherboard Replacement: шаг 10, изображение 1 из 1
    • Lift the motherboard and lens out of the case.

Заключение

To reassemble your device, follow these instructions in reverse order.

10 участников успешно повторили данное руководство.

Richard Hicks

Участник с: 01/13/15

1 262 Репутация

Автор 4 руководств

Команда

USF Tampa, Team 1-3, Sullivan Winter 2015 Участник USF Tampa, Team 1-3, Sullivan Winter 2015

USFT-SULLIVAN-W15S1G3

3 членов

Автор 4 руководств

Один комментарий

Hey mate, what do you do after the motherboard replacement? Just turn the camera on? Do you need to do a master reset?

Sam - Ответить

Добавить комментарий

Просмотр статистики:

За последние 24часов: 0

За последние 7 дней: 2

За последние 30 дней: 10

За всё время: 4,983