Перейти к основному содержанию

Samsung Galaxy Camera Lens or Motherboard Replacement

Выберете то, что вам нужно

  1. Samsung Galaxy Camera Lens or Motherboard Replacement, Lens or Motherboard: шаг 1, изображение 1 из 1
    • Gather your camera and tools. Also make sure that the battery is removed before proceeding.

    • Follow battery replacement guide through step three to remove the battery.

  2. Samsung Galaxy Camera Lens or Motherboard Replacement: шаг 2, изображение 1 из 3 Samsung Galaxy Camera Lens or Motherboard Replacement: шаг 2, изображение 2 из 3 Samsung Galaxy Camera Lens or Motherboard Replacement: шаг 2, изображение 3 из 3
    • Remove all seven 4 millimeter long screws using the PH000 screwdriver bit.

  3. Samsung Galaxy Camera Lens or Motherboard Replacement: шаг 3, изображение 1 из 2 Samsung Galaxy Camera Lens or Motherboard Replacement: шаг 3, изображение 2 из 2
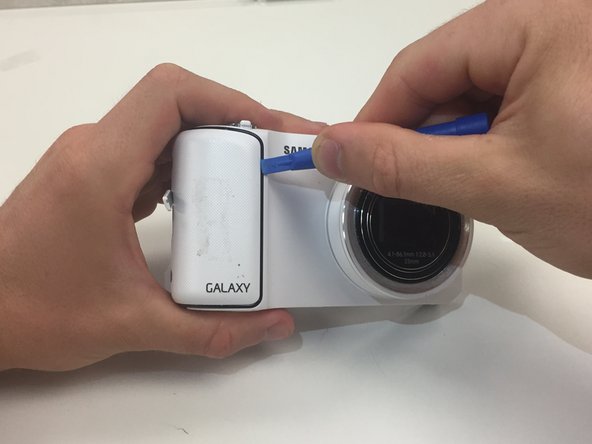
    • Use plastic opening tool to remove the cover on the non-lens side of the camera.

  4. Samsung Galaxy Camera Lens or Motherboard Replacement: шаг 4, изображение 1 из 3 Samsung Galaxy Camera Lens or Motherboard Replacement: шаг 4, изображение 2 из 3 Samsung Galaxy Camera Lens or Motherboard Replacement: шаг 4, изображение 3 из 3
    • Open the battery compartment and remove the 2 screws. Also remove the screw from the bottom of the camera after pulling off the white sticker concealing it. Removing these screws releases the bottom of the display assembly.

    • Starting at the non-lens side of the camera, use plastic opening tool to pry screen away from main housing on all sides.

  5. Samsung Galaxy Camera Lens or Motherboard Replacement: шаг 5, изображение 1 из 2 Samsung Galaxy Camera Lens or Motherboard Replacement: шаг 5, изображение 2 из 2
    • Use plastic opening tool to pull connector away from motherboard.

    • Remove screen completely and set aside.

  6. Samsung Galaxy Camera Lens or Motherboard Replacement: шаг 6, изображение 1 из 2 Samsung Galaxy Camera Lens or Motherboard Replacement: шаг 6, изображение 2 из 2
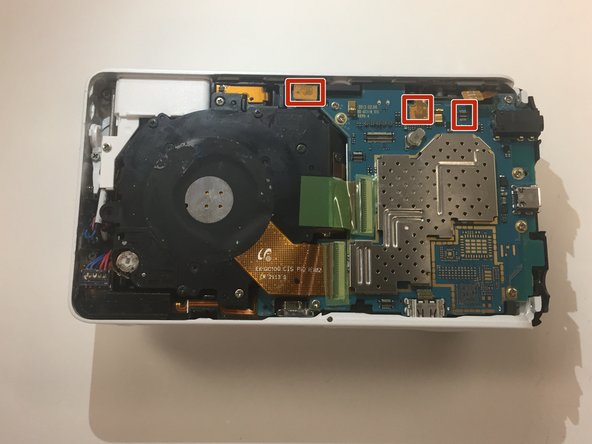
    • Using the plastic opening tool, disconnect the three connectors from the motherboard.

  7. Samsung Galaxy Camera Lens or Motherboard Replacement: шаг 7, изображение 1 из 1
    • Remove the three 3.5 mm long screws (red circle markers) using the PH000 screwdriver bit.

    • Remove the four 2 mm long screws (orange circle markers) using the PH000 screwdriver bit.

  8. Samsung Galaxy Camera Lens or Motherboard Replacement: шаг 8, изображение 1 из 2 Samsung Galaxy Camera Lens or Motherboard Replacement: шаг 8, изображение 2 из 2
    • Remove the three 3 mm long screws connecting the lens unit to the main housing using the PH000 screwdriver bit.

    • Carefully remove the lens and motherboard from main housing.

  9. Samsung Galaxy Camera Lens or Motherboard Replacement: шаг 9, изображение 1 из 3 Samsung Galaxy Camera Lens or Motherboard Replacement: шаг 9, изображение 2 из 3 Samsung Galaxy Camera Lens or Motherboard Replacement: шаг 9, изображение 3 из 3
    • Remove stickers off of connectors.

    • Open latch door on connectors.

    • Separate lens from motherboard.

    • Now you may replace either motherboard or lens with new part.

Заключение

To reassemble your device, follow these instructions in reverse order.

8 участников успешно повторили данное руководство.

Keith Lipking

Участник с: 09/26/15

359 Репутация

1 руководство автора

Команда

IUPUI, Team 2-3, Wilson Fall 2015 Участник IUPUI, Team 2-3, Wilson Fall 2015

IUPUI-WILSON-F15S2G3

4 членов

Автор 4 руководств

2 Комментариев

Would love a video of this, as well.

David CrossmN - Ответить

Hey after you replace the motherboard do you just turn the camera on and it works?

Ive done it and some chinese characters show up in a dialog box...

Sam - Ответить

Добавить комментарий

Просмотр статистики:

За последние 24часов: 0

За последние 7 дней: 1

За последние 30 дней: 10

За всё время: 3,310