Перейти к основному содержанию

Samsung Galaxy J3 Luna Pro Headphone jack Replacement

Выберете то, что вам нужно

  1. Samsung Galaxy J3 Luna Pro Headphone jack Replacement, Motherboard Change: шаг 1, изображение 1 из 1
    • Turn off the phone.

    • Remove the back cover and battery

  2. Samsung Galaxy J3 Luna Pro Headphone jack Replacement: шаг 2, изображение 1 из 3 Samsung Galaxy J3 Luna Pro Headphone jack Replacement: шаг 2, изображение 2 из 3 Samsung Galaxy J3 Luna Pro Headphone jack Replacement: шаг 2, изображение 3 из 3
    • Attach a suction cup to the screen and pry upwards.

    • Insert the plastic opening tool into the gap under the screen and work your way around the perimeter.

    • Don't remove the screen completely as there are cables still connection the two pieces.

  3. Samsung Galaxy J3 Luna Pro Headphone jack Replacement: шаг 3, изображение 1 из 3 Samsung Galaxy J3 Luna Pro Headphone jack Replacement: шаг 3, изображение 2 из 3 Samsung Galaxy J3 Luna Pro Headphone jack Replacement: шаг 3, изображение 3 из 3
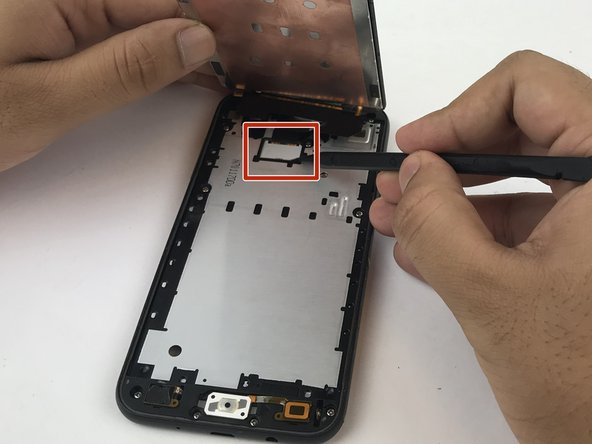
    • Use the pointy end of a spudger to remove the white plastic cover from the display cover.

    • Use the spudger to pry up the display cable from the motherboard.

    • Remove the screen.

  4. Samsung Galaxy J3 Luna Pro Headphone jack Replacement: шаг 4, изображение 1 из 3 Samsung Galaxy J3 Luna Pro Headphone jack Replacement: шаг 4, изображение 2 из 3 Samsung Galaxy J3 Luna Pro Headphone jack Replacement: шаг 4, изображение 3 из 3
    • Remove the eleven JIS 00 screws from the mid-frame.

    • Using a spudger, pry the mid-frame from the screen.

  5. Samsung Galaxy J3 Luna Pro Headphone jack Replacement: шаг 5, изображение 1 из 3 Samsung Galaxy J3 Luna Pro Headphone jack Replacement: шаг 5, изображение 2 из 3 Samsung Galaxy J3 Luna Pro Headphone jack Replacement: шаг 5, изображение 3 из 3
    • Remove the motherboard from the mid-frame.

  6. Samsung Galaxy J3 Luna Pro Headphone jack Replacement, Headphone jack: шаг 6, изображение 1 из 2 Samsung Galaxy J3 Luna Pro Headphone jack Replacement, Headphone jack: шаг 6, изображение 2 из 2
    • Use the flat end of a spudger to pry up the headphone jack cable connector from its socket on the motherboard.

Заключение

To reassemble your device, follow these instructions in reverse order.

Еще один человек закончил это руководство.

Brandon Mendoza

Участник с: 01/29/18

646 Репутация

Автор 2 руководств

Команда

USF Tampa, Team S5-G5, Passmore Spring 2018 Участник USF Tampa, Team S5-G5, Passmore Spring 2018

USFT-PASSMORE-S18S5G5

5 членов

Автор 5 руководств

0 Комментариев

Добавить комментарий

Просмотр статистики:

За последние 24часов: 0

За последние 7 дней: 0

За последние 30 дней: 2

За всё время: 1,187