Эта версия возможно содержит некорректные исправления. Переключить на последнюю проверенную версию.
Выберете то, что вам нужно
-
Этот шаг не переведен. Помогите перевести
-
This is the back of the device and where you will begin to take it apart
-
It is neccesary to remove this piece first before removing the bigger back piece.
-
Use the plastic opening tools to pry along the indicated box.
-
Lift up the silver piece to reveal the rest of the back cover.
-
-
Этот шаг не переведен. Помогите перевести
-
Unscrew the three 5 mm screws indicated by the red circles with the Philips #00 screwdriver.
-
Using the plastic opening tools pry along the bottom of the device, moving to the sides of the cover to the top.
-
Remove the back cover.
-
-
-
Этот шаг не переведен. Помогите перевести
-
Carefully remove all of the ribbons that connect over the battery.
-
-
Этот шаг не переведен. Помогите перевести
-
Remove all of the 3 mm screws indicated by a red circle with the #00 Philips Screwdriver.
-
Disconnect the battery connector from the motherboard.
-
Now you may remove the battery. The replacement battery should be 3.7 Volts and 25.9 kWh.
-
-
Этот шаг не переведен. Помогите перевести
-
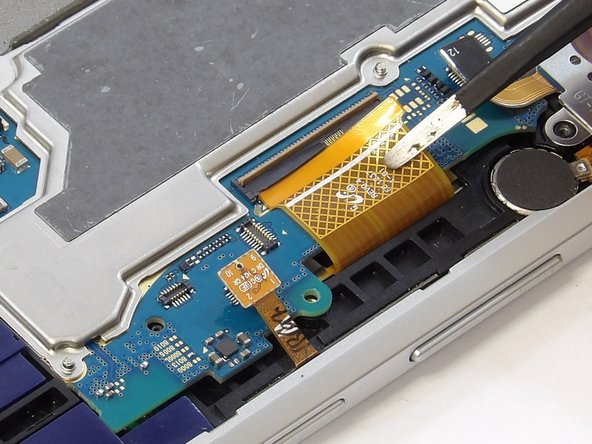
Disconnect the cable connectors from the motherboard by gently lifting the connection hubs.
-
Remove each ribbon cable by lifting the locking mechanism on the casing holding the cable.
-
Gently pull the ribbon cable from the casing with your fingers or tweezers.
-
-
Этот шаг не переведен. Помогите перевести
-
Remove the motherboard by gently sliding it out of its casing.
-


Отменить: Я не выполнил это руководство.
3 участников успешно повторили данное руководство.

Команда

Idaho State University, Team S1-G4, Watkins Fall 2019 Участник Idaho State University, Team S1-G4, Watkins Fall 2019
ISU-WATKINS-F19S1G4
3 членов
Автор 2 руководств