Эта версия возможно содержит некорректные исправления. Переключить на последнюю проверенную версию.
Выберете то, что вам нужно
-
Этот шаг не переведен. Помогите перевести
-
Prepare an iOpener and apply it to the left edge of the back panel for one minute.
-
-
Этот шаг не переведен. Помогите перевести
-
Apply a suction cup to the heated edge of the back panel, as close to the edge as possible.
-
Pull up on the suction cup with strong, steady force to create a gap between the back panel and the frame.
-
Insert the point of an opening pick into the gap.
-
-
Этот шаг не переведен. Помогите перевести
-
Slide the opening pick along the left edge towards the bottom left corner to slice the adhesive.
-
Leave the pick inserted in the bottom left corner to prevent the adhesive from re-sealing.
-
-
Этот шаг не переведен. Помогите перевести
-
Insert a second opening pick and slide it across the left side towards the top left corner to slice the adhesive.
-
Leave the pick inserted in the top left corner to prevent the adhesive from re-sealing.
-
-
Этот шаг не переведен. Помогите перевести
-
Prepare an iOpener and apply it to the top edge of the phone for one minute.
-
-
Этот шаг не переведен. Помогите перевести
-
Insert a third opening pick into the gap on the top edge of the phone.
-
Slide the opening pick to the top right corner, slicing the adhesive.
-
Leave the pick inserted in the top right corner to prevent the adhesive from re-sealing.
-
-
Этот шаг не переведен. Помогите перевести
-
Prepare an iOpener and apply it to the right edge of the phone for one minute.
-
-
Этот шаг не переведен. Помогите перевести
-
Insert a fourth and final opening pick into the gap on the right side of the phone, sliding it down towards the bottom right corner of the phone to slice the adhesive.
-
Slide an opening pick back and forth around the entire perimeter of the phone to release any missed adhesive, reheating if you find any extra-stubborn adhesive.
-
-
-
Этот шаг не переведен. Помогите перевести
-
Use a Phillips screwdriver to remove the five 4 mm screws securing the wireless charging coil.
-
-
Этот шаг не переведен. Помогите перевести
-
Use a pair of tweezers to lift up and flip back the metal shield covering the battery connector.
-
-
Этот шаг не переведен. Помогите перевести
-
While holding the metal shield up and out of the way, use the pointed end of a spudger to pry up the battery connector to disconnect it.
-
-
Этот шаг не переведен. Помогите перевести
-
Use the pointed end of a spudger to disconnect the wireless charging coil connector from the motherboard.
-
-
Этот шаг не переведен. Помогите перевести
-
Tilt the metal shielding up so you can grip it with your fingers.
-
Peel the wireless charging coil up and away from the device.
-
Remove the wireless charging coil.
-
-
Этот шаг не переведен. Помогите перевести
-
Use a Phillips screwdriver to remove the five 4 mm screws securing the loudspeaker.
-
-
Этот шаг не переведен. Помогите перевести
-
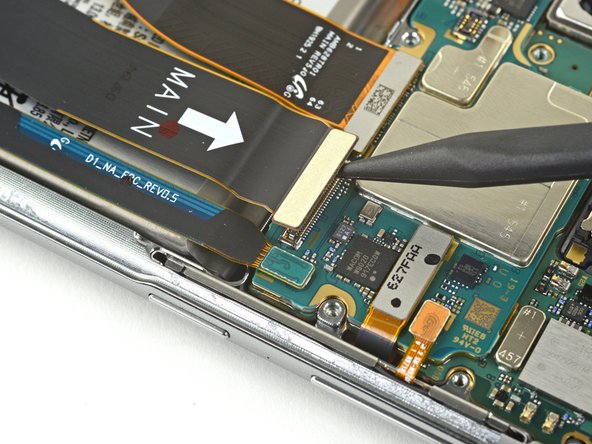
Use the pointed end of a spudger to disconnect the main interconnect cable from the motherboard.
-
Disconnect the secondary interconnect cable from the motherboard.
-
-
Этот шаг не переведен. Помогите перевести
-
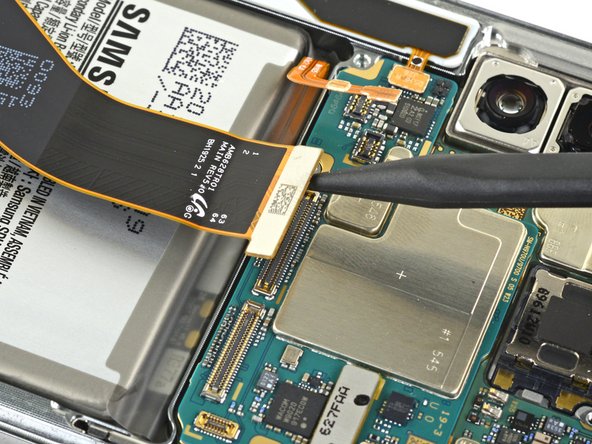
Use the pointed end of a spudger to disconnect the main interconnect cable from the daughterboard.
-
Disconnect the secondary interconnect cable from the daughterboard.
-
-
Этот шаг не переведен. Помогите перевести
-
Use the pointed end of a spudger to disconnect the display cable connector from the motherboard.
-
-
Этот шаг не переведен. Помогите перевести
-
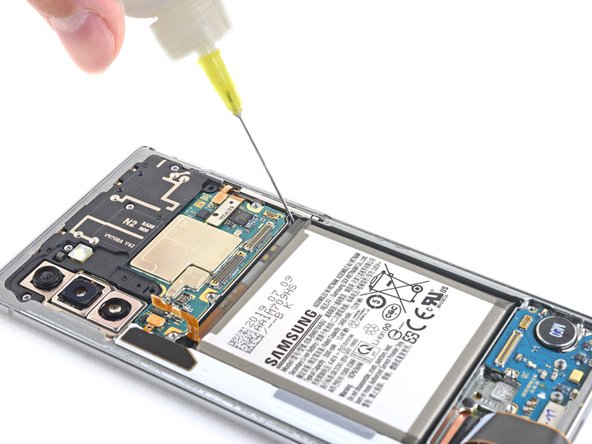
Apply a few drops of high concentration (90% or greater) isopropyl alcohol underneath the battery at the tear-shaped indents near the corners of the battery well.
-
Wait about two minutes for the isopropyl alcohol to penetrate and weaken the battery adhesive before you proceed to the next step.
-
-
Этот шаг не переведен. Помогите перевести
-
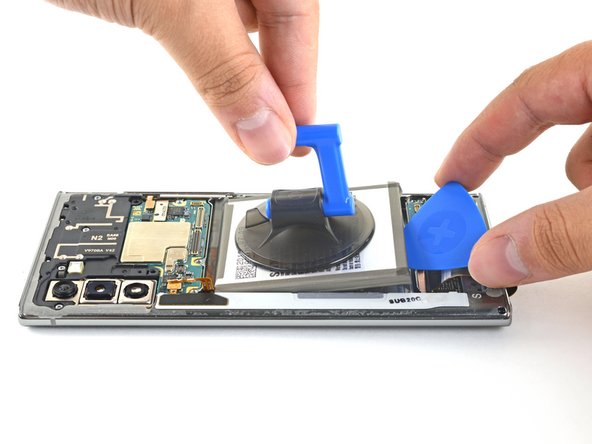
Apply a suction cup to the back of the battery.
-
Pull up on the suction cup with strong, steady force to begin to separate the battery from the frame.
-
Insert the point of an opening pick into the gap created between the battery and frame.
-
Pull up on the suction cup to remove the battery.
-


Отменить: Я не выполнил это руководство.
13 участников успешно повторили данное руководство.


5 Комментариев
Here is the Galaxy Note 10+ battery replacement guide!
I just wanted to add that after swapping in the new battery, apparently the only way to reset the battery cycle count is by rooting the phone. There doesn't seem to be any way to get the phone to recognize the new battery as new, otherwise.
Are you sure about that? I mean, can't just we use the classic calibration with Samsung ?
Federico -
Good instructions. Per iFixit, I am supposed to do "Battery Calibration" which consists of charging and keeping on charger for +2 hours, then using it until it dies, then recharging to 100%. Simple.
Apparently, I messed up the fingerprint sensor because it wouldn't work, but the phone was working great. Chaulk that up to learning experience. Was looking for a reason to upgrade anyway.
I set it up to play YouTube shorts, which loop until the phone dies. The phone dies while I'm asleep. I wake up. I plug it in. NOTHING. I flip the charger. NOTHING. I try a different charger. NOTHING. GREAT.
I swap back to my old battery in hopes I got a bad NEW battery. Get that all swapped and still nothing, but SOMETHING. It vibes when I plug it in but the screen is totally black. Try soft reset. Try reversing through all the steps to see if I forgot a cable or had one unseated. No problems at all.
Something happened to the SCREEN when the BATTERY DIED during recalibration. PROCEED WITH CAUTION