Перейти к основному содержанию

Samsung Galaxy S21 Ultra Screen and Battery Assembly Replacement

Выберете то, что вам нужно

  1. Samsung Galaxy S21 Ultra Screen and Battery Assembly Replacement, Remove the SIM card tray: шаг 1, изображение 1 из 3 Samsung Galaxy S21 Ultra Screen and Battery Assembly Replacement, Remove the SIM card tray: шаг 1, изображение 2 из 3 Samsung Galaxy S21 Ultra Screen and Battery Assembly Replacement, Remove the SIM card tray: шаг 1, изображение 3 из 3
    • Insert a SIM eject tool, bit, or straightened paper clip into the SIM card tray hole on the top edge of the phone.

    • Press the SIM eject tool into the SIM card tray hole to eject the SIM card tray.

    • Remove the SIM card tray.

    • If you accidentally inserted the SIM eject tool into a microphone hole, don't worry! You most likely didn't damage the microphone.

  2. Samsung Galaxy S21 Ultra Screen and Battery Assembly Replacement, Heat the back cover: шаг 2, изображение 1 из 1
    • Unplug and power off your phone before you begin.

    • Prepare an iOpener and apply it to the back cover for at least three minutes to loosen the adhesive underneath.

    • A hair dryer, heat gun, or hot plate may also be used, but be careful not to overheat the phone—the display and internal battery are both susceptible to heat damage.

  3. Samsung Galaxy S21 Ultra Screen and Battery Assembly Replacement, Insert an opening pick: шаг 3, изображение 1 из 3 Samsung Galaxy S21 Ultra Screen and Battery Assembly Replacement, Insert an opening pick: шаг 3, изображение 2 из 3 Samsung Galaxy S21 Ultra Screen and Battery Assembly Replacement, Insert an opening pick: шаг 3, изображение 3 из 3
    • Secure a suction handle to the bottom edge of the back cover, as close to the edge as possible.

    • If the back cover is badly cracked, covering it with a layer of clear packing tape may allow the suction cup to adhere. Alternatively, very strong tape may be used instead of the suction cup. If all else fails, you can superglue the suction cup to the broken cover.

    • Lift the back cover with the suction handle to create a small gap between the back cover and the frame.

    • If you have trouble creating a gap, apply more heat to further soften the adhesive. Follow the iOpener instructions to avoid overheating.

    • Insert an opening pick into the gap you created.

    • Slide the opening pick to the bottom left corner to slice the adhesive.

    • Leave the opening pick in place to prevent the adhesive from resealing.

  4. Samsung Galaxy S21 Ultra Screen and Battery Assembly Replacement, Slice the adhesive: шаг 4, изображение 1 из 2 Samsung Galaxy S21 Ultra Screen and Battery Assembly Replacement, Slice the adhesive: шаг 4, изображение 2 из 2
    • Insert a second opening pick at the bottom edge of your phone.

    • Slide the opening pick to the bottom right corner to slice the adhesive.

    • Leave the opening picks in place to prevent the adhesive from resealing.

  5. Samsung Galaxy S21 Ultra Screen and Battery Assembly Replacement: шаг 5, изображение 1 из 3 Samsung Galaxy S21 Ultra Screen and Battery Assembly Replacement: шаг 5, изображение 2 из 3 Samsung Galaxy S21 Ultra Screen and Battery Assembly Replacement: шаг 5, изображение 3 из 3
    • If the adhesive becomes hard to cut, it has most likely cooled down. Use your iOpener for two to three minutes to reheat it.

    • Insert a third opening pick at the bottom right corner of your phone.

    • Slide the opening pick along the right edge of your phone to slice the adhesive.

    • Leave the opening pick in the top right corner to prevent the adhesive from resealing.

  6. Samsung Galaxy S21 Ultra Screen and Battery Assembly Replacement: шаг 6, изображение 1 из 3 Samsung Galaxy S21 Ultra Screen and Battery Assembly Replacement: шаг 6, изображение 2 из 3 Samsung Galaxy S21 Ultra Screen and Battery Assembly Replacement: шаг 6, изображение 3 из 3
    • When you slice near the camera assembly, insert only the tip of the opening pick (~ 4-5 mm) to avoid damaging or smearing the camera.

    • Insert a fourth opening pick underneath the top right corner of your phone.

    • Slide the opening pick along the top edge to slice the adhesive.

    • Leave the opening pick in the top left corner to prevent the adhesive from resealing.

  7. Samsung Galaxy S21 Ultra Screen and Battery Assembly Replacement: шаг 7, изображение 1 из 3 Samsung Galaxy S21 Ultra Screen and Battery Assembly Replacement: шаг 7, изображение 2 из 3 Samsung Galaxy S21 Ultra Screen and Battery Assembly Replacement: шаг 7, изображение 3 из 3
    • Insert a fifth opening pick underneath the top left corner.

    • Slide the opening pick along the left edge of the back cover to slice the remaining adhesive.

    • When you slice near the power button, insert only the tip of the opening pick (~ 3-4 mm) to avoid damaging the power and volume button flex cable.

  8. Samsung Galaxy S21 Ultra Screen and Battery Assembly Replacement, Remove the back cover: шаг 8, изображение 1 из 2 Samsung Galaxy S21 Ultra Screen and Battery Assembly Replacement, Remove the back cover: шаг 8, изображение 2 из 2
    • Remove the back cover.

    • During reassembly:

    • This is a good point to power on your phone and test all functions before sealing it up. Be sure to power your phone back down completely before you continue working.

    • Remove any adhesive chunks with a pair of tweezers or your fingers. Apply heat if you're having trouble separating the adhesive.

    • If you're using Samsung custom-cut adhesives, follow this guide.

    • If you're using double-sided tape, follow this guide.

  9. Samsung Galaxy S21 Ultra Screen and Battery Assembly Replacement, Slice the adhesive: шаг 9, изображение 1 из 2 Samsung Galaxy S21 Ultra Screen and Battery Assembly Replacement, Slice the adhesive: шаг 9, изображение 2 из 2
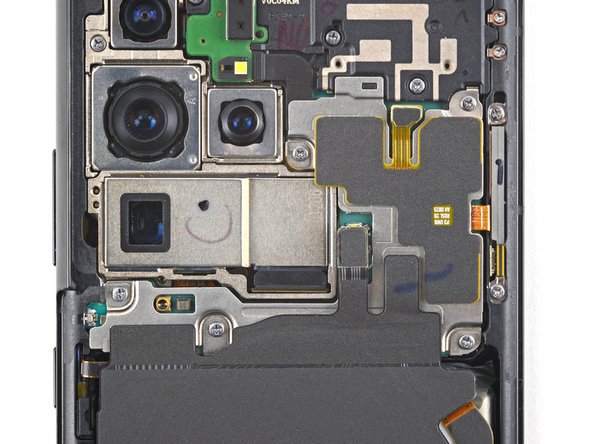
    • Insert an opening pick underneath the left bottom end of the NFC antenna and charging coil assembly.

    • Carefully slide the opening pick along the bottom left edge of the assembly to separate it from the battery.

  10. Samsung Galaxy S21 Ultra Screen and Battery Assembly Replacement, Disconnect the charging coil: шаг 10, изображение 1 из 2 Samsung Galaxy S21 Ultra Screen and Battery Assembly Replacement, Disconnect the charging coil: шаг 10, изображение 2 из 2
    • Use a spudger to disconnect the charging coil by prying the connector straight up from its socket.

  11. Samsung Galaxy S21 Ultra Screen and Battery Assembly Replacement, Disconnect the NFC antenna: шаг 11, изображение 1 из 2 Samsung Galaxy S21 Ultra Screen and Battery Assembly Replacement, Disconnect the NFC antenna: шаг 11, изображение 2 из 2
    • Use a spudger to disconnect the NFC antenna by prying the connector straight up from its socket.

  12. Samsung Galaxy S21 Ultra Screen and Battery Assembly Replacement, Unfasten the NFC antenna & charging coil assembly: шаг 12, изображение 1 из 2 Samsung Galaxy S21 Ultra Screen and Battery Assembly Replacement, Unfasten the NFC antenna & charging coil assembly: шаг 12, изображение 2 из 2
    • Use a Phillips screwdriver to remove the five 3.9 mm-long screws securing the NFC antenna and charging coil assembly.

    • If you're reassembling with the Samsung Self-Repair kit, be sure to replace the screws with new ones labeled #3427.

  13. Samsung Galaxy S21 Ultra Screen and Battery Assembly Replacement, Unfasten the loudspeaker: шаг 13, изображение 1 из 2 Samsung Galaxy S21 Ultra Screen and Battery Assembly Replacement, Unfasten the loudspeaker: шаг 13, изображение 2 из 2
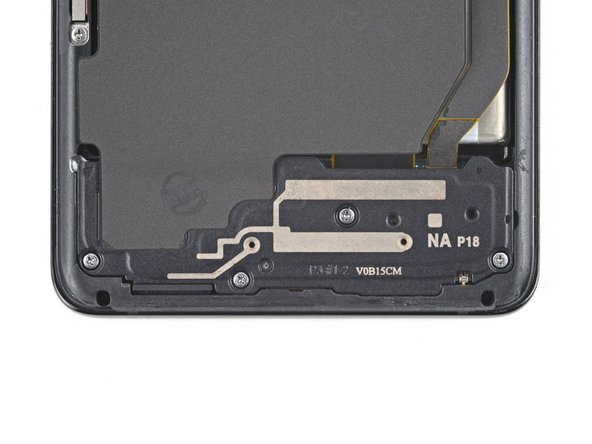
    • Use a Phillips screwdriver to remove the four 3.9 mm-long screws securing the loudspeaker assembly.

    • If you're reassembling with the Samsung Self-Repair kit, be sure to replace the screws with new ones labeled #3427.

  14. Samsung Galaxy S21 Ultra Screen and Battery Assembly Replacement, Disconnect the loudspeaker: шаг 14, изображение 1 из 2 Samsung Galaxy S21 Ultra Screen and Battery Assembly Replacement, Disconnect the loudspeaker: шаг 14, изображение 2 из 2
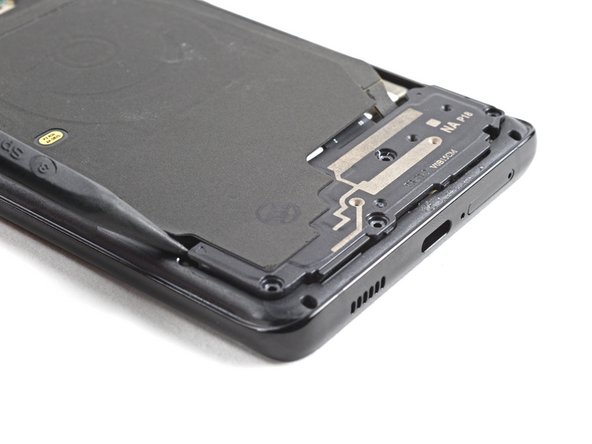
    • Insert the tip of a spudger between the frame and the upper-left notch in the loudspeaker.

    • Pry up with the spudger to release the loudspeaker from its plastic clips.

  15. Samsung Galaxy S21 Ultra Screen and Battery Assembly Replacement, Remove the NFC antenna & charging coil assembly: шаг 15, изображение 1 из 2 Samsung Galaxy S21 Ultra Screen and Battery Assembly Replacement, Remove the NFC antenna & charging coil assembly: шаг 15, изображение 2 из 2
    • Use a pair of tweezers or your fingers to carefully remove the NFC antenna, charging coil, and loudspeaker assembly.

    • Set the assembly aside. You'll reuse it during reassembly.

  16. Samsung Galaxy S21 Ultra Screen and Battery Assembly Replacement, Disconnect the battery: шаг 16, изображение 1 из 2 Samsung Galaxy S21 Ultra Screen and Battery Assembly Replacement, Disconnect the battery: шаг 16, изображение 2 из 2
    • Use a spudger to pry up and disconnect the battery's press connector.

  17. Samsung Galaxy S21 Ultra Screen and Battery Assembly Replacement, Disconnect the interconnect cables: шаг 17, изображение 1 из 3 Samsung Galaxy S21 Ultra Screen and Battery Assembly Replacement, Disconnect the interconnect cables: шаг 17, изображение 2 из 3 Samsung Galaxy S21 Ultra Screen and Battery Assembly Replacement, Disconnect the interconnect cables: шаг 17, изображение 3 из 3
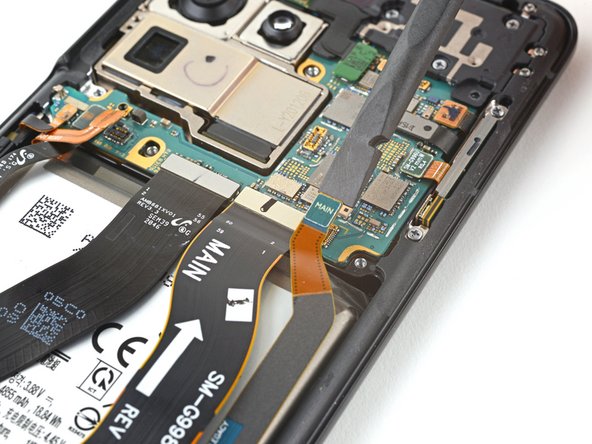
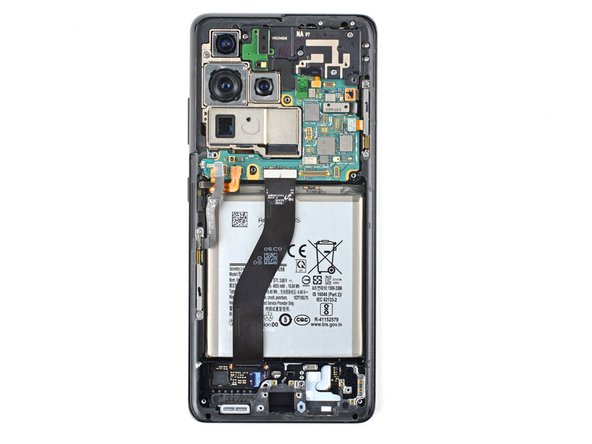
    • Use a spudger to pry up and disconnect the primary and secondary interconnect cables' press connectors on the motherboard.

  18. Samsung Galaxy S21 Ultra Screen and Battery Assembly Replacement, Remove the secondary interconnect cable: шаг 18, изображение 1 из 3 Samsung Galaxy S21 Ultra Screen and Battery Assembly Replacement, Remove the secondary interconnect cable: шаг 18, изображение 2 из 3 Samsung Galaxy S21 Ultra Screen and Battery Assembly Replacement, Remove the secondary interconnect cable: шаг 18, изображение 3 из 3
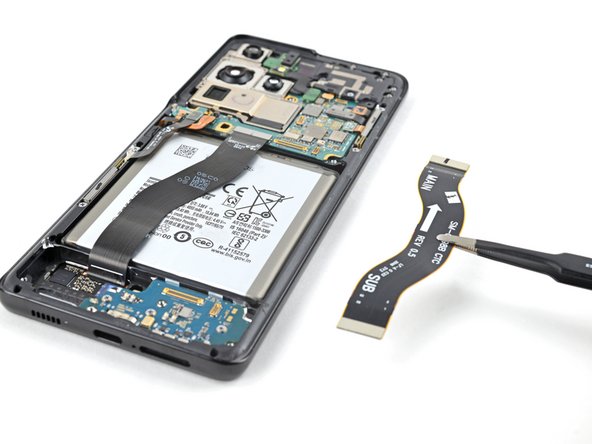
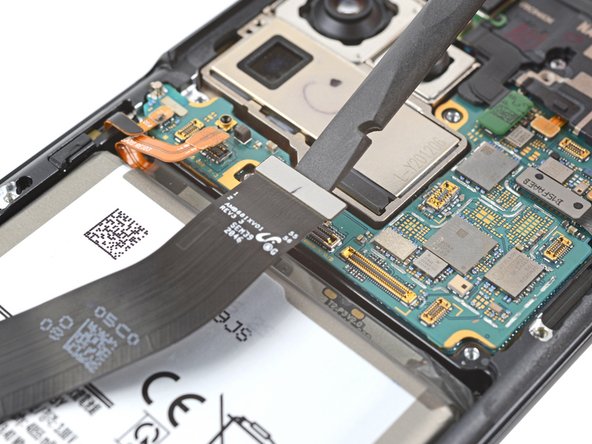
    • Use a spudger to disconnect the secondary interconnect cable from the daughterboard by prying its bottom connector straight up from its socket.

    • Use your fingers or a pair of tweezers to carefully remove the secondary interconnect cable.

    • Set the cable aside. You'll reuse it during reassembly.

  19. Samsung Galaxy S21 Ultra Screen and Battery Assembly Replacement, Remove the primary interconnect cable: шаг 19, изображение 1 из 3 Samsung Galaxy S21 Ultra Screen and Battery Assembly Replacement, Remove the primary interconnect cable: шаг 19, изображение 2 из 3 Samsung Galaxy S21 Ultra Screen and Battery Assembly Replacement, Remove the primary interconnect cable: шаг 19, изображение 3 из 3
    • Use a spudger to disconnect the primary interconnect cable from the daughterboard by prying its bottom connector straight up from its socket.

    • Use your fingers or a pair of tweezers to carefully remove the primary interconnect cable.

    • Set the cable aside. You'll reuse it during reassembly.

  20. Samsung Galaxy S21 Ultra Screen and Battery Assembly Replacement, Unfasten the charging board: шаг 20, изображение 1 из 2 Samsung Galaxy S21 Ultra Screen and Battery Assembly Replacement, Unfasten the charging board: шаг 20, изображение 2 из 2
    • Use a Phillips screwdriver to remove the three 3.4 mm-long screws securing the charging board.

    • If you're reassembling with the Samsung Self-Repair kit, be sure to replace the screws with new ones labeled #3428.

  21. Samsung Galaxy S21 Ultra Screen and Battery Assembly Replacement, Pry up the charging board: шаг 21, изображение 1 из 2 Samsung Galaxy S21 Ultra Screen and Battery Assembly Replacement, Pry up the charging board: шаг 21, изображение 2 из 2
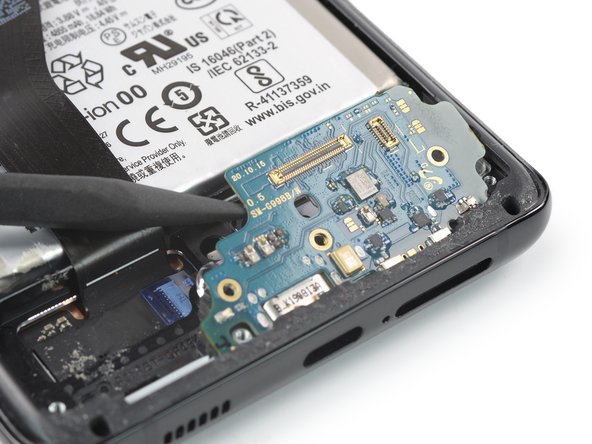
    • Insert the pointed end of a spudger underneath the left edge of the charging board next to the main flex cable connector.

    • Use your spudger to pry up the charging board.

  22. Samsung Galaxy S21 Ultra Screen and Battery Assembly Replacement, Remove the charging board: шаг 22, изображение 1 из 3 Samsung Galaxy S21 Ultra Screen and Battery Assembly Replacement, Remove the charging board: шаг 22, изображение 2 из 3 Samsung Galaxy S21 Ultra Screen and Battery Assembly Replacement, Remove the charging board: шаг 22, изображение 3 из 3
    • Use a pair of blunt tweezers or your fingers to remove the charging board. Start by lifting its top edge up and then carefully slide the USB-C connector out of its recess.

  23. Samsung Galaxy S21 Ultra Screen and Battery Assembly Replacement, Disconnect the left 5G mmWave antenna: шаг 23, изображение 1 из 2 Samsung Galaxy S21 Ultra Screen and Battery Assembly Replacement, Disconnect the left 5G mmWave antenna: шаг 23, изображение 2 из 2
    • Use a spudger to pry up and disconnect the left 5G mmWave antenna's press connector.

  24. Samsung Galaxy S21 Ultra Screen and Battery Assembly Replacement, Disconnect the right 5G mmWave antenna: шаг 24, изображение 1 из 2 Samsung Galaxy S21 Ultra Screen and Battery Assembly Replacement, Disconnect the right 5G mmWave antenna: шаг 24, изображение 2 из 2
    • Use a spudger to pry up and disconnect the right 5G mmWave antenna's press connector.

  25. Samsung Galaxy S21 Ultra Screen and Battery Assembly Replacement, Unfasten the 5G mmWave antennas: шаг 25, изображение 1 из 2 Samsung Galaxy S21 Ultra Screen and Battery Assembly Replacement, Unfasten the 5G mmWave antennas: шаг 25, изображение 2 из 2
    • Use a Phillips screwdriver to remove the four 3.4 mm-long screws securing the 5G mmWave antennas.

    • If you're reassembling with the Samsung Self-Repair kit, be sure to replace the screws with new ones labeled #3428.

  26. Samsung Galaxy S21 Ultra Screen and Battery Assembly Replacement, Remove the right 5G mmWave antenna: шаг 26, изображение 1 из 3 Samsung Galaxy S21 Ultra Screen and Battery Assembly Replacement, Remove the right 5G mmWave antenna: шаг 26, изображение 2 из 3 Samsung Galaxy S21 Ultra Screen and Battery Assembly Replacement, Remove the right 5G mmWave antenna: шаг 26, изображение 3 из 3
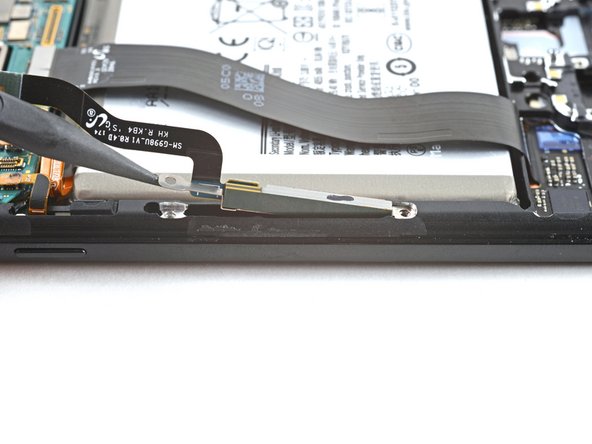
    • Use the point of a spudger to pry up on the right 5G mmWave antenna bracket's bottom screw tab.

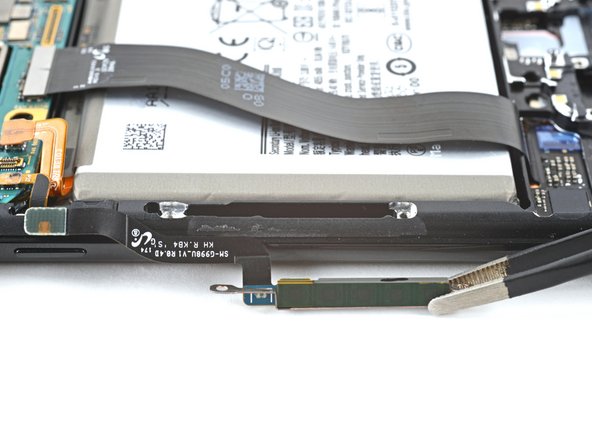
    • Use tweezers, or your fingers, to remove the right 5G mmWave antenna.

    • Set the antenna aside. You'll reuse it during reassembly.

  27. Samsung Galaxy S21 Ultra Screen and Battery Assembly Replacement, Remove the left 5G mmWave antenna: шаг 27, изображение 1 из 3 Samsung Galaxy S21 Ultra Screen and Battery Assembly Replacement, Remove the left 5G mmWave antenna: шаг 27, изображение 2 из 3 Samsung Galaxy S21 Ultra Screen and Battery Assembly Replacement, Remove the left 5G mmWave antenna: шаг 27, изображение 3 из 3
    • Use the point of a spudger to pry up on the left 5G mmWave antenna bracket's bottom screw tab.

    • Use tweezers, or your fingers, to remove the left 5G mmWave antenna.

    • Set the antenna aside. You'll reuse it during reassembly.

  28. Samsung Galaxy S21 Ultra Screen and Battery Assembly Replacement, Unfasten the earpiece and laser AF module assembly: шаг 28, изображение 1 из 2 Samsung Galaxy S21 Ultra Screen and Battery Assembly Replacement, Unfasten the earpiece and laser AF module assembly: шаг 28, изображение 2 из 2
    • Use a Phillips screwdriver to remove the four 3.9 mm-long screws securing the earpiece speaker and laser AF module assembly.

    • If you're reassembling with the Samsung Self-Repair kit, be sure to replace the screws with new ones labeled #3427.

  29. Samsung Galaxy S21 Ultra Screen and Battery Assembly Replacement, Disconnect the laser AF module and earpiece speaker: шаг 29, изображение 1 из 3 Samsung Galaxy S21 Ultra Screen and Battery Assembly Replacement, Disconnect the laser AF module and earpiece speaker: шаг 29, изображение 2 из 3 Samsung Galaxy S21 Ultra Screen and Battery Assembly Replacement, Disconnect the laser AF module and earpiece speaker: шаг 29, изображение 3 из 3
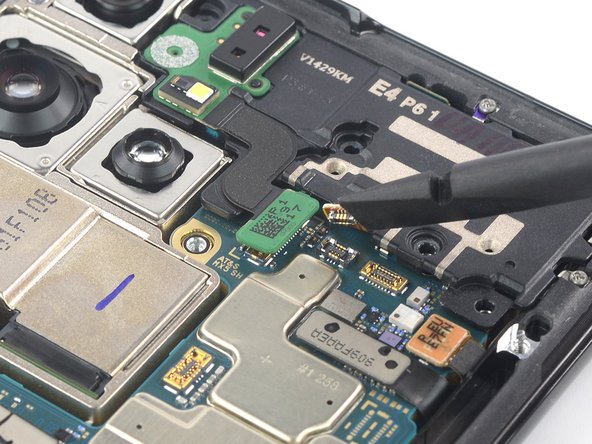
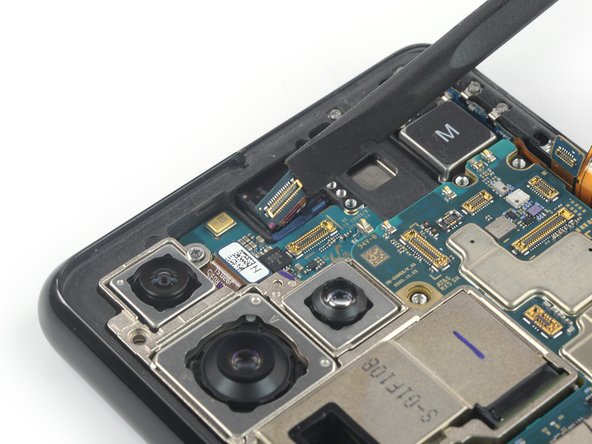
    • Use a spudger to disconnect the laser AF module and earpiece speaker flex cables by prying the connectors straight up from their socket.

  30. Samsung Galaxy S21 Ultra Screen and Battery Assembly Replacement, Remove the earpiece speaker and laser AF module assembly: шаг 30, изображение 1 из 3 Samsung Galaxy S21 Ultra Screen and Battery Assembly Replacement, Remove the earpiece speaker and laser AF module assembly: шаг 30, изображение 2 из 3 Samsung Galaxy S21 Ultra Screen and Battery Assembly Replacement, Remove the earpiece speaker and laser AF module assembly: шаг 30, изображение 3 из 3
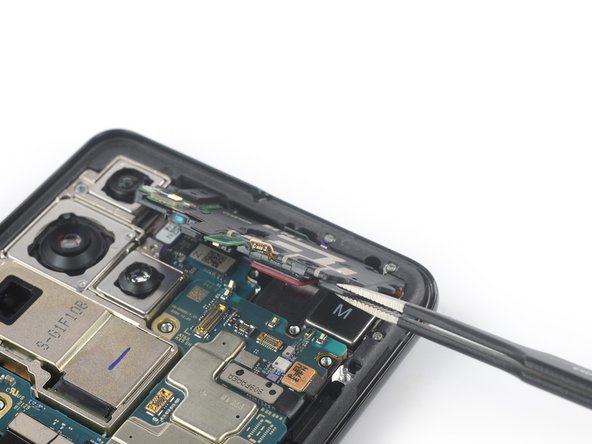
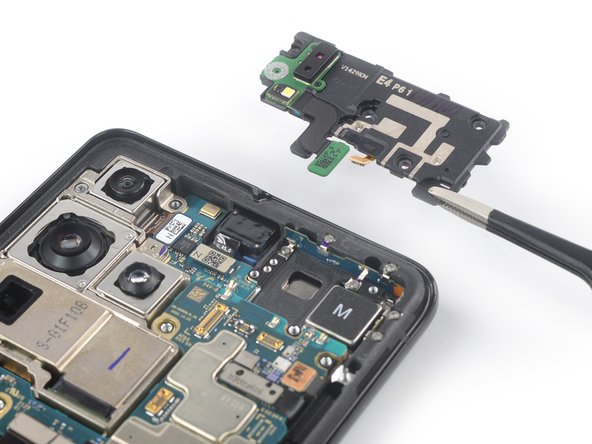
    • Grab the bottom right corner of the earpiece speaker and laser AF module assembly with a pair of blunt nose tweezers and carefully lift it upwards.

    • Remove the earpiece speaker and laser AF module assembly.

    • Set the module aside. You'll reuse it during reassembly.

  31. Samsung Galaxy S21 Ultra Screen and Battery Assembly Replacement, Disconnect the in-display fingerprint and antenna flex cables: шаг 31, изображение 1 из 3 Samsung Galaxy S21 Ultra Screen and Battery Assembly Replacement, Disconnect the in-display fingerprint and antenna flex cables: шаг 31, изображение 2 из 3 Samsung Galaxy S21 Ultra Screen and Battery Assembly Replacement, Disconnect the in-display fingerprint and antenna flex cables: шаг 31, изображение 3 из 3
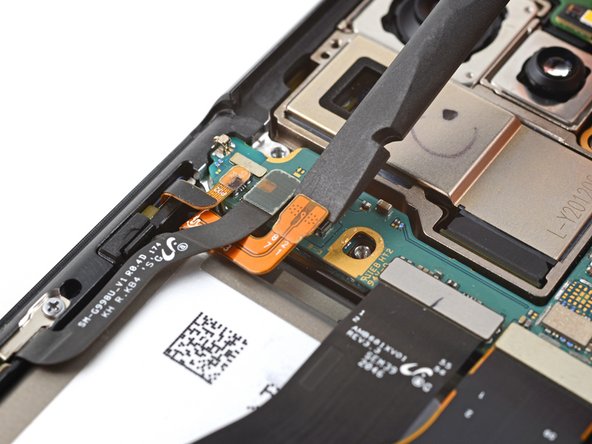
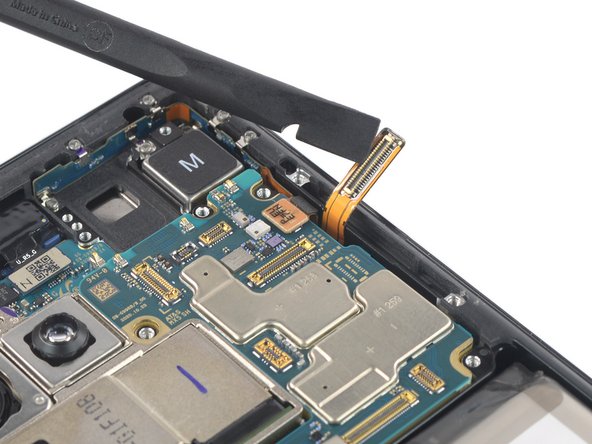
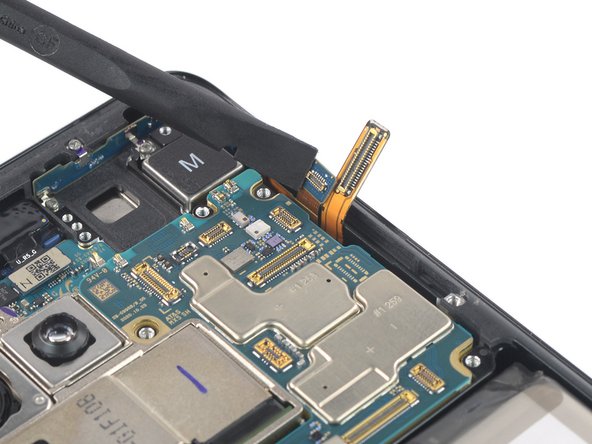
    • Use a spudger to disconnect the in-display fingerprint and antenna flex cables by prying the connectors straight up from their socket.

    • Carefully bend both connectors to the side to free the motherboard.

    • Do not fold the cables sharply and only bend them to avoid cable damage.

  32. Samsung Galaxy S21 Ultra Screen and Battery Assembly Replacement, Disconnect the front facing camera: шаг 32, изображение 1 из 2 Samsung Galaxy S21 Ultra Screen and Battery Assembly Replacement, Disconnect the front facing camera: шаг 32, изображение 2 из 2
    • Use a spudger to disconnect the front facing camera cable by prying the connector straight up from its socket.

  33. Samsung Galaxy S21 Ultra Screen and Battery Assembly Replacement, Disconnect the power button: шаг 33, изображение 1 из 2 Samsung Galaxy S21 Ultra Screen and Battery Assembly Replacement, Disconnect the power button: шаг 33, изображение 2 из 2
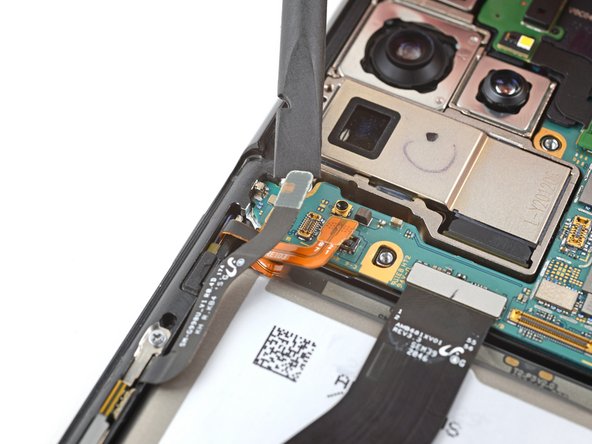
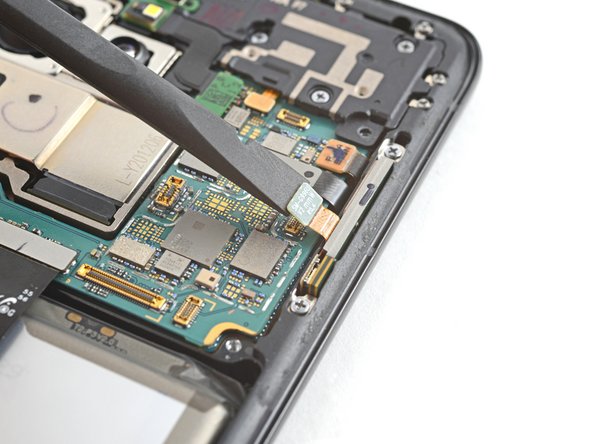
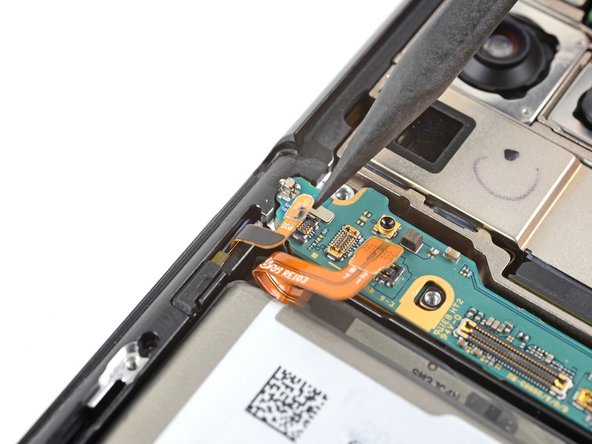
    • Use a spudger to disconnect the power button flex cable by prying the connector straight up from its socket.

    • Carefully bend the connector to the side to free the motherboard.

  34. Samsung Galaxy S21 Ultra Screen and Battery Assembly Replacement, Disconnect the display cable: шаг 34, изображение 1 из 2 Samsung Galaxy S21 Ultra Screen and Battery Assembly Replacement, Disconnect the display cable: шаг 34, изображение 2 из 2
    • Use a spudger to pry up and disconnect the display cable's press connector.

  35. Samsung Galaxy S21 Ultra Screen and Battery Assembly Replacement, Reposition the display cable: шаг 35, изображение 1 из 2 Samsung Galaxy S21 Ultra Screen and Battery Assembly Replacement, Reposition the display cable: шаг 35, изображение 2 из 2
    • Use tweezers, or your fingers, to bend the display cable away from the device.

  36. Samsung Galaxy S21 Ultra Screen and Battery Assembly Replacement, Unfasten the camera module: шаг 36, изображение 1 из 2 Samsung Galaxy S21 Ultra Screen and Battery Assembly Replacement, Unfasten the camera module: шаг 36, изображение 2 из 2
    • Use a Phillips screwdriver to remove the 3.9 mm-long screw securing the camera module.

    • If you're reassembling with the Samsung Self-Repair kit, be sure to replace the screw with a new one labeled #3427.

  37. Samsung Galaxy S21 Ultra Screen and Battery Assembly Replacement, Pry up the motherboard: шаг 37, изображение 1 из 2 Samsung Galaxy S21 Ultra Screen and Battery Assembly Replacement, Pry up the motherboard: шаг 37, изображение 2 из 2
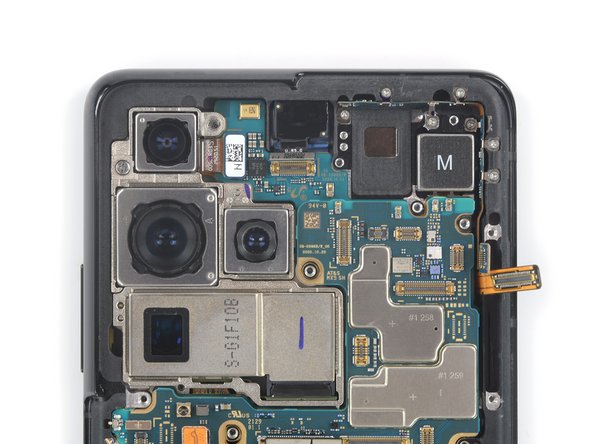
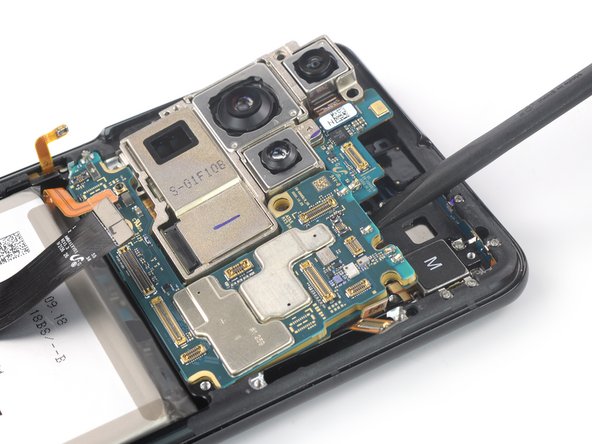
    • Insert an spudger underneath the top edge of the motherboard next to the vibration motor.

    • Twist the spudger to pry up and loosen the motherboard.

  38. Samsung Galaxy S21 Ultra Screen and Battery Assembly Replacement, Remove the motherboard: шаг 38, изображение 1 из 2 Samsung Galaxy S21 Ultra Screen and Battery Assembly Replacement, Remove the motherboard: шаг 38, изображение 2 из 2
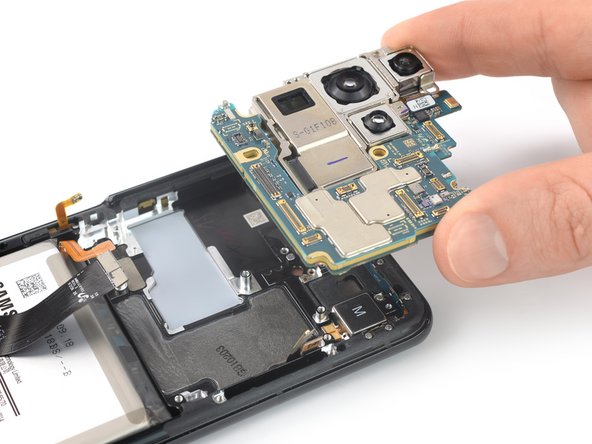
    • Carefully remove the motherboard.

    • Avoid any abrupt movements during the removal and make sure none of the flex cables are entangled in the motherboard to avoid tearing them.

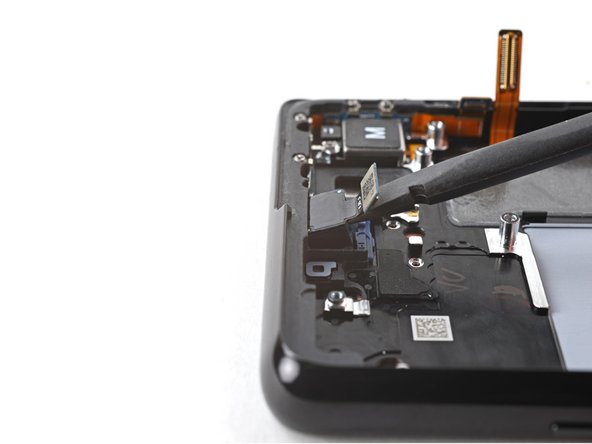
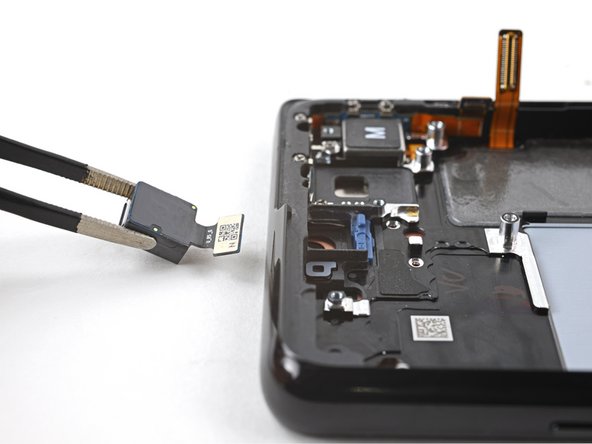
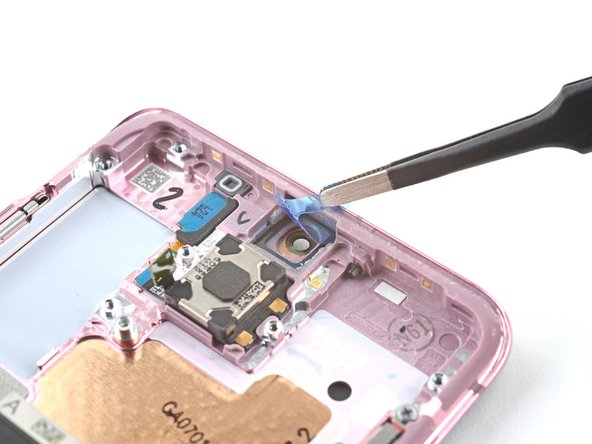
  39. Samsung Galaxy S21 Ultra Screen and Battery Assembly Replacement, Heat the front camera: шаг 39, изображение 1 из 1
    • Apply a heated iOpener to the front camera for 90 seconds.

  40. Samsung Galaxy S21 Ultra Screen and Battery Assembly Replacement, Remove the front camera: шаг 40, изображение 1 из 3 Samsung Galaxy S21 Ultra Screen and Battery Assembly Replacement, Remove the front camera: шаг 40, изображение 2 из 3 Samsung Galaxy S21 Ultra Screen and Battery Assembly Replacement, Remove the front camera: шаг 40, изображение 3 из 3
    • Insert a spudger into the gap between the frame and the front camera.

    • Pry up with the spudger to separate the front camera from the frame.

    • If you're having trouble separating the front camera from the frame, apply more heat.

    • Use tweezers, or your fingers, to remove the front camera.

    • Set the camera aside. You'll reuse it during reassembly.

  41. Samsung Galaxy S21 Ultra Screen and Battery Assembly Replacement, Only the screen and battery assembly remains: шаг 41, изображение 1 из 1
    • You're now left with the screen and battery assembly.

    • Compare your new replacement part to the original part—you may need to transfer remaining components or remove adhesive backings from the new part before installing.

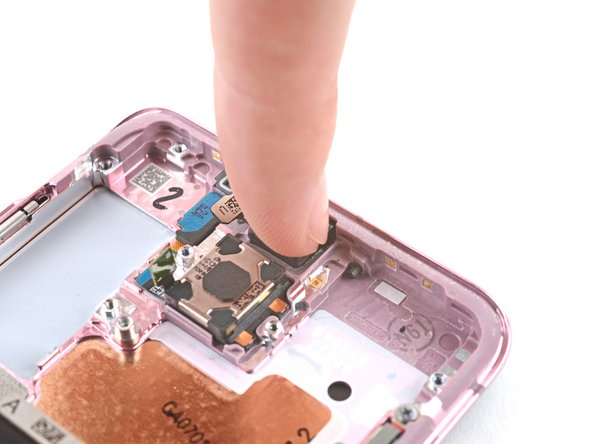
  42. Samsung Galaxy S21 Ultra Screen and Battery Assembly Replacement, Front camera reassembly instructions: шаг 42, изображение 1 из 3 Samsung Galaxy S21 Ultra Screen and Battery Assembly Replacement, Front camera reassembly instructions: шаг 42, изображение 2 из 3 Samsung Galaxy S21 Ultra Screen and Battery Assembly Replacement, Front camera reassembly instructions: шаг 42, изображение 3 из 3
    • During reassembly, follow these instructions to reinstall your front camera:

    • Peel off the front camera adhesive from its liner and apply the sticky end to the frame.

    • Use tweezers, or your fingers, to pull on the tab and expose the top layer of adhesive.

    • Insert the front camera and apply pressure to adhere it to the frame.

Заключение

To reassemble your device, follow the instructions in reverse order and perform the opposite actions, e.g., "reattach" instead of "removing." Skip steps that use heating and prying, and pay close attention to the 📌 bullets as you work through the steps.

After you've completed the repair, download the Samsung Members App from the Galaxy Store or the Play Store, and follow the Samsung Self-Repair document (beginning page 10) to make sure your device is fully functional.

Download the Self Repair Assistant on your device and follow the Samsung Self-Repair document (beginning page 11) to perform a battery cycle reset.

Take your e-waste to an R2 or e-Stewards certified recycler.

Repair didn’t go as planned? Try some basic troubleshooting, or ask our Answers community for help.

27 участников успешно повторили данное руководство.

Alex Diaz-Kokaisl

Участник с: 01/16/22

118 982 Репутация

Автор 549 руководств

Команда

iFixit Участник iFixit

Staff

135 членов

Автор 16 734 руководств

10 Комментариев

How do we seal the back cover after replacing the screen? iFixit toolset does not come with glue or adhesive. It is not clear if the screen replacement part already has adhesive on it.

Imtiaz Chowdhury - Ответить

Save yourself a lot of hassle and don't separate the camera lens assy from the back cover. Then during reassembly withr pre-cut adhesive, cut that section away at the small lines indicated on the adhesive.

Blaine Phillips - Ответить

The back cover is glass... not plastic, so be careful..... use regular intervals of heat applications. Apply 10x the heat it says....

because the glue is strong. The older the phone the more stubborn the adhesive. Worse case scenario you might need to by the back cover.

We cracked ours a little but was reusable....

jackie brennecke - Ответить

My screen replacement kit came with an adhesive cutout labeled as "G998 TAPE 3RD MIC HOLD TAPE". After much searching I was unable to find anywhere in these instructions or on the phone where it discussed using this adhesive. I am unsure where in the phone the adhesive goes. Clarification would be appreciated. I suspect it may go under the camera assembly but in these instructions that is removed whole with the motherboard so it may be an unnecessary item.

John - Ответить

Thanks for the guide on how to replace the screen. My wife's S21 Ultra is working great and I look like the hero. My only suggestion is to add an how to add the Samsung adhesive strips and where they go. @john84651 Thanks for the tip on removing the adhesive from the antennas.

Chris K - Ответить

Добавить комментарий

Просмотр статистики:

За последние 24часов: 17

За последние 7 дней: 167

За последние 30 дней: 641

За всё время: 21,337