Эта версия возможно содержит некорректные исправления. Переключить на последнюю проверенную версию.
Выберете то, что вам нужно
Видео обзор
-
Этот шаг не переведен. Помогите перевести
-
Insert a fingernail or plastic opening tool into the divot to the left of the rear-facing camera.
-
Gently pry and twist the flexible rear cover off the back of the phone.
-
-
Этот шаг не переведен. Помогите перевести
-
Insert a fingernail or plastic opening tool into the recess in the bottom right corner of the battery and lift upward.
-
Remove the battery away from the phone.
-
-
Этот шаг не переведен. Помогите перевести
-
Using a fingertip, pull the microSD card straight down out of its slot.
-
Remove the microSD card from the phone.
-
-
Этот шаг не переведен. Помогите перевести
-
Use a plastic opening tool to pry up the plastic midframe connector panel.
-
Remove the connector panel with a pair of tweezers.
-
-
Этот шаг не переведен. Помогите перевести
-
Use the sharp tip of a spudger to pry the home button cable connector straight up off its socket.
-
-
Этот шаг не переведен. Помогите перевести
-
Place a heated iOpener on the left side of the phone for at least 90 seconds.
-
Reheat the iOpener and place it on the right half of the phone.
-
-
-
Этот шаг не переведен. Помогите перевести
-
Insert the edge of an opening pick underneath the bottom right side of the front glass.
-
-
Этот шаг не переведен. Помогите перевести
-
Slide the opening pick up along the right side of the display.
-
-
Этот шаг не переведен. Помогите перевести
-
Carefully slide the pick around the corner, stopping before the speaker grille at the top of the phone.
-
-
Этот шаг не переведен. Помогите перевести
-
Slide the opening pick across the top of the phone, being very careful not to insert the pick too deeply.
-
-
Этот шаг не переведен. Помогите перевести
-
Slide the opening pick down along the left half of the phone stopping at the lower left corner.
-
-
Этот шаг не переведен. Помогите перевести
-
Slide the opening pick all the way to the bottom left corner of the phone, making sure it is securely placed.
-
-
Этот шаг не переведен. Помогите перевести
-
Place a reheated iOpener over the bottom portion of the display assembly.
-
-
Этот шаг не переведен. Помогите перевести
-
Slide the very end of the opening pick across the bottom edge of the display to separate the last of the remaining adhesive.
-
-
Этот шаг не переведен. Помогите перевести
-
Twist the opening pick to detach the glass from the phone.
-
-
Этот шаг не переведен. Помогите перевести
-
Insert an opening pick under the soft button icons on the display and pry the button cables down off the inside of the front panel.
-
-
Этот шаг не переведен. Помогите перевести
-
Slightly lift, but do not remove, the home button end of display assembly.
-
-
Этот шаг не переведен. Помогите перевести
-
Use the sharp tip of a spudger to lift the front panel assembly cable connector straight up off its socket on the motherboard.
-
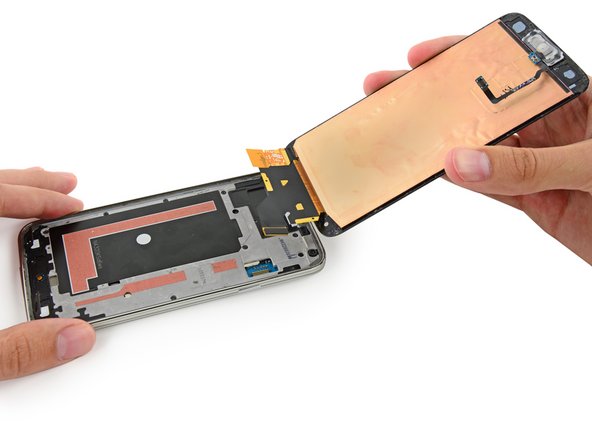
Safely remove the front panel assembly from phone.
-


Отменить: Я не выполнил это руководство.
535 участников успешно повторили данное руководство.


36 Комментариев
Be aware that the LCD is glued not just at the edges, but also in the middle (the orange areas in the photos for Step 20. These can adhere strongly enough to cause the LCD to crack. Don't ask how I know that.
I cracked it this way, so yeah. Any way to get the glue fluetly enough to get the LCD off the rest of the Phone? (the LCD and digitalizer is cracked anyway)
Onfortunately I read this to late. Many thanks anyway for confirming I'm not the only one ;)
Been there man. Had my Samsung Galaxy S5 Active pull one of those numbers. not a fun time.
Just found out about that, during my first time. Thanks for the tip.