Эта версия возможно содержит некорректные исправления. Переключить на последнюю проверенную версию.
Выберете то, что вам нужно
-
Этот шаг не переведен. Помогите перевести
-
Insert a fingernail or plastic opening tool into the divot to the left of the rear-facing camera.
-
Gently pry and twist the flexible rear cover off the back of the phone.
-
-
Этот шаг не переведен. Помогите перевести
-
Insert a fingernail or plastic opening tool into the recess in the bottom right corner of the battery and lift upward.
-
Remove the battery away from the phone.
-
-
Этот шаг не переведен. Помогите перевести
-
Using a fingertip, pull the microSD card straight down out of its slot.
-
Remove the microSD card from the phone.
-
-
Этот шаг не переведен. Помогите перевести
-
Use a plastic opening tool to pry up the plastic midframe connector panel.
-
Remove the connector panel with a pair of tweezers.
-
-
Этот шаг не переведен. Помогите перевести
-
Use the sharp tip of a spudger to pry the home button cable connector straight up off its socket.
-
-
Этот шаг не переведен. Помогите перевести
-
Place a heated iOpener on the left side of the phone for at least 90 seconds.
-
Reheat the iOpener and place it on the right half of the phone.
-
-
Этот шаг не переведен. Помогите перевести
-
Insert the edge of an opening pick underneath the bottom right side of the front glass.
-
-
Этот шаг не переведен. Помогите перевести
-
Slide the opening pick up along the right side of the display.
-
-
Этот шаг не переведен. Помогите перевести
-
Carefully slide the pick around the corner, stopping before the speaker grille at the top of the phone.
-
-
Этот шаг не переведен. Помогите перевести
-
Slide the opening pick across the top of the phone, being very careful not to insert the pick too deeply.
-
-
-
Этот шаг не переведен. Помогите перевести
-
Slide the opening pick down along the left half of the phone stopping at the lower left corner.
-
-
Этот шаг не переведен. Помогите перевести
-
Slide the opening pick all the way to the bottom left corner of the phone, making sure it is securely placed.
-
-
Этот шаг не переведен. Помогите перевести
-
Place a reheated iOpener over the bottom portion of the display assembly.
-
-
Этот шаг не переведен. Помогите перевести
-
Slide the very end of the opening pick across the bottom edge of the display to separate the last of the remaining adhesive.
-
-
Этот шаг не переведен. Помогите перевести
-
Twist the opening pick to detach the glass from the phone.
-
-
Этот шаг не переведен. Помогите перевести
-
Insert an opening pick under the soft button icons on the display and pry the button cables down off the inside of the front panel.
-
-
Этот шаг не переведен. Помогите перевести
-
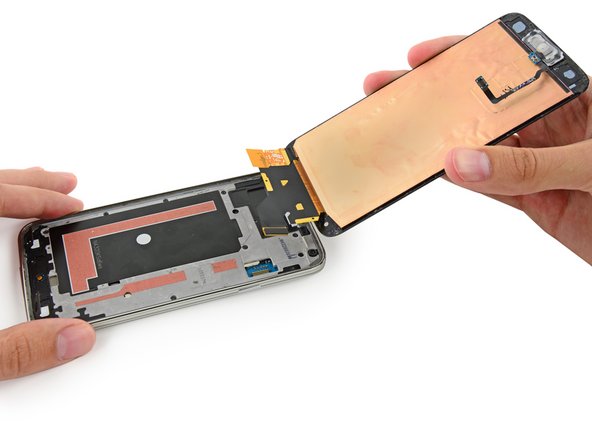
Slightly lift, but do not remove, the home button end of display assembly.
-
-
Этот шаг не переведен. Помогите перевести
-
Use the sharp tip of a spudger to lift the front panel assembly cable connector straight up off its socket on the motherboard.
-
Safely remove the front panel assembly from phone.
-
-
Этот шаг не переведен. Помогите перевести
-
Remove the ten 3.4 mm Phillips #000 screws from the display side of the midframe.
-
-
Этот шаг не переведен. Помогите перевести
-
Two 4.4 mm Phillips #000 screws near the USB port on the battery side of the phone
-
One 4.4 mm Phillips #000 screw
-
-
Этот шаг не переведен. Помогите перевести
-
Gently run a plastic opening tool down along the left inner side of the interior frame to separate the three white plastic clips.
-
-
Этот шаг не переведен. Помогите перевести
-
Gently pull the long sides of the silver bezel out away from the phone to separate the two halves of the midframe.
-
-
Этот шаг не переведен. Помогите перевести
-
Continue on to the right side of the silver bezel, pulling away from the interior section of the midframe to separate the two halves.
-
-
Этот шаг не переведен. Помогите перевести
-
Use a plastic opening tool to pry any remaining corners out of the silver bezel.
-
-
Этот шаг не переведен. Помогите перевести
-
Carefully remove the interior midframe/motherboard assembly from the white inner midframe.
-
-
Этот шаг не переведен. Помогите перевести
-
Carefully wedge the tip of a spudger underneath the antenna cable connector.
-
Delicately lift the spudger directly upwards to disconnect the antenna connector off its socket on the motherboard.
-
-
Этот шаг не переведен. Помогите перевести
-
Remove the single 3.0 mm Phillips #000 screw securing the motherboard to the midframe.
-
-
Этот шаг не переведен. Помогите перевести
-
Pull, but do not remove, the camera end of the motherboard up from the midframe to allow access to the connectors on the rear.
-
-
Этот шаг не переведен. Помогите перевести
-
Use the flat end of a spudger to pry the daughterboard connector straight up off its socket on the motherboard.
-
-
Этот шаг не переведен. Помогите перевести
-
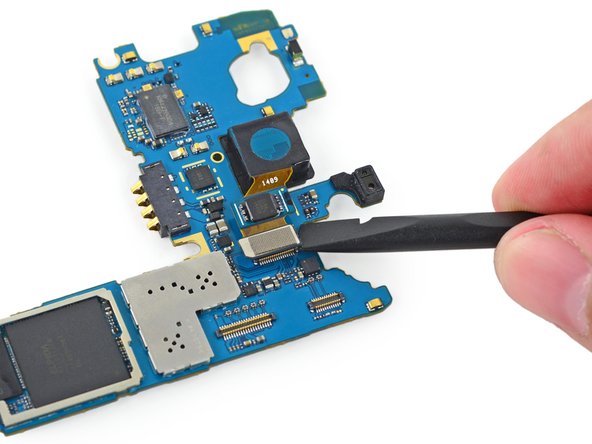
Use the flat end of a spudger to disconnect the front-facing camera connector off its socket on the motherboard.
-
Remove the front-facing camera from the motherboard.
-
-
Этот шаг не переведен. Помогите перевести
-
Use the flat end of a spudger to disengage the rear-facing camera connector straight up off its socket on the motherboard.
-
Remove the rear-facing camera from the motherboard.
-


Отменить: Я не выполнил это руководство.
87 участников успешно повторили данное руководство.


25 Комментариев
Do you know if I can put a g900p motherboard in the G900I in order to get FM radio. Cheers.
In Step 28 you will figure out that there is a second antenna cable that is brown and needs to be detached as well. It is alligned in one row with the blue antenna cable.
I want to use the motherboard from a T-Mobile galaxy s5 on an AT&T galaxy s5 I just wanted to know if it fits inside the att version because my SIM card reader is broken so I wanted to know if I could use one from T-Mobile and that it would fix and work
It would fit and work
I dropped my Galaxy S5, gps for maps, compass etc... works fine, but for Endomondo and Strava that requires a location is not working, before the problem it showed GPS signal Ready, Now it just keeps ideling looking for location (GPS), dissasemble to check for any loose connector or loose screw and found nothing, What can be wrong and how to fix it?
Regards