Введение
Use this guide to remove or replace a faulty motherboard.
This guide involves removing the rear glass cover, you will need replacement adhesive to reattach the back cover to the phone.
The motherboard and daughterboard will differ slightly depending on whether you have the North American Snapdragon (G950U) or international Exynos (G950F) version of the phone. This guide uses the North American version. The motherboard and daughterboard are not interchangeable between the two versions.
Before disassembling your phone, discharge the battery below 25%. The battery can catch fire and/or explode if accidentally punctured, but the chances of that happening are much lower if discharged.
Выберете то, что вам нужно
-
-
Heat the iOpener for thirty seconds.
-
Throughout the repair procedure, as the iOpener cools, reheat it in the microwave for an additional thirty seconds at a time.
-
-
-
Remove the iOpener from the microwave, holding it by one of the two flat ends to avoid the hot center.
-
-
-
Fill a pot or pan with enough water to fully submerge an iOpener.
-
Heat the water to a boil. Turn off the heat.
-
Place an iOpener into the hot water for 2-3 minutes. Make sure the iOpener is fully submerged in the water.
-
Use tongs to extract the heated iOpener from the hot water.
-
Thoroughly dry the iOpener with a towel.
-
Your iOpener is ready for use! If you need to reheat the iOpener, heat the water to a boil, turn off the heat, and place the iOpener in the water for 2-3 minutes.
-
-
-
Heat an iOpener and apply it to a long edge of the S8 for about 2 minutes.
-
-
-
In the following steps you will be cutting through the adhesive around the edge of the rear glass panel.
-
The adhesive on the rear case is laid out as seen in the first image.
-
The prying pattern as seen from the outside of the phone is as follows:
-
Thick portions of adhesive
-
Thin areas of adhesive
-
Avoid prying here, to protect the fingerprint sensor.
-
-
-
Once the back panel is warm to the touch, apply a suction cup as close to the heated edge of the phone as you can while avoiding the curved edge.
-
Lift on the suction cup, and insert an opening pick under the rear glass.
-
-
-
Once you have the tool firmly inserted into the glass, reheat and reapply the iOpener to soften the adhesive.
-
-
-
-
Repeat the previous heating and cutting procedure for the remaining three sides of the phone.
-
Leave an opening pick on each side as you continue to the next to prevent the adhesive from resealing.
-
-
-
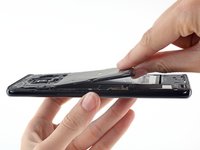
Use the opening picks to slice through any remaining adhesive and open the phone slightly.
-
Remove the glass from the phone.
-
-
Инструмент, используемый на этом этапе:Tweezers$4.99
-
Use tweezers to peel away any remaining adhesive from the phone's chassis. Then clean the adhesion areas with high concentration isopropyl alcohol (at least 90%) and a lint-free cloth to prep the surface for the new adhesive.
-
Peel the adhesive backing off of the new rear glass, carefully line up one edge of the glass against the phone chassis, and firmly press the glass onto the phone.
-
-
-
Remove eleven 3.7 mm screws using a Phillips #000 screwdriver.
-
-
-
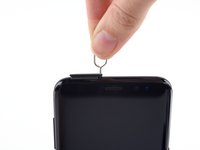
Insert a SIM card opening tool into the small hole on the left side of the top edge of the phone.
-
Press to eject the tray.
-
Remove the SIM card tray from the phone.
-
-
-
Use the flat end of a spudger to disconnect the battery connector.
-
-
-
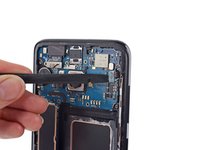
Use the flat end of a spudger to disconnect the sensor array connector.
-
-
-
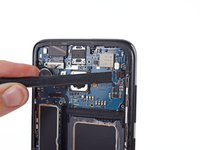
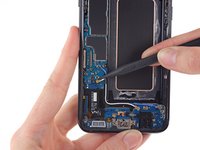
Use the flat end of a spudger to disconnect the display and digitizer connector.
-
-
-
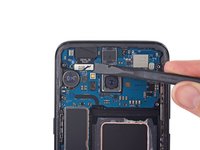
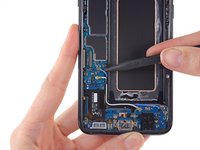
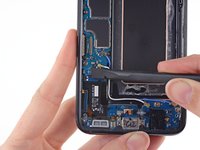
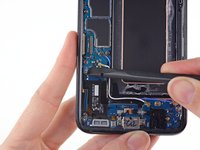
Use the point of a spudger to disconnect two antenna cables that connect the motherboard to the daughterboard.
-
-
-
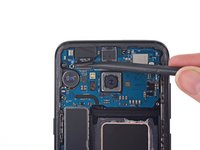
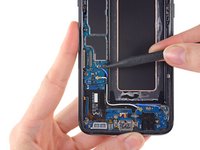
Use the flat end of a spudger to disconnect an antenna ribbon cable that connects the motherboard to the daughterboard.
-
-
-
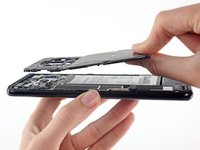
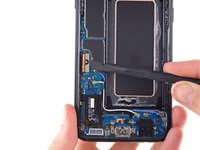
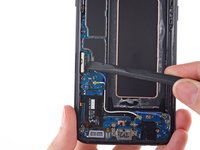
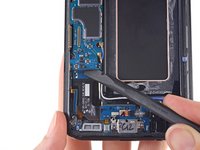
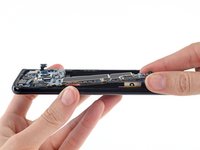
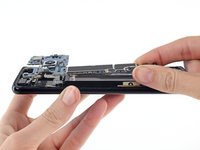
Use the flat end of a spudger to lift the motherboard and disconnect it from the daughterboard.
-


After reapplying adhesive, follow these instructions in reverse order to reassemble your device.
After you've completed the repair, follow this guide to test your repair.
After reapplying adhesive, follow these instructions in reverse order to reassemble your device.
After you've completed the repair, follow this guide to test your repair.
Отменить: Я не выполнил это руководство.
42 человек успешно провели ремонт по этому руководству.

11 Комментариев
does the size differ between s8 and s8+?
can i use s8+ motherboard for s8?
Hi Ginthozan, unfortunately the S8+ motherboard is not compatible with the S8, and vice versa.
Are all the connections and motherboard layouts the same for Sprint vs AT&T S8?
Hello i can’t charge my phone (both directly and wireless). I still can turn on my phone by charging it directly to the battery. I have replaced my chsrging port flexible but it didn’t works. I think the ic is broken. There’s two PMIC for s8, PM8998 and SM5720, which one that i should change if i can’t charge my phone? Thankyou
After change my LCD and the motherboard the display screen (!)