Перейти к основному содержанию

Этот документ имеет более свежие изменения. Перейти к последней непроверенной версии.

Samsung Galaxy Tab 3 10.1 Speaker & Auxiliary Port Replacement

Выберете то, что вам нужно

  1. Samsung Galaxy Tab 3 10.1 Speaker & Auxiliary Port Replacement, Rear Case: шаг 1, изображение 1 из 2 Samsung Galaxy Tab 3 10.1 Speaker & Auxiliary Port Replacement, Rear Case: шаг 1, изображение 2 из 2
    • Insert an opening pick between the rear case and the plastic rim.

    • You may need to add multiple picks to detach the clips.

    • Slide the pick along the edge of the rear case until you release the plastic clips attaching the rear case to the display.

    • Continue to slide the pick around the edge of the rear case until all clips are released.

  2. Samsung Galaxy Tab 3 10.1 Speaker & Auxiliary Port Replacement: шаг 2, изображение 1 из 2 Samsung Galaxy Tab 3 10.1 Speaker & Auxiliary Port Replacement: шаг 2, изображение 2 из 2
    • Lift the case up to remove it.

  3. Samsung Galaxy Tab 3 10.1 Speaker & Auxiliary Port Replacement, Battery: шаг 3, изображение 1 из 3 Samsung Galaxy Tab 3 10.1 Speaker & Auxiliary Port Replacement, Battery: шаг 3, изображение 2 из 3 Samsung Galaxy Tab 3 10.1 Speaker & Auxiliary Port Replacement, Battery: шаг 3, изображение 3 из 3
    • Use the flat end of a nlyon spudger to pry up the black plastic tabs securing the two ZIF connectors.

  4. Samsung Galaxy Tab 3 10.1 Speaker & Auxiliary Port Replacement: шаг 4, изображение 1 из 2 Samsung Galaxy Tab 3 10.1 Speaker & Auxiliary Port Replacement: шаг 4, изображение 2 из 2
    • Use the flat end of a nylon spudger to pry up the brown plastic tab securing the orange ribbon cable.

  5. Samsung Galaxy Tab 3 10.1 Speaker & Auxiliary Port Replacement: шаг 5, изображение 1 из 3 Samsung Galaxy Tab 3 10.1 Speaker & Auxiliary Port Replacement: шаг 5, изображение 2 из 3 Samsung Galaxy Tab 3 10.1 Speaker & Auxiliary Port Replacement: шаг 5, изображение 3 из 3
    • Remove all three ribbon cables by gently pulling the cables away from the ZIF connectors.

  6. Samsung Galaxy Tab 3 10.1 Speaker & Auxiliary Port Replacement: шаг 6, изображение 1 из 1
    • Use a Phillips #000 screwdriver to remove the ten 3mm screws securing the battery to the chassis.

  7. Samsung Galaxy Tab 3 10.1 Speaker & Auxiliary Port Replacement: шаг 7, изображение 1 из 2 Samsung Galaxy Tab 3 10.1 Speaker & Auxiliary Port Replacement: шаг 7, изображение 2 из 2
    • Use the pointed end of a nylon spudger to pry the two battery connections away from the motherboard.

  8. Samsung Galaxy Tab 3 10.1 Speaker & Auxiliary Port Replacement: шаг 8, изображение 1 из 2 Samsung Galaxy Tab 3 10.1 Speaker & Auxiliary Port Replacement: шаг 8, изображение 2 из 2
    • Lift with a nylon spudger to remove the battery.

  9. Samsung Galaxy Tab 3 10.1 Speaker & Auxiliary Port Replacement, Motherboard: шаг 9, изображение 1 из 2 Samsung Galaxy Tab 3 10.1 Speaker & Auxiliary Port Replacement, Motherboard: шаг 9, изображение 2 из 2
    • Insert an opening pick between the plastic frame and the screen.

    • Slide the opening pick around the perimeter of the screen.

    • You will hear clicking noises as each plastic clip is released from the display chassis.

  10. Samsung Galaxy Tab 3 10.1 Speaker & Auxiliary Port Replacement: шаг 10, изображение 1 из 1
    • Lift the plastic frame to remove.

    • Avoid the three delicate ribbon cables.

  11. Samsung Galaxy Tab 3 10.1 Speaker & Auxiliary Port Replacement: шаг 11, изображение 1 из 1
    • Use a Phillips #000 screwdriver to remove the 3mm screw attaching the motherboard to the display chassis.

  12. Samsung Galaxy Tab 3 10.1 Speaker & Auxiliary Port Replacement: шаг 12, изображение 1 из 3 Samsung Galaxy Tab 3 10.1 Speaker & Auxiliary Port Replacement: шаг 12, изображение 2 из 3 Samsung Galaxy Tab 3 10.1 Speaker & Auxiliary Port Replacement: шаг 12, изображение 3 из 3
    • Use a nylon spudger to flip up the eight press-fit connectors from the motherboard.

    • The vibration motor is missing from these photos.

  13. Samsung Galaxy Tab 3 10.1 Speaker & Auxiliary Port Replacement: шаг 13, изображение 1 из 2 Samsung Galaxy Tab 3 10.1 Speaker & Auxiliary Port Replacement: шаг 13, изображение 2 из 2
    • Use nylon-tipped tweezers to remove the motherboard.

  14. Samsung Galaxy Tab 3 10.1 Speaker & Auxiliary Port Replacement, Speaker & Auxiliary Port: шаг 14, изображение 1 из 2 Samsung Galaxy Tab 3 10.1 Speaker & Auxiliary Port Replacement, Speaker & Auxiliary Port: шаг 14, изображение 2 из 2
    • Using the pointed end of a nylon spudger, pry upwards between the screen chassis and the auxiliary port.

    • The speaker is permanently connected to the auxiliary port and will need to be removed from the device as a single unit.

  15. Samsung Galaxy Tab 3 10.1 Speaker & Auxiliary Port Replacement: шаг 15, изображение 1 из 2 Samsung Galaxy Tab 3 10.1 Speaker & Auxiliary Port Replacement: шаг 15, изображение 2 из 2
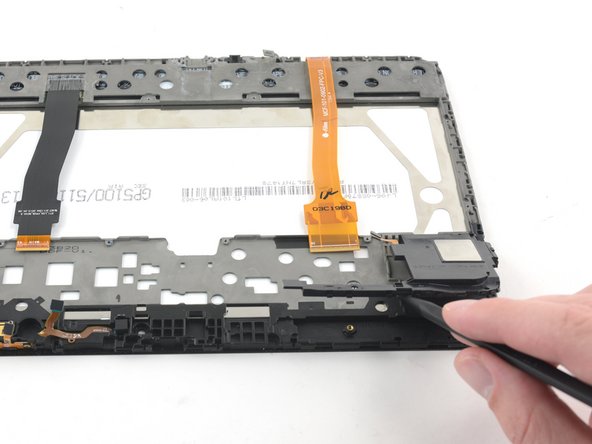
    • Use the flat end of a spudger to pry upwards between the speaker and the display chassis.

    • Remove the speaker and auxiliary port assembly.

  16. Samsung Galaxy Tab 3 10.1 Speaker & Auxiliary Port Replacement: шаг 16, изображение 1 из 2 Samsung Galaxy Tab 3 10.1 Speaker & Auxiliary Port Replacement: шаг 16, изображение 2 из 2
    • Use the pointed end of a spudger to pry upwards between the other speaker unit and the display chassis.

Заключение

To reassemble your device, follow these instructions in reverse order.

Еще один человек закончил это руководство.

Corey Brown

Участник с: 06/24/16

8 679 Репутация

Автор 11 руководств

0 Комментариев

Добавить комментарий

Просмотр статистики:

За последние 24часов: 0

За последние 7 дней: 0

За последние 30 дней: 3

За всё время: 1,358