Эта версия возможно содержит некорректные исправления. Переключить на последнюю проверенную версию.
Выберете то, что вам нужно
-
Этот шаг не переведен. Помогите перевести
-
Start out by separating the screen from the back cover using the larger plastic opening tool to pry them apart.
-
-
Этот шаг не переведен. Помогите перевести
-
Once every part of the screen is separated from the back cover, you should be able to fully remove it with your hands.
-
-
Этот шаг не переведен. Помогите перевести
-
To remove the battery you must use something small, such as tweezers, to disconnect the battery from its port.
-
-
Этот шаг не переведен. Помогите перевести
-
After the battery is disconnected, use the pulling tab to safely remove the battery.
-
-
Этот шаг не переведен. Помогите перевести
-
Unscrew the 2.9mm screws from the speakers using a Phillips head #000 screwdriver, then lift the speakers from the device.
-
-
Этот шаг не переведен. Помогите перевести
-
Using the plastic remover tool carefully unseat the four rectangular electric leads from the board. Each rectangle is a different size, the first one is large, the second one is medium, and the last two are small.
-
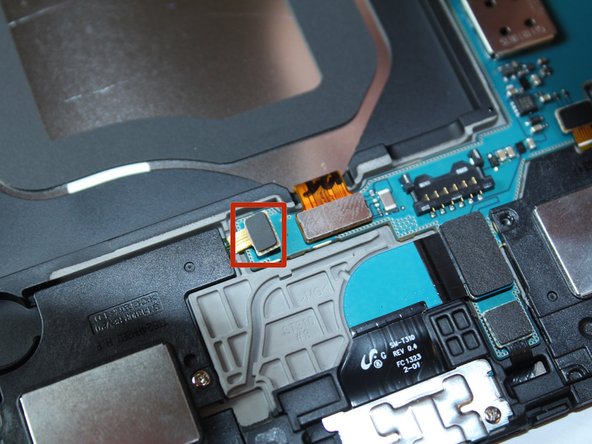
Using the plastic remover tool carefully unseat the square electric lead (marked in orange) from the board.
-
Using the plastic remover tool carefully unseat the small square and the two rectangular electric leads (marked in yellow) from the board.
-
-
Этот шаг не переведен. Помогите перевести
-
Unscrew the one 2.9mm Phillips #000 screw above the battery, and the three 2.9mm Phillips #000 screws to the right of the battery.
-


Отменить: Я не выполнил это руководство.
12 участников успешно повторили данное руководство.
Команда

USF Tampa, Team 4-2, Brown Fall 2014 Участник USF Tampa, Team 4-2, Brown Fall 2014
USFT-BROWN-F14S4G2
3 членов
Автор 26 руководств
2 Комментариев
You don’t need to remove the battery in order to remove the motherboard. Just disconnect the battery!