Перейти к основному содержанию

Эта версия возможно содержит некорректные исправления. Переключить на последнюю проверенную версию.

Выберете то, что вам нужно

  1. Этот шаг не переведен. Помогите перевести

    : шаг 1, изображение 1 из 1
    • Remove the four Tri-point #00 screws (4.2 mm length) on the backside of the watch.

  2. Этот шаг не переведен. Помогите перевести

    : шаг 2, изображение 1 из 2 : шаг 2, изображение 2 из 2
    • Use an opening tool to get between the back cover and the metal housing of the watch.

    • Carefully pry the plastic back cover open.

    • Don't remove the back cover yet. There is a flex cable running to the core assembly inside.

  3. Этот шаг не переведен. Помогите перевести

    : шаг 3, изображение 1 из 2 : шаг 3, изображение 2 из 2
    • Lay down the watch and lift the back cover to access the sensor connector on the motherboard.

  4. Этот шаг не переведен. Помогите перевести

    : шаг 4, изображение 1 из 2 : шаг 4, изображение 2 из 2
    • Use a spudger to disconnect the sensor flex cable from the motherboard.

  5. Этот шаг не переведен. Помогите перевести

    : шаг 5, изображение 1 из 3 : шаг 5, изображение 2 из 3 : шаг 5, изображение 3 из 3
    • Remove the back cover.

    • When closing the watch make sure the rubber gasket is undamaged or replace it with a new one.

  6. Этот шаг не переведен. Помогите перевести

    : шаг 6, изображение 1 из 2 : шаг 6, изображение 2 из 2
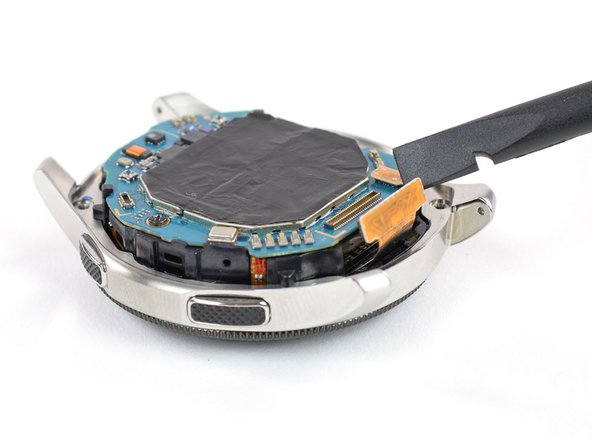
    • Use a spudger to disconnect the display flex cable from the motherboard.

  7. Этот шаг не переведен. Помогите перевести

    : шаг 7, изображение 1 из 2 : шаг 7, изображение 2 из 2
    • Lift the core unit out of the housing.

    • The core's plastic frame sits tight inside the housing.

    • Carefully thread the display flex cable through the gap of the core's plastic frame.

  8. Этот шаг не переведен. Помогите перевести

    : шаг 8, изображение 1 из 1
    • If necessary apply some tape over the display to avoid any injury from glass shards.

  9. Этот шаг не переведен. Помогите перевести

    : шаг 9, изображение 1 из 2 : шаг 9, изображение 2 из 2
    • Use your finger or thumb to steadily push down on the display to loosen the adhesive.

    • Heating the display with a hair dryer or iOpener helps softening the adhesive.

    • Remove the display.

Финишная черта

8 участников успешно повторили данное руководство.

Tobias Isakeit

Участник с: 03/31/14

118 122 Репутация

Автор 189 руководств

Команда

Tobias Isakeit - Repairability Engineer Участник Tobias Isakeit - Repairability Engineer

Business

1 член

Автор 1 086 руководств

Один комментарий

Hi does this process work with the galaxy 5 watch?

Rey Thomas Jude Ho - Ответить

Добавить комментарий

Просмотр статистики:

За последние 24часов: 40

За последние 7 дней: 317

За последние 30 дней: 1,442

За всё время: 52,652