Перейти к основному содержанию

Samsung HMX-F90 Record Button Replacement

Выберете то, что вам нужно

  1. Samsung HMX-F90 Record Button Replacement, Battery: шаг 1, изображение 1 из 3 Samsung HMX-F90 Record Button Replacement, Battery: шаг 1, изображение 2 из 3 Samsung HMX-F90 Record Button Replacement, Battery: шаг 1, изображение 3 из 3
    • Pull the release tab away from the battery.

    • Slide the battery towards the release tab and then pull the battery away from the camcorder.

  2. Samsung HMX-F90 Record Button Replacement, Strap Side Outer Casing: шаг 2, изображение 1 из 2 Samsung HMX-F90 Record Button Replacement, Strap Side Outer Casing: шаг 2, изображение 2 из 2
    • Rotate the camcorder so that the strap side is facing you.

    • Locate and remove the three 4.5mm Phillips #00 screws around the hand strap.

  3. Samsung HMX-F90 Record Button Replacement: шаг 3, изображение 1 из 2 Samsung HMX-F90 Record Button Replacement: шаг 3, изображение 2 из 2
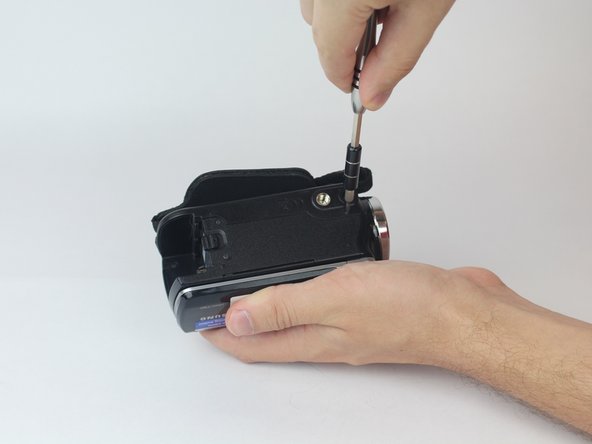
    • Rotate the camcorder so that the battery slot is facing you.

    • Located in the top left corner of the battery slot, remove the 4.5mm Phillips #00 screw.

  4. Samsung HMX-F90 Record Button Replacement: шаг 4, изображение 1 из 2 Samsung HMX-F90 Record Button Replacement: шаг 4, изображение 2 из 2
    • Rotate the camcorder so you are looking at the bottom of the camcorder.

    • Locate and remove the last three 4.5mm Phillips #00 screws.

  5. Samsung HMX-F90 Record Button Replacement: шаг 5, изображение 1 из 3 Samsung HMX-F90 Record Button Replacement: шаг 5, изображение 2 из 3 Samsung HMX-F90 Record Button Replacement: шаг 5, изображение 3 из 3
    • With both hands, pull the side strap apart from the rest of the camcorder.

  6. Samsung HMX-F90 Record Button Replacement, Record Button: шаг 6, изображение 1 из 3 Samsung HMX-F90 Record Button Replacement, Record Button: шаг 6, изображение 2 из 3 Samsung HMX-F90 Record Button Replacement, Record Button: шаг 6, изображение 3 из 3
    • Locate plastic clips of the record button.

    • With tweezers squeeze together the two plastic clips and push the button out.

    • Wiggle and pull the record button to remove completely.

Заключение

To reassemble your device, follow these instructions in reverse order.

Amir Harb

Участник с: 09/26/17

705 Репутация

Автор 6 руководств

Команда

USF Tampa, Team S13-G1, Boczar Fall 2017 Участник USF Tampa, Team S13-G1, Boczar Fall 2017

USFT-BOCZAR-F17S13G1

4 членов

Автор 12 руководств

0 Комментариев

Добавить комментарий

Просмотр статистики:

За последние 24часов: 0

За последние 7 дней: 4

За последние 30 дней: 5

За всё время: 278