Эта версия возможно содержит некорректные исправления. Переключить на последнюю проверенную версию.
Выберете то, что вам нужно
-
Этот шаг не переведен. Помогите перевести
-
Remove 4 screws from bottom of camera
-
Remove 2 screws from side of camera
-
Remove 2 screws from side of camera
-
-
Этот шаг не переведен. Помогите перевести
-
Squeeze area noted by blue square and pull outside shell apart from remaining camera.
-
-
Этот шаг не переведен. Помогите перевести
-
Remove 6 screws identified by red circles
-
Remove 3 screws identified by orange circles
-
-
-
Этот шаг не переведен. Помогите перевести
-
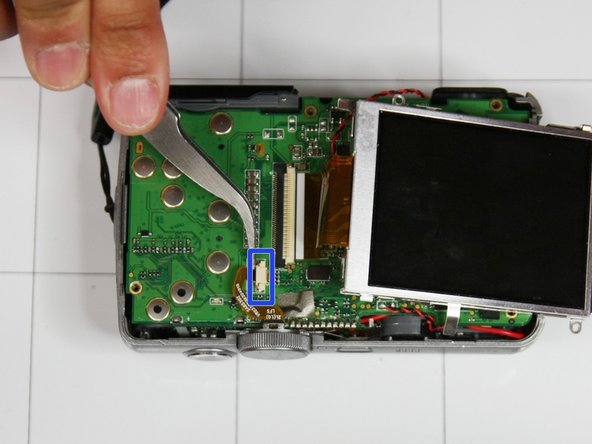
Gently remove orange circuit ribbon identified by red square
-
Gently remove narrow orange circuit ribbon identified by blue square
-
-
Этот шаг не переведен. Помогите перевести
-
Using a soldering iron, remove solder from wire identified by red circle
-
Using a soldering iron, remove solder from black and red wire identified by orange circle
-
Using a soldering iron, remove solder from wire identified by yellow circle
-
-
Этот шаг не переведен. Помогите перевести
-
Using soldering iron, melt away solder and warm up metal located at top of circuit board as shown in picture
-
Repeat step two to three times until board feels flexible to bend
-
Slowly bend circuit board upwards (towards power button) until at 90 degree angle with remaining part of camera.
-
-
Этот шаг не переведен. Помогите перевести
-
Remove black rubber door located on side of camera closest to lens using tweezers.
-


Отменить: Я не выполнил это руководство.
Еще один человек закончил это руководство.
Команда

University of Illinois Urbana-Champaign, Team 1-4, Scrogum Spring 2014 Участник University of Illinois Urbana-Champaign, Team 1-4, Scrogum Spring 2014
UICU-SCROGUM-S14S1G4
4 членов
Автор 10 руководств